Tag: microsoft-365

  • Windows 365 Business: What It Is, Who It’s For, and How to Get Started

    Windows 365 Business: What It Is, Who It’s For, and How to Get Started

    Microsoft will cut Windows 365 Business prices by 20%, effective 1 May 2026. If you’ve been sitting on the fence about Cloud PCs for your organisation, this is a good moment to revisit the conversation. But before you can decide whether Windows 365 Business is the right fit, you need to understand what it actually is, what it isn’t, and where it makes sense to deploy it.

    This post covers all of that, plus a quick-start guide to get your first Cloud PC provisioned.


    What Is Windows 365 Business?

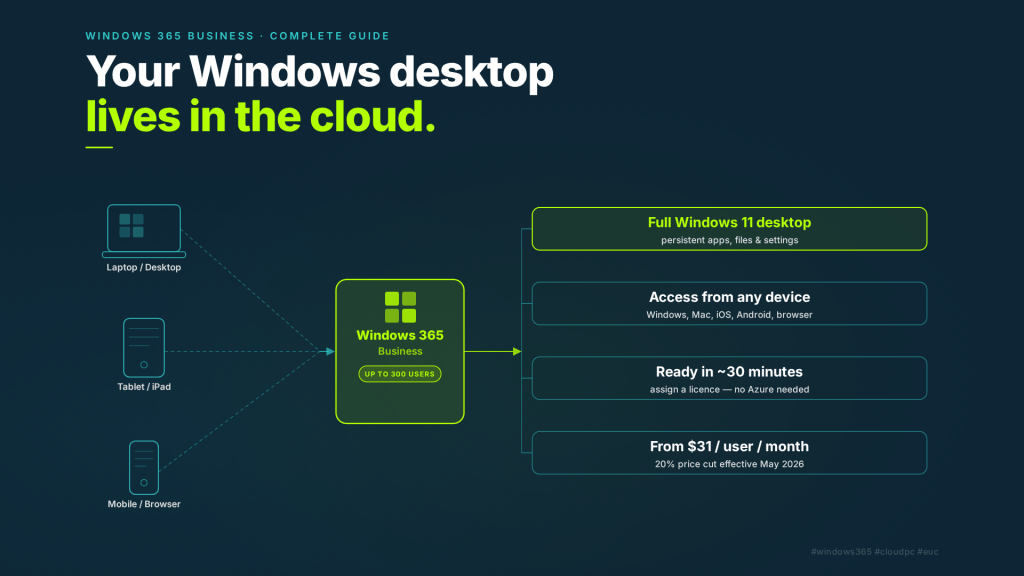
    Windows 365 Business is Microsoft’s Cloud PC offering for smaller organisations — specifically, tenants with up to 300 users. It delivers a full Windows 11 desktop, hosted in Microsoft’s cloud, streamed to virtually any device a user already owns: Windows, macOS, iOS, Android, or a web browser.

    Unlike Azure Virtual Desktop (AVD), which requires you to manage Azure infrastructure, session hosts, and networking, Windows 365 Business is fully managed by Microsoft. You buy a license, assign it to a user, and within about 30 minutes, they have a Cloud PC waiting for them at windows365.microsoft.com. No Azure subscription required. No virtual network to configure. No infrastructure to maintain.

    The trade-off for that simplicity is control — more on that shortly.


    Who Should Use Windows 365 Business?

    Windows 365 Business is built for small to medium-sized businesses with up to 300 users that want the benefits of a cloud-hosted desktop without the complexity of a traditional VDI deployment or the licensing overhead of Windows 365 Enterprise.

    It’s particularly well suited to:

    Businesses without a dedicated IT team. If there’s no one managing Intune policies or Azure environments, Windows 365 Business gives you a manageable Cloud PC through the familiar Microsoft 365 Admin Center. Setup is genuinely straightforward.

    Organisations with high contractor or seasonal worker turnover. Instead of imaging laptops, shipping hardware, and reclaiming devices, you assign a license and revoke it when the engagement ends. The Cloud PC is ready in minutes and leaves no data on the contractor’s personal device.

    Remote or hybrid teams. Users can pick up exactly where they left off from any device, anywhere. The full desktop experience — apps, files, settings — is persistent and consistent regardless of what endpoint they’re connecting from.

    BYOD environments. Windows 365 Business lets users run a corporate Windows environment on their personal Mac or Windows laptop without any corporate management touching their personal device. The Cloud PC is isolated in the cloud.

    Disaster recovery and business continuity. If a laptop dies or an office becomes inaccessible, users can log into their Cloud PC from any available device and keep working. Hardware failure becomes a minor inconvenience rather than a productivity outage.


    Windows 365 Business vs Windows 365 Enterprise: Know the Difference

    This is the question that trips most people up. Here’s the short version:

    Windows 365 BusinessWindows 365 Enterprise
    User limitUp to 300Unlimited
    Licensing prereqsNoneRequires Windows 10/11 Enterprise + Intune + Entra ID P1
    ManagementMicrosoft 365 Admin CenterMicrosoft Intune admin center
    Policy management (GPO/MDM)Not supportedFully supported
    Custom imagesNot supportedSupported
    Monitoring & analyticsNot supportedEndpoint Analytics via Intune
    Conditional AccessEntra ID P1 requiredSupported via Intune or Entra
    Microsoft Defender for EndpointRequires separate E5 licenseIntegrated with E5

    The headline: Windows 365 Business is for simplicity; Windows 365 Enterprise is for control. If you need to push apps, enforce security baselines, deploy compliance policies, or manage more than 300 Cloud PCs, Enterprise is your path. If you need to get a small team productive quickly without building out an Intune environment, Business is the right fit.


    Pricing (prediction – Updated May 2026)

    Microsoft’s 20% price cut brings Windows 365 Business down to three clean tiers:

    PlanSpecsPrice per user/month
    Basic2 vCPU, 4 GB RAM, 128 GB storage$25
    Standard2 vCPU, 8 GB RAM, 128 GB storage$33
    Premium4 vCPU, 16 GB RAM, 128 GB storage$53

    Basic suits light productivity users: web browsing, email, Teams calls, and basic Microsoft 365 apps. Standard is the sweet spot for most knowledge workers running a full suite of productivity tools and line-of-business applications. Premium is for users running heavier workloads — data processing, software development, or resource-intensive line-of-business apps.

    If your organisation already licenses Windows 10 or Windows 11 Pro, you may also qualify for additional discounts through Windows Hybrid Benefit. Worth checking before you buy.


    Quick Start: Setting Up Your First Windows 365 Business Cloud PC

    No Azure subscription. No virtual network. Here’s all you need to do.

    Step 1 — Check your Entra device settings.
    Before anything else, make sure Users may join devices to Microsoft Entra ID is set to All in your Entra admin center. Cloud PCs will fail to provision if this is locked down.

    Step 2 — Purchase licenses.
    Go to the Windows 365 Business pricing page or navigate to Billing > Purchase services in the Microsoft 365 Admin Center and search for Windows 365 Business. Select your tier based on user workload needs, enter the number of seats, and complete the purchase.

    Step 3 — Assign a license to a user.
    In the Microsoft 365 Admin Center, go to Billing > Licenses, find your Windows 365 Business subscription, and assign it to a user. Alternatively, assign directly from windows365.microsoft.com under Quick actions > Manage your organisation.

    Step 4 — Wait ~30 minutes.
    Windows 365 automatically provisions the Cloud PC using a standard Windows 11 gallery image. No further action needed from you.

    Step 5 — User connects.
    The user visits windows365.microsoft.com, signs in with their Microsoft 365 credentials, and their Cloud PC is waiting. They can also connect via the Windows App or Microsoft Remote Desktop client on any platform.

    That’s genuinely it. No imaging, no infrastructure, no VNet configuration.


    Is Windows 365 Business Right for You?

    If you’re running a business with fewer than 300 users, your team is remote or hybrid, you have BYOD challenges, or you’re spending too much time on endpoint management — Windows 365 Business is worth a serious look, especially at the new pricing.

    The 20% price reduction makes the TCO case significantly more compelling. Gartner noted in April 2026 that cloud-hosted PCs now offer lower total cost of ownership than traditional laptops when you factor in hardware refresh cycles, IT support overhead, and device management costs. At $25–$53 per user per month, Windows 365 Business is squarely in that conversation.

    The simplicity is real, but so are the limitations. If your organisation needs Intune-based policy management, custom images, or advanced security integration, you’ll want to evaluate Windows 365 Enterprise or Azure Virtual Desktop instead.

    For most small businesses and SMBs looking to modernise their desktop estate without a large IT investment, Windows 365 Business is a clean, low-friction option. And right now, it’s the cheapest it’s ever been.


    Have questions about sizing Cloud PCs for your team, or whether Business or Enterprise is the right fit for your environment? Drop a comment below or reach out directly.
  • Microsoft Entra Backup and Recovery: The Safety Net Your Tenant Has Always Needed

    Microsoft Entra Backup and Recovery: The Safety Net Your Tenant Has Always Needed

    Every Entra ID administrator has a horror story.

    Maybe it was a bulk user import that went wrong and overwrote attributes across half your directory. Maybe it was a well-intentioned change to a Conditional Access policy that cascaded into a lockout at 11pm on a Friday. Maybe it was a compromised account that quietly weakened your MFA requirements before anyone noticed.

    Up until recently, recovering from those situations meant one of three things: rebuilding from memory, combing through audit logs and manually reversing changes one by one, or restoring from a third-party backup tool you may or may not have had the budget for.

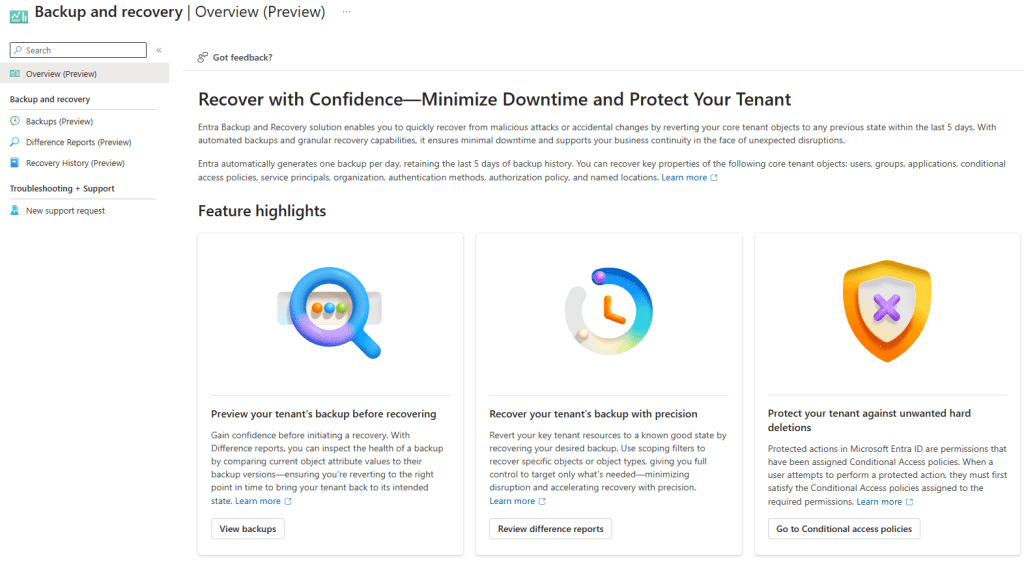
    Microsoft has quietly shipped something that changes that equation. Microsoft Entra Backup and Recovery entered public preview in March 2026, and if your tenant has Entra ID P1 or P2 licensing, it’s already running — no setup required.

    Here’s what it actually does, what it doesn’t do, and what you should do with it right now.


    What It Is

    Entra Backup and Recovery is a built-in, automated snapshot service for your Entra ID tenant. Once a day, Microsoft takes a point-in-time backup of the critical objects in your directory and retains the last five days of history. Crucially, the backups are tamper-proof — no user, application, or admin (including Global Administrators) can delete, modify, or disable them. Backup data is stored in the same geo-location as your tenant, determined at tenant creation.

    From those snapshots, you can:

    • View available backups — a rolling five-day history available in the Entra admin centre
    • Create difference reports — compare any backup snapshot against the current state of your tenant and see exactly what changed
    • Recover objects — restore all objects, specific object types, or individual objects by ID to their backed-up state
    • Review recovery history — audit completed and in-progress recovery operations

    What Gets Backed Up

    This is where the detail matters. Entra Backup and Recovery covers a defined set of object types, and within those types, a defined set of properties. It’s not a full serialisation of every attribute on every object — but it covers the things that matter most.

    Conditional Access policies and named locations

    This is arguably the most valuable part of the whole feature. All properties of Conditional Access policies are in scope, as are all properties of named location policies. This is the scenario most admins will reach for this tool first. A misapplied policy, a deleted exclusion group, a grant control that got changed — all of that is now recoverable.

    Users

    A broad set of user properties is included: display name, UPN, account enabled/disabled state, department, job title, mail, mobile, usage location, employee data, and more. What’s notably not in scope: manager and sponsor relationships. Those won’t be restored.

    Groups

    Core group properties are covered: display name, description, mail settings, security settings, classification, and theme. Group ownership changes are out of scope. Dynamic group rule changes are also out of scope — so if someone modified a dynamic membership rule, that won’t appear in the diff.

    Applications and service principals

    For app registrations, properties like display name, sign-in audience, required resource access, optional claims, and redirect URI configuration are included. For service principals, the backup extends further: when a service principal is recovered, Entra also restores the OAuth2 delegated permission grants and app role assignments tied to it. That’s important — it means recovering an enterprise app brings back the permissions alongside it, not just the object itself.

    Authentication method policies

    The backup covers the configured state of individual authentication methods: FIDO2 passkeys, Microsoft Authenticator, SMS, voice call, email OTP, Temporary Access Pass, certificate-based authentication, and third-party OATH tokens. If someone disables passkey authentication or weakens your Authenticator configuration, that’s recoverable.

    Authorization policy

    Guest user role settings are covered — specifically, the permission level assigned to guest users in your tenant (member access, guest access, or restricted guest). It also covers the blockMsolPowerShell setting.

    Organisation-level MFA settings

    Tenant-wide per-user MFA settings are included — available MFA methods, whether app passwords are blocked, and device remembering settings.


    What It Doesn’t Cover

    It’s equally important to understand the scope boundaries.

    Hard-deleted objects are not recoverable through this feature. If a user, group, or application has been permanently deleted (either manually hard-deleted, or after the 30-day soft delete window expires), Entra Backup and Recovery cannot restore them. That’s what soft delete and the recycle bin are for — more on that below.

    On-premises synced objects are excluded from recovery. If you’re running hybrid identity with AD Connect or Cloud Sync, changes to synced objects will appear in difference reports, but they’re automatically excluded from recovery. That’s by design: the source of truth for those objects is on-premises AD, so recovery has to happen there. The exception is if you’ve converted objects to cloud-managed (moved the source of authority to the cloud) — those become fully recoverable.

    Not every attribute on every object is included. The supported property list is well-defined and growing over time, but it’s not a complete object dump. If the change you’re trying to reverse involves an attribute outside the supported set, the backup won’t capture it.


    The Difference Between This and Soft Delete

    A point worth emphasising: these are two different tools for two different problems.

    Soft delete handles object deletion. When you delete a user, group, M365 group, or application, it goes into the recycle bin for 30 days. You can restore it from there through the portal or Graph API with all its properties intact. Soft delete is on by default and is your first line of defence against accidental deletions.

    Entra Backup and Recovery handles attribute corruption. If an object still exists but its properties have been changed — by a misconfiguration, a bad import, or a malicious actor — that’s where backup and recovery steps in. It restores the values of supported properties back to their backed-up state.

    The scenario you need to think about for a security incident is both:

    1. A bad actor might corrupt attributes (that’s where backup and recovery helps)
    2. A bad actor might also delete objects and then hard-delete them from the recycle bin to prevent recovery

    Which brings us to the companion feature.


    Protected Actions: Locking Down the Recycle Bin

    If you’re setting up Entra Backup and Recovery as part of a resilience posture, you should do this alongside it.

    Protected actions let you require step-up authentication before specific high-risk operations can be performed. The one to configure immediately is microsoft.directory/deletedItems/delete — the action that hard-deletes an object from the recycle bin.

    By assigning a Conditional Access authentication context to that protected action, you can require that anyone trying to permanently purge a directory object must first satisfy strict conditions — phishing-resistant MFA, a compliant device, maybe even a Secure Access Workstation (SAW). Even a compromised Global Administrator account would be blocked from hard-deleting objects if the device or authentication method doesn’t meet the bar.

    Combined, the picture looks like this:

    • Soft delete keeps deleted objects recoverable for 30 days
    • Protected actions prevent hard deletion without step-up authentication
    • Entra Backup and Recovery lets you restore attribute values from the last five days
    • Audit logs and Entra ID Protection signals alert you when changes happen

    That’s a layered identity resilience posture, not just a backup feature.


    The Two New RBAC Roles

    Entra Backup and Recovery introduces two new built-in roles:

    Microsoft Entra Backup Reader — Read-only access to backups, difference reports, and recovery history. Useful for security auditors or operations teams that need visibility without the ability to trigger changes.

    Microsoft Entra Backup Administrator — Everything in Backup Reader, plus the ability to initiate difference reports and trigger recovery operations. Note that all Backup Administrator permissions are already included in the Global Administrator role, so your existing GA accounts can use this without role assignment. For least-privilege, use the dedicated role.

    One preview caveat: early reports indicate the Backup Administrator role can be difficult to assign through the UI during preview. If you hit that, PowerShell (via Microsoft Graph) works as a workaround.


    How to Use It: The Practical Workflow

    Finding it: In the Entra admin centre, look for Backup and recovery in the left navigation pane. You’ll see four sections: Overview, Backups, Difference Reports, and Recovery History.

    Running a difference report: Select one of your five available backups, choose “Create difference report,” and select your scope — all object types, specific types, or individual object IDs. The first time you run a report against a particular backup, it takes longer (the service needs to load the backup metadata). A first run for a small tenant can take over an hour in the current preview. Subsequent reports against the same backup run much faster since the data is already loaded. This is a known limitation that Microsoft is expected to improve before general availability.

    Reading the report: The output shows you changed objects, grouped by type. For each object, you can drill into the specific attributes that changed and see the old value (from the backup) versus the current value. This is genuinely useful for understanding what happened before you decide whether to recover.

    Triggering recovery: From a difference report, you can choose to recover — scoping to all changed objects, specific object types, or individual object IDs. Recovery time scales with the number of changes involved. Small targeted recoveries (a handful of users, a few CA policies) are fast. Large-scale recoveries across hundreds of thousands of objects can take significantly longer.

    Best practice from Microsoft’s own documentation: Always run a difference report first. Review the changes, confirm you understand the scope, and then trigger recovery. This also pre-loads the backup data, which speeds up the recovery operation itself.


    What to Do Right Now

    Given that this is already running in your tenant if you have P1/P2, there are a few things worth doing today:

    Check that it’s visible. Go to the Entra admin centre and navigate to Backup and recovery. Confirm you can see your last five daily backups. If you can’t, verify your licensing and role assignment.

    Run your first difference report against yesterday’s backup. Even if you don’t expect anything to be wrong, this is worth doing for two reasons: you’ll understand the interface before you’re under pressure, and it pre-loads the data so your first real recovery runs faster.

    Set up protected actions for hard-delete. Go to Roles and Administrators > Protected Actions, find microsoft.directory/deletedItems/delete, assign an authentication context, and wire up a Conditional Access policy with appropriately strict controls. This takes 20 minutes and significantly raises the bar for a malicious actor trying to permanently destroy directory objects.

    Test a recovery in a development tenant. Before you need this in production, run a test. Make a deliberate change to a test user or a non-production CA policy, wait for the next daily backup (or use your existing snapshot), run a diff, and recover. Know how it works before the stakes are real.


    The Bigger Picture

    Entra Backup and Recovery is still in preview, and it has real limitations — the five-day retention window is narrow, the initial diff report performance needs work, and the scope of recoverable properties will keep expanding. It’s not a replacement for a well-documented change management process or a broader identity resilience strategy.

    But it’s a meaningful step forward. For the first time, Entra ID has a native, tamper-proof, automatically-maintained safety net for the objects and policies that your entire cloud environment depends on. The cases where an admin mistake, a bad import, or a compromised account could previously cause hours of manual remediation work now have a straightforward, auditable recovery path.

    Set it up. Test it. Pair it with protected actions. And make sure your team knows where to find it before they need it.


    Resources:

  • Choosing the Right Nerdio Manager Installation Method: A Practical Guide for AVD Environments

    Choosing the Right Nerdio Manager Installation Method: A Practical Guide for AVD Environments

    If you’ve ever planned a Nerdio Manager for Enterprise (NME) deployment, you may be aware that there isn’t just one way to install it. Depending on how your Azure environment is structured — identities, tenants, permissions, governance, and AVD architecture — the installation path can look very different.

    This is one of the questions I’m asked most often by customers:

    “Which installation method do I actually need to use?”

    To make this easier, I created a simple decision tree (I’ll include a diagram at the end) and broke down each installation type. Whether you’re deploying for a single small environment or a global multi-tenant estate, this guide should point you in the right direction.

    Why are there multiple installation methods?

    Nerdio Manager integrates deeply with:

    • Entra ID
    • Azure subscriptions
    • Azure Virtual Networking
    • AVD / Windows 365 resources
    • App registrations
    • Service principals
    • Resource providers

    Because every customer structures their identity and resource topology differently, NME provides installation paths for a range of real-world scenarios — including restricted RBAC environments and split-tenant setups.

    Summary of All Installation Types

    Here is a high-level overview of all six installation methods available in Nerdio Manager.

    1️⃣ Standard Install (Azure Marketplace)

    The most common and simplest deployment method.

    Use this when:

    • Your user identities and AVD resources live in the same Entra ID tenant.
    • You have the required permissions to deploy and initialise NME.
    • You don’t need to customise the Entra ID application name.

    Typical customers: Most AVD/W365 deployments, POCs, and standard single-tenant setups.

    📄 Guide: https://nmehelp.getnerdio.com/hc/en-us/articles/26124313550477-Nerdio-Manager-Installation-Guide


    2️⃣ Custom Entra ID Application Name

    Some customers need to customise the app registration name (e.g., naming conventions or multiple NME instances in the same tenant).

    Use this when:

    • You do have app creation permissions.
    • You need a non-default app name.
    • You want to avoid conflicts when deploying multiple Nerdio Manager instances.

    📄 Guide: https://nmehelp.getnerdio.com/hc/en-us/articles/26124326251405-Advanced-Installation-Methods


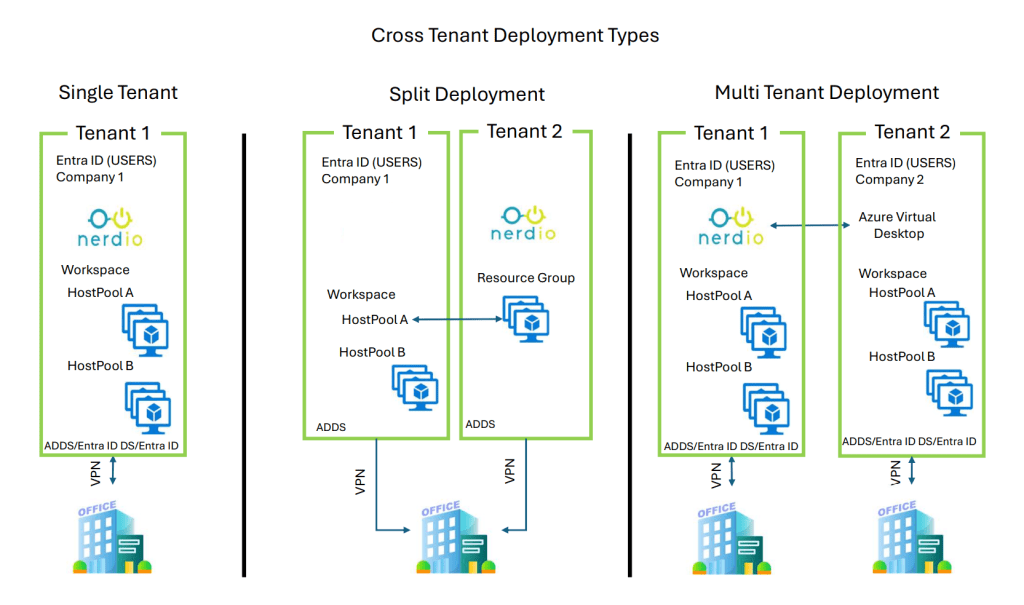
    3️⃣ Split Identity Deployment

    This is for customers whose user identities exist in one Entra ID tenant, while the AVD session hosts and Azure resources live in another.

    This is common with:

    • NHS Trusts
    • Shared services
    • Large groups that centralise identity
    • Multi-organisation structures

    Use this when:

    • You must separate identity governance from Azure resource management.

    📄 Guide: https://nmehelp.getnerdio.com/hc/en-us/articles/26124326194573-Advanced-Installation-Split-Identity


    4️⃣ Pre-Created Entra ID Application

    Some organisations do not allow deployment engineers to create app registrations — typically due to strict RBAC, identity governance, or Conditional Access rules.

    Use this when:

    • You don’t have permission to create an Entra ID app.
    • A separate team (Identity/Security) needs to pre-create the Nerdio app for you.
    • You’ll reference the existing App ID, Secret, and Object ID during initialization.

    📄 Guide: https://nmehelp.getnerdio.com/hc/en-us/articles/26124326326669-Advanced-installation-Create-Entra-ID-application


    5️⃣ External Identities (Guest Accounts)

    Some customers have user identities mastered in another tenant but synchronised into the AVD tenant as guest / external identities. This is not split identity — everything still runs in a single AVD tenant.

    Use this when:

    • Your users are guests from another tenant.
    • You want them to connect to AVD/Windows 365 using External Identities.
    • You want to avoid maintaining a full split-tenant architecture.

    This overlays onto Install Types 1, 2, or 4.

    📄 Microsoft announcement: https://techcommunity.microsoft.com/blog/windows-itpro-blog/windows-365-and-azure-virtual-desktop-support-external-identities-now-generally-/4468103


    6️⃣ Multi-Tenant Deployment

    Once NME is installed, you can manage AVD deployments across multiple Entra tenants from a single console.

    Use this when:

    • You’re an MSP, enterprise group, or global organisation.
    • You want one Nerdio Manager instance for multiple tenants.
    • You need unified monitoring, autoscale, images, apps, and governance across tenants.

    📄 Guide: https://nmehelp.getnerdio.com/hc/en-us/articles/26124299740685-Tenants-Overview


    Putting It All Together — The Installation Decision Tree

    I created a simple flowchart to help customers quickly identify the correct installation type. It includes:

    • Tenant topology
    • Permissions
    • Identity architecture
    • Guest user model
    • Multi-tenant requirements
    Nerdio Manager for Enterprise deployment decision tree
    NME deployment decision tree

    Final Thoughts

    Choosing the right installation method is crucial for:

    • Proper AVD lifecycle management
    • Compliance with your organisation’s identity model
    • Ensuring NME has the permissions it needs
    • Avoiding rework later
    • Supporting multi-tenant or cross-tenant architectures

    If you’re planning a new deployment or reviewing your existing setup, this guide (and the diagram) should help you pick the correct path with confidence.