Tag: technology

  • Microsoft Just Packaged Azure Expertise into a Plugin. Here’s What It Means for AVD Admins.

    Microsoft Just Packaged Azure Expertise into a Plugin. Here’s What It Means for AVD Admins.

    Picture a normal AVD admin morning. A user can’t connect. You want to know which session host they’re on, whether that host is even healthy, how many other people are sharing it, and whether the host pool has spare capacity. None of that is hard. But answering it means a portal tab for the host pool, another for the session hosts, a PowerShell window for the session list, and possibly Cost Management in a fourth tab to check you’re not bleeding money on hosts nobody is using.

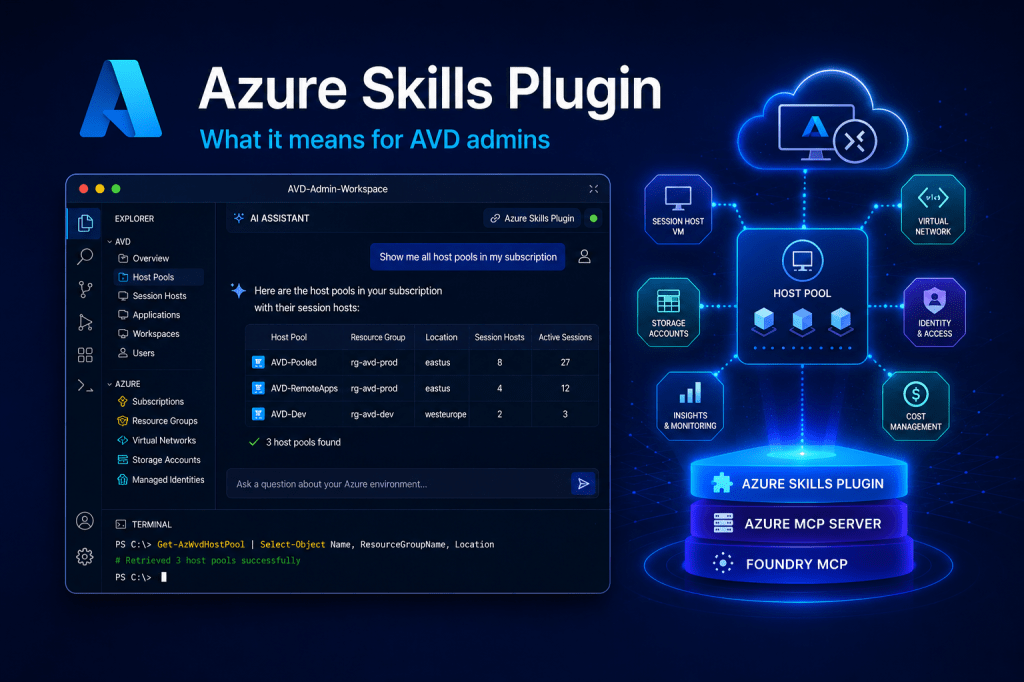
    Microsoft now has an answer to that, and it’s bigger than I expected. The Azure Skills Plugin, released in beta earlier this year and currently sitting at version 1.1.48, packages curated Azure expertise, the Azure MCP Server and the Foundry MCP server into a single install. You can drop it into Claude Code, GitHub Copilot, VS Code, the Copilot CLI or Cursor. One package, about a minute to install, and your AI agent suddenly knows how Azure work actually gets done.

    What the Azure Skills Plugin actually is

    Microsoft frames the launch this way: “Azure work is not just a code problem. It is a decision problem: which service fits this app, what needs to be validated before deployment, which tools should run, and what guardrails matter.”

    That’s a useful sentence, because it gets at what’s been missing. The Azure MCP Server, on its own, gives an agent the hands to operate Azure. 200+ tools across 40+ services, all callable through the Model Context Protocol. But hands without a brain produce confident nonsense. The agent can run a Resource Graph query, but it doesn’t know which query, or what to do with the result, or which guardrail you’d want checked first.

    The Azure Skills Plugin bundles three things into one install to fix that:

    • The skills layer. 19+ curated Azure skills covering build and deploy (azure-prepare, azure-validate, azure-deploy), troubleshoot and monitor (azure-diagnostics, azure-resource-lookup, azure-quotas), optimise (azure-cost, azure-compute, azure-resource-visualizer) and cross-domain work (azure-rbac, azure-storage, entra-app-registration). This is the expertise layer. Workflows Microsoft engineers actually use.
    • The Azure MCP Server. The 200+ tools that do the real work. The same server I’d previously have written about on its own.
    • The Foundry MCP server. Extra tools for Microsoft Foundry scenarios like model discovery and deployment. Less relevant for AVD work, but it’s in the box.

    Microsoft is explicit that this “is not a prompt pack. It is a packaged Azure capability layer”. The distinction matters. Prompt packs make an agent sound informed. This makes an agent actually competent at a set of Azure tasks, because the skills know what to check, in what order, and what tools to call.

    A note for anyone nervous about pointing this at production. Authentication is Entra ID, and every call runs in the context of the signed-in user, bound by Azure RBAC. The agent can’t do anything you couldn’t do yourself in the portal. If your account is read-only on a subscription, so is the agent.

    The part that matters for EUC

    The honest bit first: there is no dedicated AVD skill in the bundle today. The 19 curated skills are organised around general Azure work like cost, deployment and diagnostics, not the AVD lifecycle specifically. But the Azure MCP Server underneath does ship a dedicated Azure Virtual Desktop tool namespace, virtualdesktop, and it currently does three things, all of them about visibility:

    • List host pools in a subscription or resource group
    • List session hosts in a host pool
    • List user sessions on a specific session host

    So with the plugin installed you can type things like:

    “Show me all host pools in my subscription.”

    “List the session hosts in the production-hostpool host pool.”

    “What users are connected to session host avd-prod-04 in host pool production-pool?”

    You get a straight answer in the chat panel, with no portal navigation and no pausing to remember whether it’s Get-AzWvdSessionHost or Get-AzWvdUserSession this time.

    The AVD surface today is mostly a window onto your estate rather than a control panel for it. The agent can see everything: every host pool, every session host, who’s logged in where. It can also stop and start session hosts, since those are just virtual machines underneath. What it can’t do is the AVD lifecycle work you’d actually reach for, like draining a host before patching, signing out a stuck session, or scaling a pool up before Monday morning. None of that has shipped yet.

    That sounds like a limitation, and it is. But read-first is the right order. An AI agent with unattended write access to your session hosts is a genuinely bad failure mode, and “show me my estate accurately” is the capability you’d want to trust before any other.

    Where it gets useful: skills working together on your AVD estate

    The three AVD tools on their own are convenient. The reason the plugin format matters is what happens when the skills layer pulls those tools together with everything else.

    Take the questions you actually want answered about an AVD estate:

    • “Which session host VMs are running right now but have zero user sessions?” That’s an idle-capacity question, and idle capacity is wasted money. Without the plugin, an agent would need you to spell out the join between the virtualdesktop tools and the VM power state. With azure-cost and azure-resource-lookup in the picture, it knows to do that, and to express the answer in money rather than VM IDs.
    • “List every session host VM across all my subscriptions that isn’t on the current image version.” That’s a drift question. The azure-resource-lookup skill is built around exactly this pattern of Azure Resource Graph queries.
    • “Show me the monthly cost of each resource group that contains a host pool.” azure-cost plus the AVD tools, and it’s the question finance keeps asking you, answered in one sentence.
    • “Do any of my session host VMs have RDP open to the internet?” azure-compliance plus azure-rbac plus the VM tooling, and the answer is a list rather than an audit project.

    The point isn’t any one of these queries. It’s that the skills know which checks belong together, which tools to call, and what good output looks like. That’s the gap a raw MCP server leaves, and that’s the gap this plugin fills.

    This matters for AVD because the estate is rarely just AVD. A session host is a VM, behind a NIC, on a vNet, with a managed identity, pointed at an FSLogix storage account, scaled by an Automation Account, monitored by Log Analytics. Asking sensible questions about it means asking sensible questions across half a dozen Azure services. That’s exactly the surface area the skills cover.

    Bonus: turning a question into a diagram, for free

    One skill in the bundle is worth calling out on its own: azure-resource-visualizer. Ask the agent to “analyse this session host and show how it connects to the rest of the infrastructure” and you get back a real architecture diagram of the live environment: the VM, its NIC, the vNet, the public IP, the FSLogix storage account, the managed identity and what it can reach.

    For AVD that’s quietly valuable. Architecture documentation for a virtual desktop estate is almost always missing or badly out of date. Being able to regenerate an accurate diagram of a host pool and everything around it, on demand from the live environment, makes an audit or a handover meaningfully less painful. Previously you’d have wired up a separate community-built draw.io MCP server to get this. Now it’s just a skill in the box.

    Setting it up

    This is the part where the plugin format earns its keep. Setup is genuinely a minute. You install once, and the same package runs across whichever agent host you’re using: VS Code with GitHub Copilot, Claude Code, the Copilot CLI, Cursor, Gemini CLI, Codex CLI or IntelliJ. No separate config per tool, no duplicated setup work if your team uses more than one agent.

    For my Claude Code setup it was a single install command and a sign-in prompt the first time an Azure tool ran. The agent then operates as me, against my Entra ID, with my RBAC. Nothing else to configure. No service principal, no secret to store, no separate permissions to manage.

    Microsoft’s documentation has the current step-by-step for each host. Given this is beta, treat the docs as the source of truth rather than anything I’d write here.

    Where this fits, and where it doesn’t

    A few honest caveats, because this is a personal blog and not a product page.

    It’s beta and moving fast. The plugin is on its ninth release in a few months, and the MCP server underneath is on 3.0.0-beta.11 for a reason. Tools and skills are being added and changed release to release. Don’t build a process around a specific skill name until things settle.

    It’s a developer-side tool. Microsoft is explicit that this is intended for developer and admin use within your organisation, not for external applications or as a production automation backbone. It’s a smarter way to interact with Azure from your editor. It is not an unattended automation platform.

    There is no AVD-specific skill yet. The plugin gets you the virtualdesktop MCP tools and a lot of useful cross-domain skills around them, but the AVD lifecycle work (draining, scaling, image management) isn’t expressed as a curated skill. It’s the obvious next gap.

    And for AVD specifically, the actual AVD surface is read-only today. It will tell you about your estate. It won’t run your estate. It doesn’t replace whatever management layer, scaling automation or operational tooling your team already relies on to keep host pools healthy. It’s a fast way to ask questions. It sits alongside your existing tools, not on top of them.

    None of that makes it less interesting. It just means you should be precise about what it is.

    The takeaway

    The headline isn’t “AI now runs your AVD estate”. It doesn’t, and you wouldn’t want it to yet. The smaller, more useful headline is this: the distance between having a question about your Azure estate and having a sensible answer just got a lot shorter. And Microsoft’s curated Azure expertise now travels with your agent, whichever one you use.

    For an AVD admin, that distance has always been measured in portal tabs and half-remembered PowerShell. Swap that for a plain-English question, answered in the editor you already work in, against the permissions you already have. That’s a real quality-of-life improvement, even in a read-only beta.

    Read-only is where it starts. Deployment and validation skills already sit in the same plugin. The direction of travel is fairly obvious.

    Found this useful? Share it with whoever owns your AVD estate.


    Wayne Bellows is a Technical Account Manager at Nerdio. He writes about Azure Virtual Desktop, Windows 365, Intune and the EUC industry at modern-euc.com.
    Further reading

  • Your Most Locked-Down Users Just Got AVD’s Biggest Connectivity Upgrade in Years

    Your Most Locked-Down Users Just Got AVD’s Biggest Connectivity Upgrade in Years

    You know the user. They’re in financial services, healthcare, or government. Their network team blocks UDP at the firewall because it’s harder to inspect than TCP, and the risk appetite is zero. They’ve heard you talk about RDP Shortpath and how it transforms the AVD experience — lower latency, better audio, fluid video, no session drops. And then they remind you, politely, that none of that applies to them.

    Because their UDP is blocked. Has been for years. Probably always will be.

    For these users, Azure Virtual Desktop has always meant one thing for connectivity: a single TCP tunnel punched through port 443 to Microsoft’s Azure Gateway infrastructure, via a mechanism called Reverse Connect. No shortcuts, no direct paths, no Shortpath. Just TCP — and if that one path hiccups, the session degrades or drops.

    Microsoft just changed that. And it’s bigger than the announcement makes it sound.


    First, a Quick Primer on How AVD Connectivity Actually Works

    Before unpacking what’s new, it’s worth being precise about the layers involved — because the terminology gets muddled.

    AVD has two fundamental transport modes:

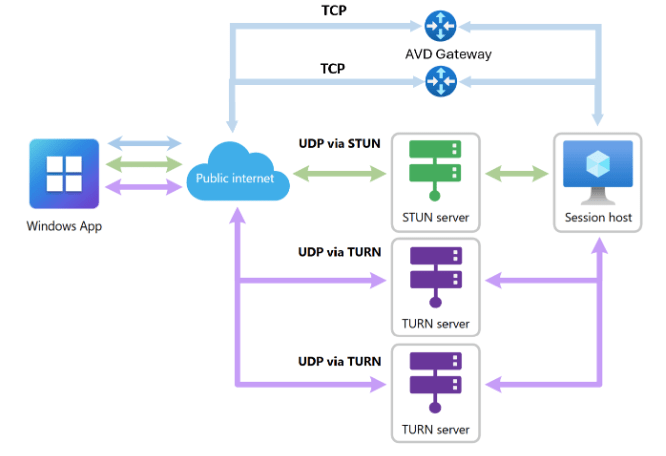
    RDP Shortpath (UDP): A direct or relayed UDP connection between the Windows App client and the session host. This uses STUN (Simple Traversal Underneath NAT) for direct peer-to-peer discovery, or TURN (Traversal Using Relays around NAT) when a relay is needed. UDP is faster, has lower latency, and handles packet loss more gracefully than TCP for interactive desktop traffic. This is what most people mean when they say “optimised AVD connectivity.”

    Reverse Connect (TCP): When UDP is unavailable — blocked firewall, restrictive proxy, NAT that won’t play ball — AVD falls back to a TCP connection routed through Microsoft’s Gateway infrastructure on port 443. Every hop goes through Azure’s control plane. It works, but it’s a longer path, more sensitive to latency, and historically, it’s been a single connection with no redundancy.

    RDP Multipath — introduced in public preview last year — added intelligence on top of this. Rather than just connecting on one path and hoping for the best, Multipath continuously evaluates multiple network routes simultaneously and keeps backup paths warm on standby. If the active path degrades, it silently switches to the next best option — no reconnection required, no session drop, often imperceptible to the user.

    The original Multipath implementation focused on UDP paths. Multiple STUN routes, multiple TURN relays, intelligent failover between them. For organisations running RDP Shortpath over UDP, it was a genuine step forward in session resilience.

    But for TCP-only environments? Nothing changed. You still had one TCP tunnel, and Multipath’s safety nets didn’t extend to you.

    Until now.


    What Redundant TCP Multipath Actually Does

    Microsoft this week announced public preview of redundant TCP transport paths for RDP Multipath. The headline is short, but the implication is significant.

    Here’s what it means in practice:

    For environments where UDP is available, Multipath now maintains redundant UDP paths and standby TCP paths simultaneously. UDP remains the preferred and primary transport — it’s faster, and if it’s working, you want it. But when UDP paths degrade or fail, the system now has TCP paths pre-established and ready to take over instantly, rather than scrambling to establish a new connection under duress.

    For environments where UDP is blocked entirely — the financial services firms, the government agencies, the healthcare organisations — this is the more significant change. These environments have historically relied on a single active TCP Reverse Connect path. Now, Azure Virtual Desktop can establish multiple standby TCP paths in parallel. If the active TCP tunnel becomes degraded or fails, the system automatically switches to the next available TCP path without requiring a reconnect.

    Think about what that means operationally. A transient ISP hiccup, a brief VPN instability, a brief network path interruption — these used to manifest as a session freeze followed by a reconnect dialogue. With redundant TCP paths, the session moves silently to the next available path. The user might not notice anything at all.


    Why This Matters More Than It Seems

    The AVD connectivity story has always had an implicit two-tier problem.

    Tier one: organisations that can open UDP ports and run RDP Shortpath. These users get low-latency, high-quality sessions with increasingly sophisticated resilience features. Microsoft has invested heavily here.

    Tier two: organisations where network policy, compliance requirements, or legacy infrastructure means UDP isn’t an option. These users have always had a degraded experience by comparison — not because AVD couldn’t deliver quality, but because the transport architecture underneath it left them with fewer options.

    Multipath’s original launch improved tier one significantly. Redundant TCP Multipath is the first meaningful improvement for tier two. And tier two is disproportionately large in the enterprise segments where AVD is growing fastest — regulated industries where network teams run tight ships.

    This also matters for a subtler reason. Even in environments where UDP is available, there are scenarios where redundant TCP paths matter: a mobile device roaming between networks, a user on a hotel Wi-Fi that quietly blocks UDP, a VPN split-tunnelling configuration that misbehaves. Having TCP redundancy as a backstop makes the entire connectivity architecture more robust, not just for the edge cases.


    The Technical Reality of “Silent Failover”

    It’s worth being specific about what “automatic switching” means here, because it’s not magic.

    RDP Multipath uses ICE (Interactive Connectivity Establishment) — the same protocol that video conferencing platforms have been using for years to negotiate optimal network paths between peers. ICE discovers and ranks available routes, keeps them evaluated continuously, and triggers a path switch when the active route falls below the threshold.

    For TCP paths specifically, Multipath uses a mechanism called Rendezvous to establish Reverse Connect paths. Multiple Rendezvous connections are established to different relay endpoints, maintained on standby, and promoted to active status if the primary path fails. The session state is preserved throughout — the switch happens at the transport layer, not the application layer, so the desktop session itself continues uninterrupted.

    This is the same basic architecture that makes modern video conferencing resilient. Teams, Zoom, and WebRTC-based applications have solved this problem. It’s taken longer for RDP — a protocol with very different characteristics — to get there. But it’s getting there.


    How to Enable It and What You Need

    This is currently in public preview, and there are two requirements:

    Host pool side: You need to opt your host pool into the Validation ring. The feature is enabled by default for host pools in validation, with no additional configuration required.

    Client side: Users must be running Windows App version 2.0.1069.0 or later on a Windows device. This is important — the classic Remote Desktop client doesn’t support this. Other platforms (macOS, iOS, Android) aren’t currently supported either. If your user population is Windows-heavy, you’re well-positioned. If you have significant macOS or Linux client usage, you’ll need to wait.

    To verify Multipath is active, users can check the connection bar in their remote session — it will indicate RDP Multipath is enabled. Administrators can validate connectivity patterns in Azure Virtual Desktop Insights under the connection reliability use case.

    If you want to test without the validation ring, you can also enable Multipath manually via registry on individual session hosts:

    reg add "HKLM\SYSTEM\CurrentControlSet\Control\Terminal Server\RdpCloudStackSettings" /v SmilesV3ActivationThreshold /t REG_DWORD /d 100 /f

    Users need to disconnect and reconnect after the registry change takes effect.


    The Bottom Line

    Redundant TCP Multipath isn’t going to transform your AVD environment overnight, and it doesn’t close the gap between TCP and UDP performance — UDP is still faster, and you should still strive to enable Shortpath where network policy allows.

    But it quietly solves a problem that has affected some of the most demanding enterprise AVD environments for years: the fragility of single-path TCP connectivity in restrictive networks.

    If you have customers or users in finance, healthcare, government, or any sector where the network team is conservative, and UDP isn’t on the table — put this on your radar, opt a test host pool into validation, and start building the evidence for a change.

    The users who’ve always had the worst AVD connectivity experience are finally getting some of the resilience that everyone else has had for a while. That’s worth paying attention to.


    More on AVD connectivity architecture at modern-euc.com. Follow me on LinkedIn for weekly EUC insights.

    References:

  • Windows 365 Business: What It Is, Who It’s For, and How to Get Started

    Windows 365 Business: What It Is, Who It’s For, and How to Get Started

    Microsoft will cut Windows 365 Business prices by 20%, effective 1 May 2026. If you’ve been sitting on the fence about Cloud PCs for your organisation, this is a good moment to revisit the conversation. But before you can decide whether Windows 365 Business is the right fit, you need to understand what it actually is, what it isn’t, and where it makes sense to deploy it.

    This post covers all of that, plus a quick-start guide to get your first Cloud PC provisioned.


    What Is Windows 365 Business?

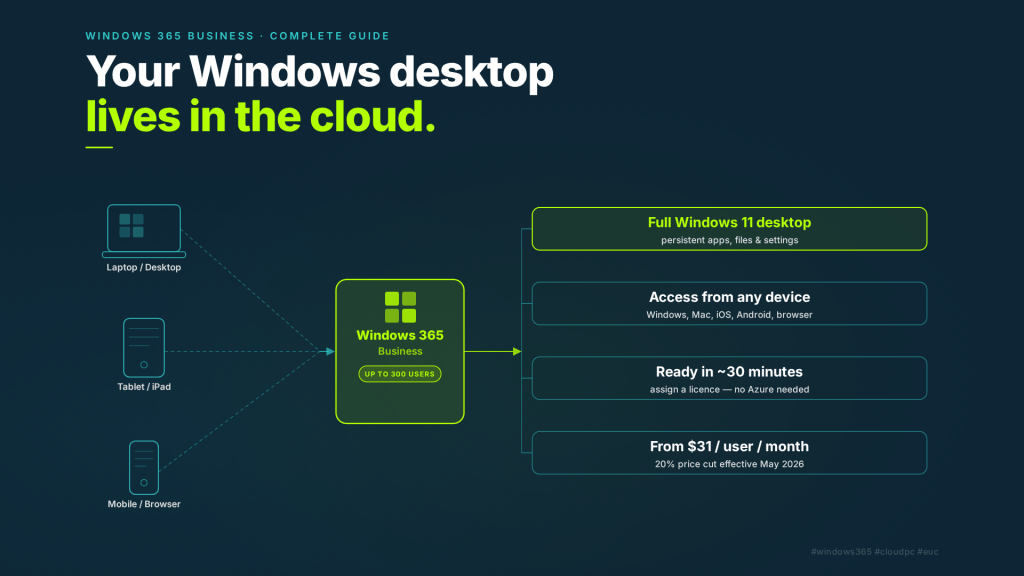
    Windows 365 Business is Microsoft’s Cloud PC offering for smaller organisations — specifically, tenants with up to 300 users. It delivers a full Windows 11 desktop, hosted in Microsoft’s cloud, streamed to virtually any device a user already owns: Windows, macOS, iOS, Android, or a web browser.

    Unlike Azure Virtual Desktop (AVD), which requires you to manage Azure infrastructure, session hosts, and networking, Windows 365 Business is fully managed by Microsoft. You buy a license, assign it to a user, and within about 30 minutes, they have a Cloud PC waiting for them at windows365.microsoft.com. No Azure subscription required. No virtual network to configure. No infrastructure to maintain.

    The trade-off for that simplicity is control — more on that shortly.


    Who Should Use Windows 365 Business?

    Windows 365 Business is built for small to medium-sized businesses with up to 300 users that want the benefits of a cloud-hosted desktop without the complexity of a traditional VDI deployment or the licensing overhead of Windows 365 Enterprise.

    It’s particularly well suited to:

    Businesses without a dedicated IT team. If there’s no one managing Intune policies or Azure environments, Windows 365 Business gives you a manageable Cloud PC through the familiar Microsoft 365 Admin Center. Setup is genuinely straightforward.

    Organisations with high contractor or seasonal worker turnover. Instead of imaging laptops, shipping hardware, and reclaiming devices, you assign a license and revoke it when the engagement ends. The Cloud PC is ready in minutes and leaves no data on the contractor’s personal device.

    Remote or hybrid teams. Users can pick up exactly where they left off from any device, anywhere. The full desktop experience — apps, files, settings — is persistent and consistent regardless of what endpoint they’re connecting from.

    BYOD environments. Windows 365 Business lets users run a corporate Windows environment on their personal Mac or Windows laptop without any corporate management touching their personal device. The Cloud PC is isolated in the cloud.

    Disaster recovery and business continuity. If a laptop dies or an office becomes inaccessible, users can log into their Cloud PC from any available device and keep working. Hardware failure becomes a minor inconvenience rather than a productivity outage.


    Windows 365 Business vs Windows 365 Enterprise: Know the Difference

    This is the question that trips most people up. Here’s the short version:

    Windows 365 BusinessWindows 365 Enterprise
    User limitUp to 300Unlimited
    Licensing prereqsNoneRequires Windows 10/11 Enterprise + Intune + Entra ID P1
    ManagementMicrosoft 365 Admin CenterMicrosoft Intune admin center
    Policy management (GPO/MDM)Not supportedFully supported
    Custom imagesNot supportedSupported
    Monitoring & analyticsNot supportedEndpoint Analytics via Intune
    Conditional AccessEntra ID P1 requiredSupported via Intune or Entra
    Microsoft Defender for EndpointRequires separate E5 licenseIntegrated with E5

    The headline: Windows 365 Business is for simplicity; Windows 365 Enterprise is for control. If you need to push apps, enforce security baselines, deploy compliance policies, or manage more than 300 Cloud PCs, Enterprise is your path. If you need to get a small team productive quickly without building out an Intune environment, Business is the right fit.


    Pricing (prediction – Updated May 2026)

    Microsoft’s 20% price cut brings Windows 365 Business down to three clean tiers:

    PlanSpecsPrice per user/month
    Basic2 vCPU, 4 GB RAM, 128 GB storage$25
    Standard2 vCPU, 8 GB RAM, 128 GB storage$33
    Premium4 vCPU, 16 GB RAM, 128 GB storage$53

    Basic suits light productivity users: web browsing, email, Teams calls, and basic Microsoft 365 apps. Standard is the sweet spot for most knowledge workers running a full suite of productivity tools and line-of-business applications. Premium is for users running heavier workloads — data processing, software development, or resource-intensive line-of-business apps.

    If your organisation already licenses Windows 10 or Windows 11 Pro, you may also qualify for additional discounts through Windows Hybrid Benefit. Worth checking before you buy.


    Quick Start: Setting Up Your First Windows 365 Business Cloud PC

    No Azure subscription. No virtual network. Here’s all you need to do.

    Step 1 — Check your Entra device settings.
    Before anything else, make sure Users may join devices to Microsoft Entra ID is set to All in your Entra admin center. Cloud PCs will fail to provision if this is locked down.

    Step 2 — Purchase licenses.
    Go to the Windows 365 Business pricing page or navigate to Billing > Purchase services in the Microsoft 365 Admin Center and search for Windows 365 Business. Select your tier based on user workload needs, enter the number of seats, and complete the purchase.

    Step 3 — Assign a license to a user.
    In the Microsoft 365 Admin Center, go to Billing > Licenses, find your Windows 365 Business subscription, and assign it to a user. Alternatively, assign directly from windows365.microsoft.com under Quick actions > Manage your organisation.

    Step 4 — Wait ~30 minutes.
    Windows 365 automatically provisions the Cloud PC using a standard Windows 11 gallery image. No further action needed from you.

    Step 5 — User connects.
    The user visits windows365.microsoft.com, signs in with their Microsoft 365 credentials, and their Cloud PC is waiting. They can also connect via the Windows App or Microsoft Remote Desktop client on any platform.

    That’s genuinely it. No imaging, no infrastructure, no VNet configuration.


    Is Windows 365 Business Right for You?

    If you’re running a business with fewer than 300 users, your team is remote or hybrid, you have BYOD challenges, or you’re spending too much time on endpoint management — Windows 365 Business is worth a serious look, especially at the new pricing.

    The 20% price reduction makes the TCO case significantly more compelling. Gartner noted in April 2026 that cloud-hosted PCs now offer lower total cost of ownership than traditional laptops when you factor in hardware refresh cycles, IT support overhead, and device management costs. At $25–$53 per user per month, Windows 365 Business is squarely in that conversation.

    The simplicity is real, but so are the limitations. If your organisation needs Intune-based policy management, custom images, or advanced security integration, you’ll want to evaluate Windows 365 Enterprise or Azure Virtual Desktop instead.

    For most small businesses and SMBs looking to modernise their desktop estate without a large IT investment, Windows 365 Business is a clean, low-friction option. And right now, it’s the cheapest it’s ever been.


    Have questions about sizing Cloud PCs for your team, or whether Business or Enterprise is the right fit for your environment? Drop a comment below or reach out directly.

  • Microsoft Entra Backup and Recovery: The Safety Net Your Tenant Has Always Needed

    Microsoft Entra Backup and Recovery: The Safety Net Your Tenant Has Always Needed

    Every Entra ID administrator has a horror story.

    Maybe it was a bulk user import that went wrong and overwrote attributes across half your directory. Maybe it was a well-intentioned change to a Conditional Access policy that cascaded into a lockout at 11pm on a Friday. Maybe it was a compromised account that quietly weakened your MFA requirements before anyone noticed.

    Up until recently, recovering from those situations meant one of three things: rebuilding from memory, combing through audit logs and manually reversing changes one by one, or restoring from a third-party backup tool you may or may not have had the budget for.

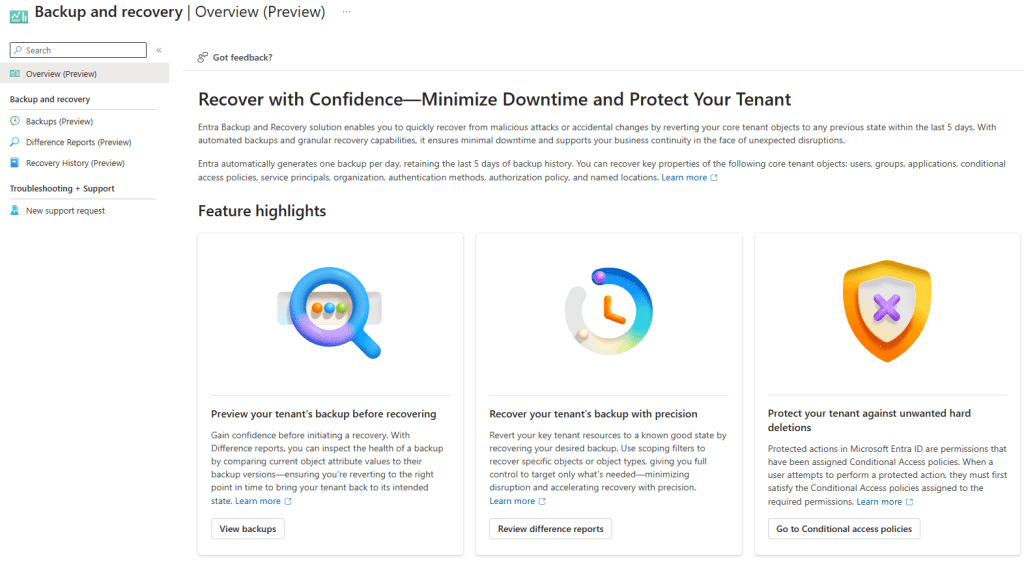
    Microsoft has quietly shipped something that changes that equation. Microsoft Entra Backup and Recovery entered public preview in March 2026, and if your tenant has Entra ID P1 or P2 licensing, it’s already running — no setup required.

    Here’s what it actually does, what it doesn’t do, and what you should do with it right now.


    What It Is

    Entra Backup and Recovery is a built-in, automated snapshot service for your Entra ID tenant. Once a day, Microsoft takes a point-in-time backup of the critical objects in your directory and retains the last five days of history. Crucially, the backups are tamper-proof — no user, application, or admin (including Global Administrators) can delete, modify, or disable them. Backup data is stored in the same geo-location as your tenant, determined at tenant creation.

    From those snapshots, you can:

    • View available backups — a rolling five-day history available in the Entra admin centre
    • Create difference reports — compare any backup snapshot against the current state of your tenant and see exactly what changed
    • Recover objects — restore all objects, specific object types, or individual objects by ID to their backed-up state
    • Review recovery history — audit completed and in-progress recovery operations

    What Gets Backed Up

    This is where the detail matters. Entra Backup and Recovery covers a defined set of object types, and within those types, a defined set of properties. It’s not a full serialisation of every attribute on every object — but it covers the things that matter most.

    Conditional Access policies and named locations

    This is arguably the most valuable part of the whole feature. All properties of Conditional Access policies are in scope, as are all properties of named location policies. This is the scenario most admins will reach for this tool first. A misapplied policy, a deleted exclusion group, a grant control that got changed — all of that is now recoverable.

    Users

    A broad set of user properties is included: display name, UPN, account enabled/disabled state, department, job title, mail, mobile, usage location, employee data, and more. What’s notably not in scope: manager and sponsor relationships. Those won’t be restored.

    Groups

    Core group properties are covered: display name, description, mail settings, security settings, classification, and theme. Group ownership changes are out of scope. Dynamic group rule changes are also out of scope — so if someone modified a dynamic membership rule, that won’t appear in the diff.

    Applications and service principals

    For app registrations, properties like display name, sign-in audience, required resource access, optional claims, and redirect URI configuration are included. For service principals, the backup extends further: when a service principal is recovered, Entra also restores the OAuth2 delegated permission grants and app role assignments tied to it. That’s important — it means recovering an enterprise app brings back the permissions alongside it, not just the object itself.

    Authentication method policies

    The backup covers the configured state of individual authentication methods: FIDO2 passkeys, Microsoft Authenticator, SMS, voice call, email OTP, Temporary Access Pass, certificate-based authentication, and third-party OATH tokens. If someone disables passkey authentication or weakens your Authenticator configuration, that’s recoverable.

    Authorization policy

    Guest user role settings are covered — specifically, the permission level assigned to guest users in your tenant (member access, guest access, or restricted guest). It also covers the blockMsolPowerShell setting.

    Organisation-level MFA settings

    Tenant-wide per-user MFA settings are included — available MFA methods, whether app passwords are blocked, and device remembering settings.


    What It Doesn’t Cover

    It’s equally important to understand the scope boundaries.

    Hard-deleted objects are not recoverable through this feature. If a user, group, or application has been permanently deleted (either manually hard-deleted, or after the 30-day soft delete window expires), Entra Backup and Recovery cannot restore them. That’s what soft delete and the recycle bin are for — more on that below.

    On-premises synced objects are excluded from recovery. If you’re running hybrid identity with AD Connect or Cloud Sync, changes to synced objects will appear in difference reports, but they’re automatically excluded from recovery. That’s by design: the source of truth for those objects is on-premises AD, so recovery has to happen there. The exception is if you’ve converted objects to cloud-managed (moved the source of authority to the cloud) — those become fully recoverable.

    Not every attribute on every object is included. The supported property list is well-defined and growing over time, but it’s not a complete object dump. If the change you’re trying to reverse involves an attribute outside the supported set, the backup won’t capture it.


    The Difference Between This and Soft Delete

    A point worth emphasising: these are two different tools for two different problems.

    Soft delete handles object deletion. When you delete a user, group, M365 group, or application, it goes into the recycle bin for 30 days. You can restore it from there through the portal or Graph API with all its properties intact. Soft delete is on by default and is your first line of defence against accidental deletions.

    Entra Backup and Recovery handles attribute corruption. If an object still exists but its properties have been changed — by a misconfiguration, a bad import, or a malicious actor — that’s where backup and recovery steps in. It restores the values of supported properties back to their backed-up state.

    The scenario you need to think about for a security incident is both:

    1. A bad actor might corrupt attributes (that’s where backup and recovery helps)
    2. A bad actor might also delete objects and then hard-delete them from the recycle bin to prevent recovery

    Which brings us to the companion feature.


    Protected Actions: Locking Down the Recycle Bin

    If you’re setting up Entra Backup and Recovery as part of a resilience posture, you should do this alongside it.

    Protected actions let you require step-up authentication before specific high-risk operations can be performed. The one to configure immediately is microsoft.directory/deletedItems/delete — the action that hard-deletes an object from the recycle bin.

    By assigning a Conditional Access authentication context to that protected action, you can require that anyone trying to permanently purge a directory object must first satisfy strict conditions — phishing-resistant MFA, a compliant device, maybe even a Secure Access Workstation (SAW). Even a compromised Global Administrator account would be blocked from hard-deleting objects if the device or authentication method doesn’t meet the bar.

    Combined, the picture looks like this:

    • Soft delete keeps deleted objects recoverable for 30 days
    • Protected actions prevent hard deletion without step-up authentication
    • Entra Backup and Recovery lets you restore attribute values from the last five days
    • Audit logs and Entra ID Protection signals alert you when changes happen

    That’s a layered identity resilience posture, not just a backup feature.


    The Two New RBAC Roles

    Entra Backup and Recovery introduces two new built-in roles:

    Microsoft Entra Backup Reader — Read-only access to backups, difference reports, and recovery history. Useful for security auditors or operations teams that need visibility without the ability to trigger changes.

    Microsoft Entra Backup Administrator — Everything in Backup Reader, plus the ability to initiate difference reports and trigger recovery operations. Note that all Backup Administrator permissions are already included in the Global Administrator role, so your existing GA accounts can use this without role assignment. For least-privilege, use the dedicated role.

    One preview caveat: early reports indicate the Backup Administrator role can be difficult to assign through the UI during preview. If you hit that, PowerShell (via Microsoft Graph) works as a workaround.


    How to Use It: The Practical Workflow

    Finding it: In the Entra admin centre, look for Backup and recovery in the left navigation pane. You’ll see four sections: Overview, Backups, Difference Reports, and Recovery History.

    Running a difference report: Select one of your five available backups, choose “Create difference report,” and select your scope — all object types, specific types, or individual object IDs. The first time you run a report against a particular backup, it takes longer (the service needs to load the backup metadata). A first run for a small tenant can take over an hour in the current preview. Subsequent reports against the same backup run much faster since the data is already loaded. This is a known limitation that Microsoft is expected to improve before general availability.

    Reading the report: The output shows you changed objects, grouped by type. For each object, you can drill into the specific attributes that changed and see the old value (from the backup) versus the current value. This is genuinely useful for understanding what happened before you decide whether to recover.

    Triggering recovery: From a difference report, you can choose to recover — scoping to all changed objects, specific object types, or individual object IDs. Recovery time scales with the number of changes involved. Small targeted recoveries (a handful of users, a few CA policies) are fast. Large-scale recoveries across hundreds of thousands of objects can take significantly longer.

    Best practice from Microsoft’s own documentation: Always run a difference report first. Review the changes, confirm you understand the scope, and then trigger recovery. This also pre-loads the backup data, which speeds up the recovery operation itself.


    What to Do Right Now

    Given that this is already running in your tenant if you have P1/P2, there are a few things worth doing today:

    Check that it’s visible. Go to the Entra admin centre and navigate to Backup and recovery. Confirm you can see your last five daily backups. If you can’t, verify your licensing and role assignment.

    Run your first difference report against yesterday’s backup. Even if you don’t expect anything to be wrong, this is worth doing for two reasons: you’ll understand the interface before you’re under pressure, and it pre-loads the data so your first real recovery runs faster.

    Set up protected actions for hard-delete. Go to Roles and Administrators > Protected Actions, find microsoft.directory/deletedItems/delete, assign an authentication context, and wire up a Conditional Access policy with appropriately strict controls. This takes 20 minutes and significantly raises the bar for a malicious actor trying to permanently destroy directory objects.

    Test a recovery in a development tenant. Before you need this in production, run a test. Make a deliberate change to a test user or a non-production CA policy, wait for the next daily backup (or use your existing snapshot), run a diff, and recover. Know how it works before the stakes are real.


    The Bigger Picture

    Entra Backup and Recovery is still in preview, and it has real limitations — the five-day retention window is narrow, the initial diff report performance needs work, and the scope of recoverable properties will keep expanding. It’s not a replacement for a well-documented change management process or a broader identity resilience strategy.

    But it’s a meaningful step forward. For the first time, Entra ID has a native, tamper-proof, automatically-maintained safety net for the objects and policies that your entire cloud environment depends on. The cases where an admin mistake, a bad import, or a compromised account could previously cause hours of manual remediation work now have a straightforward, auditable recovery path.

    Set it up. Test it. Pair it with protected actions. And make sure your team knows where to find it before they need it.


    Resources:

  • Windows 365 Cloud Apps Just Got Serious: APPX and MSIX Support Changes Everything for Frontline

    Windows 365 Cloud Apps Just Got Serious: APPX and MSIX Support Changes Everything for Frontline

    Windows 365 Cloud Apps went generally available in November 2025, and the concept is compelling: stream individual apps from a Cloud PC to a user’s device, without giving them a full desktop. Think RemoteApp, but cloud-native and managed entirely through Intune.

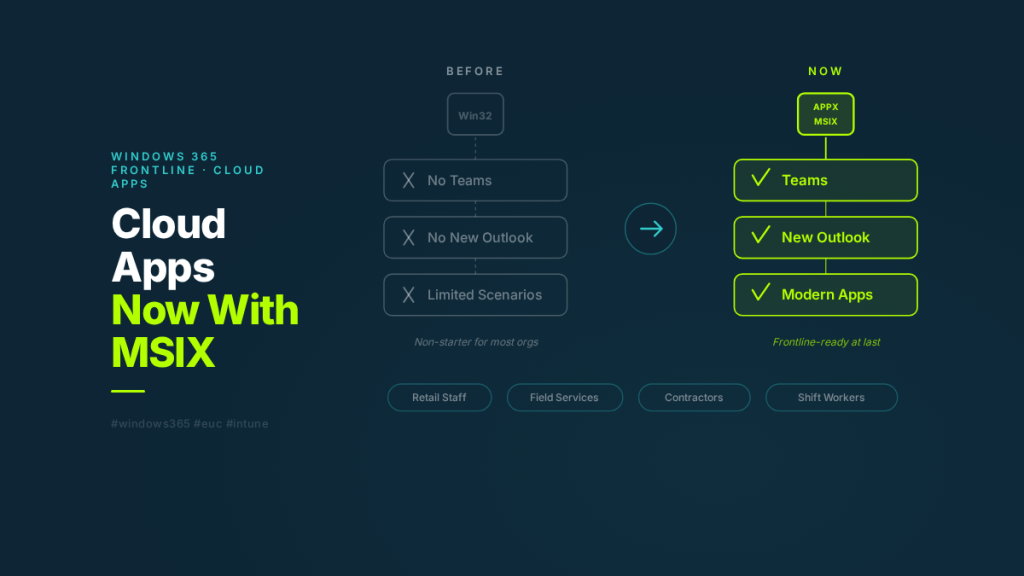
    The problem? Until this week, Cloud Apps only supported Win32 applications. That meant Microsoft Teams and the new Outlook — both packaged as APPX or MSIX — couldn’t be published through it. For most real-world scenarios, that was a deal-breaker.

    As of the week of March 23, 2026, Microsoft added APPX and MSIX application support to Cloud Apps. It sounds like a packaging update. In practice, it removes the single biggest barrier to Cloud Apps adoption.

    This post covers what Cloud Apps is, how it works architecturally, what this update actually changes, and where it fits alongside a full Cloud PC deployment.

    What Are Windows 365 Cloud Apps?

    Cloud Apps is a delivery model within Windows 365 Frontline that lets you publish individual applications to users instead of provisioning a full Cloud PC desktop for each person.

    The experience from the user’s perspective: they open Windows App, see only the specific apps that have been published to them, and click to launch. The app opens in its own window on their local device — no desktop, no taskbar, no Start menu. Just the app.

    From an architecture perspective, Cloud Apps runs on top of Windows 365 Frontline Cloud PCs operating in shared mode. When a user launches a Cloud App, it initiates a RemoteApp connection to one of the shared Cloud PCs in the pool. The Windows UI is stripped away so only the application window is rendered in the remote session. The user sees an app. Under the hood, it’s a Cloud PC running in shared mode, with concurrency tied to the number of Frontline licences assigned to the provisioning policy.

    The key distinction from a full Cloud PC: users don’t get a persistent desktop environment. There’s no personal desktop, no file explorer, no Start menu. They get access to the specific applications IT has published — nothing more.

    How App Discovery and Publishing Works

    This is where it gets interesting, and where the APPX/MSIX limitation was most painful.

    Cloud Apps discovers available applications by scanning the Start Menu of the underlying Cloud PC image. When you create a provisioning policy with the experience type set to “Access only apps,” Windows 365 enumerates every application that has a Start Menu entry on the image. Those apps are then listed in the Intune admin centre as “Ready to publish.”

    Admins select which apps to publish, and those apps become available in Windows App for all users assigned to the provisioning policy. You can edit display names, descriptions, and icons — but the core app discovery is driven by what’s on the image.

    Here’s the catch that tripped up the original release: the discovery and publishing pipeline only supported Win32 executables. APPX and MSIX packages register themselves differently in Windows — they use the modern app model with package identity, containerised execution, and different Start Menu registration paths. The Cloud Apps discovery engine simply didn’t know how to find them.

    That’s what changed this week. The discovery pipeline now supports APPX and MSIX packages alongside Win32 apps. Any application on the image that creates a Start Menu entry — regardless of packaging format — can now be discovered and published as a Cloud App.

    Why This Matters More Than It Sounds

    If you’re not deep in Windows packaging, “we added APPX/MSIX support” might sound like a minor technical improvement. Here’s why it’s not.

    Microsoft has been steadily moving its own applications to modern packaging formats. Teams is an MSIX package. The new Outlook is an APPX package. Many apps delivered through the Microsoft Store and via Intune’s app catalogue are MSIX. The direction of travel is clear: MSIX is the future of Windows app packaging.

    A Cloud Apps deployment that can only publish Win32 apps is a deployment that can’t publish Microsoft’s own flagship productivity tools. That’s not a niche gap — it’s a fundamental limitation that made Cloud Apps impractical for most organisations.

    With APPX and MSIX support, a Cloud Apps deployment can now publish Teams, the new Outlook, and any other modern-packaged app that’s on the image. The feature goes from “interesting concept with a big asterisk” to “genuinely viable for production frontline scenarios.”

    A Quick Primer: Win32 vs APPX vs MSIX

    For context on why these packaging formats matter and what makes them different:

    Win32 is the traditional application model that’s been around for decades. MSI installers, EXE files, and applications that write directly to Program Files, the registry, and shared system locations. They’re flexible but messy — installs can leave residual files, uninstalls aren’t always clean, and conflicts between applications sharing system resources are common.

    APPX was introduced with Windows 8 for Universal Windows Platform (UWP) apps. APPX packages run in a containerised environment with their own virtualised filesystem and registry. They install cleanly, uninstall completely, and can’t interfere with other apps. The trade-off: they were originally designed for UWP-only, limiting their usefulness for traditional desktop applications.

    MSIX is the evolution that bridges both worlds. It brings the clean install/uninstall behaviour and containerisation of APPX to traditional Win32 and .NET Framework applications. MSIX supports differential updates (only downloading what changed), mandatory digital signing for security, and a 99.96% install success rate according to Microsoft’s data. It’s designed to be the single packaging format for all Windows app types going forward.

    The reason Cloud Apps struggled without APPX/MSIX support is that Microsoft has been packaging its own apps in these formats for years. Teams, the new Outlook, and many Store-delivered apps aren’t Win32 — they’re MSIX or APPX. If your app delivery platform can’t see them, you can’t publish them.

    Cloud Apps vs Full Cloud PC: When to Use Which

    Cloud Apps doesn’t replace a full Cloud PC. They solve different problems for different user personas. Here’s how to think about when each model fits.

    Cloud Apps makes sense when:

    The user needs access to a small number of specific applications — typically two or three. They don’t need a full desktop environment, file management, or the ability to install additional software. Think frontline retail workers who need a POS system and Teams. Field service staff who need a single line-of-business app on shared devices. Contractors who need controlled access to specific tools without a full managed desktop. Seasonal or temporary staff where provisioning and deprovisioning full Cloud PCs per person would be operationally heavy.

    A full Cloud PC makes sense when:

    The user needs a persistent desktop environment with their own files, settings, and application state. They work with multiple applications simultaneously and switch between them throughout the day. They need the ability to open apps ad hoc — not just pre-published ones. Their workflow involves file management, browser-based tools alongside desktop apps, or other activities that need a complete Windows desktop.

    The shared licensing model underneath:

    Both Cloud Apps and shared-mode Frontline Cloud PCs use the same Windows 365 Frontline licensing. The licence model allows unlimited user assignments per licence, but only one concurrent active session per licence at a time. So if you have 50 Frontline licences assigned to a Cloud Apps provisioning policy, up to 50 users can have active Cloud App sessions simultaneously.

    This makes Frontline significantly more cost-effective than Enterprise Cloud PCs for shift-based or part-time workers. You’re not paying for a dedicated Cloud PC per user — you’re paying for concurrent capacity.

    Security Consideration: Published Apps Can Launch Other Apps

    There’s one architectural detail worth flagging that catches some admins off guard.

    When a user launches a published Cloud App, that app runs on a full Cloud PC under the hood. The published app can launch other applications that exist on the Cloud PC image, even if those other apps haven’t been published as Cloud Apps.

    For example: if you publish Outlook as a Cloud App and a user clicks a link in an email, it can launch Edge — even if Edge isn’t published. If an app has a “Open in Explorer” option, it could launch File Explorer.

    For many scenarios, this is fine and even expected behaviour. But if you’re in a regulated environment or need strict application control, you should layer Application Control for Windows (formerly Windows Defender Application Control) on top of Cloud Apps to enforce exactly which executables can run on the underlying Cloud PC.

    Don’t assume that publishing three apps means only three apps can run. The published app list controls what the user can launch directly — not what can execute on the session host.

    What’s Still in Preview

    A few things to be aware of that are still in preview or coming soon:

    Enhanced user experiences for Cloud Apps are in public preview. This includes improved Windows Snap support, full-screen mode, better DPI handling, and visual refinements like borders, shadows, and theme integration. These improvements use the same RemoteApp enhancements available in Azure Virtual Desktop.

    Autopilot Device Preparation support for Cloud Apps is also in public preview. This gives you an alternative to custom images for getting apps onto the underlying Cloud PCs — you can use Autopilot Device Preparation policies to install apps during provisioning, and Cloud Apps will discover them once installed.

    User Experience Sync allows app settings and data to persist between user sessions on shared Cloud PCs. Since Cloud Apps runs on shared-mode Frontline Cloud PCs, user state would normally be lost when a session ends. User Experience Sync preserves settings and data, which is important for apps that store user preferences locally.

    The Bigger Picture

    Cloud Apps has been a “watch this space” feature since it launched. The concept was right — not every user needs a full desktop, and app-only delivery is often the better fit for frontline and contractor scenarios. But the Win32 limitation made it hard to recommend for production use when you couldn’t even publish Teams.

    With APPX and MSIX support, that changes. The feature is now capable of delivering the apps that most organisations actually need in frontline scenarios. Combined with the Frontline shared licensing model, it’s a genuinely cost-effective alternative to provisioning full Cloud PCs for users who only need a handful of apps.

    If you evaluated Cloud Apps earlier and parked it because of app support gaps, it’s worth taking another look. The gap that mattered most is now closed.


    Wayne Bellows is a Technical Account Manager at Nerdio. He writes about Azure Virtual Desktop, Windows 365, Intune, and the EUC industry at modern-euc.com.
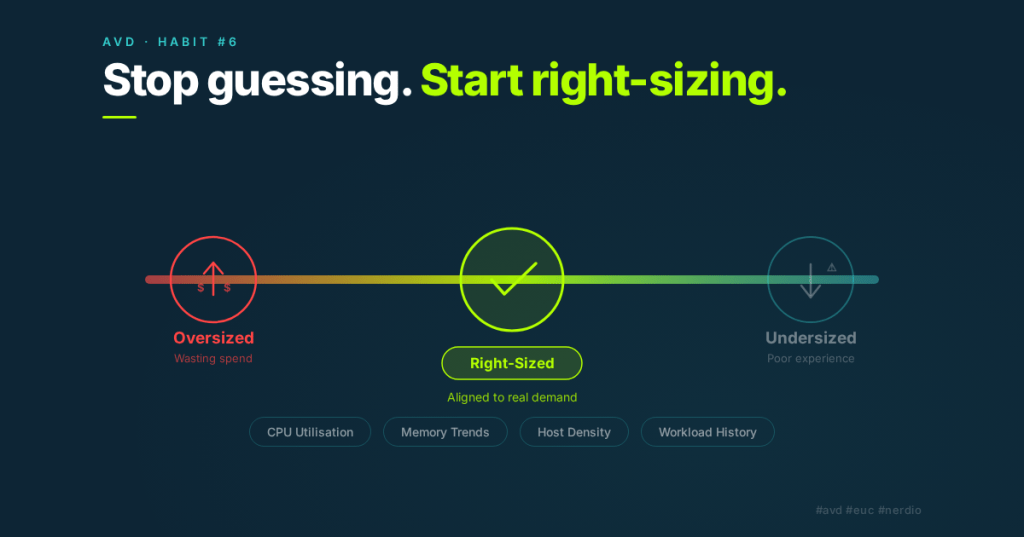
  • Habit #6: Regularly Right-Size Using Nerdio Advisor

    Habit #6: Regularly Right-Size Using Nerdio Advisor

    The environment you designed six months ago probably isn’t the environment you’re running today.

    Most Azure Virtual Desktop environments start out well-designed.

    VM sizes are carefully chosen.
    Host pool capacity is planned.
    Autoscale is configured.

    At the beginning, everything fits.

    But environments rarely stay static.

    Users come and go.
    Applications change.
    Workloads evolve.

    Over time, what was once the right size often becomes the wrong size.

    That’s why Habit #6 exists.

    Highly effective admins don’t assume their original VM sizing decisions are still correct.

    They validate them regularly.


    Environment Drift Is Inevitable

    Even the most disciplined environments drift.

    Over time, you may see:

    • Increased user density on session hosts
    • New applications changing resource demands
    • Departments adopting new workflows
    • Seasonal fluctuations in usage

    None of this means that something was configured incorrectly.

    It simply means the environment evolved.

    The risk comes when sizing decisions stay frozen while everything else changes.

    That’s where right-sizing becomes essential.


    What Right-Sizing Actually Means

    Right-sizing isn’t about aggressively shrinking VM sizes.

    It’s about aligning infrastructure with real demand.

    In Nerdio Manager for Enterprise, Nerdio Advisor helps surface opportunities where VM sizes or host counts no longer match usage patterns.

    It analyses:

    • CPU utilisation trends
    • Memory utilisation
    • Host density
    • Historical workload behaviour

    From this data, it can highlight potential opportunities to:

    • Reduce VM size
    • Adjust host counts
    • Improve session density
    • Eliminate unused capacity

    Advisor doesn’t force changes.

    It simply shows where optimisation may exist.


    The Three Pillars of Habit #6

    Like the other habits in this series, right-sizing becomes effective when it’s treated as a repeatable behaviour rather than a one-time task.


    Pillar 1: Review Advisor Recommendations Regularly

    Right-sizing should be part of your operational rhythm.

    Highly effective admins review Advisor recommendations periodically to understand how their environment is evolving.

    These reviews help answer questions such as:

    Are hosts consistently underutilised?
    Are machines running close to resource limits?
    Has user demand changed since the environment was first deployed?

    Looking at these trends regularly prevents small inefficiencies from turning into long-term overspend.


    Pillar 2: Validate Host Pool Sizing Against Real Demand

    Advisor recommendations are a starting point.

    Before making changes, administrators should validate recommendations against how the environment is actually used.

    Important considerations include:

    • Login storms
    • Peak usage periods
    • Critical applications
    • Future growth expectations

    Right-sizing should always balance efficiency with user experience.

    The goal is optimisation — not risk.


    Pillar 3: Make Incremental Adjustments

    The most successful optimisation strategies are gradual.

    Highly effective admins:

    • Test smaller VM sizes in validation pools
    • Adjust session density carefully
    • Monitor performance after changes
    • Iterate based on real results

    This approach ensures improvements are sustainable and predictable.

    Large, aggressive changes introduce uncertainty.

    Small, measured adjustments build confidence.


    What This Habit Enables

    When environments are regularly right-sized, several things happen.

    First, infrastructure becomes more efficient.

    Unused capacity is eliminated, and VM sizes better match the workloads they support.

    Second, costs become more predictable.

    Right-sizing ensures organisations are paying for what they actually use — not what they once needed.

    Finally, operational confidence improves.

    Administrators know their environment reflects current demand rather than historical assumptions.


    Common Mistakes to Avoid

    Right-sizing is powerful, but it can be misunderstood.

    Some common pitfalls include:

    • Treating right-sizing as a one-time exercise
    • Blindly applying recommendations without validation
    • Optimising based on short-term usage spikes
    • Reducing VM sizes too aggressively

    Good optimisation is disciplined.

    It balances cost efficiency with stability.


    How Habit #6 Builds on the Previous Habits

    By the time organisations reach Habit #6, the earlier habits have already created a stable foundation.

    Images are standardised.
    Patching is predictable.
    Applications are decoupled from images.
    Autoscale behaviour is understood.

    Only once that foundation exists does right-sizing become safe.

    Without it, changing VM sizes can introduce instability.

    With it, right-sizing becomes one of the most powerful cost optimisation tools available.


    The Real Takeaway

    Infrastructure decisions age.

    What worked six months ago may not be optimal today.

    Highly effective admins recognise this.

    They don’t rely on past assumptions.

    They validate them.

    Regular right-sizing ensures that the environment you’re running today reflects the demands of today — not the design decisions of yesterday.

    That’s the essence of Habit #6.


    Next in the series:
    Habit #7 — Optimise Log Analytics

    Monitoring is essential for maintaining visibility into your environment, but unmanaged telemetry can quietly inflate Azure costs. The final habit explores how to maintain observability while keeping analytics costs under control.

  • Habit #4: Act on Auto-Scale Insights

    Habit #4: Act on Auto-Scale Insights

    Don’t set it and forget it.

    Auto-scale is one of the most powerful features in Azure Virtual Desktop.

    It promises elasticity.
    It promises cost control.
    It promises performance stability.

    But here’s the reality:

    Most environments drift.

    Auto-scale gets configured once — often during deployment — and then quietly left alone. Months later, usage patterns have changed, user numbers have shifted, and application behaviour has evolved… but scaling logic hasn’t.

    That’s where Habit #4 comes in.

    Highly effective Nerdio admins don’t treat auto-scale as a static configuration.
    They treat it as a feedback loop.


    Auto-Scale Drift Is Normal

    Even well-designed environments don’t stay optimal forever.

    Over time:

    • Users join or leave
    • Working hours shift
    • Seasonal spikes come and go
    • Applications change resource profiles

    None of this means the original configuration was wrong.

    It just means the environment evolved.

    The problem isn’t drift.
    The problem is ignoring it.


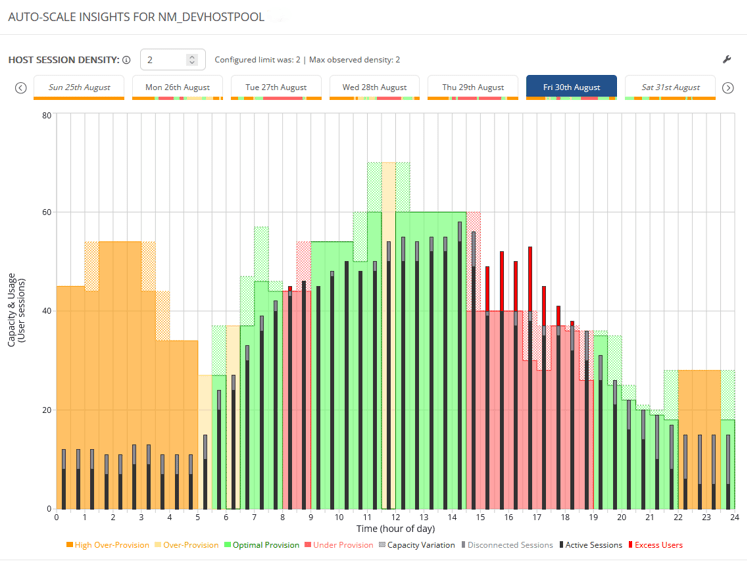
    What Auto-Scale Insights Actually Do

    Auto-Scale Insights in Nerdio Manager for Enterprise surface where your configuration no longer reflects reality.

    They highlight:

    • Idle capacity
    • Inefficient scaling schedules
    • Burst logic that may be too conservative — or too aggressive

    Insights don’t make changes for you.
    They show you where opportunity exists.

    They turn instinct into evidence.


    The Three Pillars of Habit #4

    Like the other habits, this one breaks down into repeatable behaviours.

    You don’t need a dramatic reconfiguration.
    You need a disciplined review.


    Pillar 1: Review Insights Regularly

    Auto-scale should have an operational cadence.

    Highly effective admins:

    • Review Insights monthly (or at minimum quarterly)
    • Look for trends, not one-off anomalies
    • Treat it like a performance and cost dashboard

    Small adjustments made regularly compound over time.

    What’s dangerous isn’t one imperfect configuration.
    It’s leaving it untouched for a year.


    Pillar 2: Validate Provisioning Against Real Usage

    The question isn’t “Is autoscale enabled?”

    The question is:

    Does our current provisioning reflect how the environment is actually being used?

    Review:

    • Active and disconnected sessions per host
    • Scale-out frequency
    • Ramp, peak, and taper events
    • Host counts during low-demand periods

    As a general rule of thumb, sustained utilisation below ~60% often signals overprovisioning. Sustained utilisation above ~80% may indicate constrained performance.

    The goal isn’t to chase perfect numbers.

    The goal is alignment between capacity and demand.


    Pillar 3: Optimise Safely, Not Aggressively

    Cost optimisation should be invisible to users.

    Highly effective admins:

    • Adjust VM size incrementally
    • Modify session limits gradually
    • Tune burst thresholds cautiously
    • Validate performance after changes

    Aggressive optimisation introduces risk.

    Disciplined optimisation builds confidence.


    What This Enables

    When Auto-Scale Insights are acted on consistently:

    • Compute costs drop meaningfully
    • Scaling becomes predictable
    • Surprise overruns decrease
    • Performance stabilises

    More importantly, optimisation becomes a data exercise — not guesswork.

    This aligns strongly with my broader emphasis on disciplined, data-driven decision making.


    Common Mistakes to Avoid

    Even experienced teams fall into these traps:

    • Blindly applying every recommendation without context
    • Optimising based on one week of data
    • Ignoring seasonal workload patterns
    • Tuning autoscale before stabilising images and applications

    Order matters.

    Autoscale optimisation works best when:

    • Images are consistent
    • Patching is predictable
    • Applications are disciplined

    That foundation makes scaling behaviour easier to interpret — and safer to adjust.


    How Habit #4 Builds on the Foundation

    Habit #4 doesn’t stand alone.

    It builds on:

    • Habit #1: Standardised image management
    • Habit #2: Predictable patching
    • Habit #3: Controlled application delivery

    Only when the environment is stable does autoscale optimisation become safe.

    Otherwise, you’re just scaling instability faster.


    The Real Takeaway

    Autoscale isn’t about turning machines on and off.

    It’s about continuously aligning capacity with reality.

    Set it.
    Measure it.
    Refine it.

    That’s the habit.


    Next up: Habit #5 — Analyse Auto-Scale History
    Insights show what might be wrong. History tells you why.

  • March 31, 2026, is coming: New Azure VNets won’t have outbound internet by default — here’s the EUC-ready fix (NAT Gateway v2)

    March 31, 2026, is coming: New Azure VNets won’t have outbound internet by default — here’s the EUC-ready fix (NAT Gateway v2)

    The change that won’t hurt… until it does

    If you run Azure Virtual Desktop (AVD) or Windows 365 (Cloud PCs) in Azure, you’ve probably relied on a quiet convenience for years:

    Deploy a VM in a subnet and—without doing anything special—it can reach the internet.

    That “it just works” behavior is going away by default for new networks.

    Microsoft has confirmed that after March 31, 2026, newly created Azure Virtual Networks will default to private subnets, meaning no default outbound internet access unless you explicitly configure an outbound method.

    And here’s the trap: nothing breaks on day one. Your existing VNets keep working as they do today. Then, weeks later, someone builds a new VNet (or a new subnet), tries to deploy AVD session hosts or provision Cloud PCs… and suddenly:

    • Hosts can’t download what they need
    • Windows activation and updates don’t behave
    • Intune enrollment/sync gets weird
    • Provisioning workflows fail in ways that look like “AVD is broken” (it’s not)

    Microsoft explicitly notes that certain services (including Windows activation and Windows updates) won’t function in a private subnet unless you add explicit outbound connectivity.

    So, let’s make this change boring—in a good way. ✅


    What exactly is changing on March 31, 2026?

    ✅ What changes

    • New VNets created after March 31, 2026 will default to private subnets (Azure sets the subnet property defaultOutboundAccess = false by default).
    • Private subnets mean VMs do not get “default outbound access” to the internet or public Microsoft endpoints unless you configure an explicit egress method.

    ✅ What does not change

    • Existing VNets are not automatically modified.
    • New VMs deployed into existing VNets will continue to behave as those subnets are configured today, unless you change those subnets.

    Also important: you still have control

    Microsoft’s guidance is “secure by default,” but you can still configure subnets as non-private if you truly need to keep the default outbound behavior for a period of time.
    That said… for EUC, the better long-term move is to standardize on explicit outbound now.


    Why AVD and Windows 365 teams should care (more than most)

    EUC workloads have a long list of dependencies on outbound connectivity. A few high-impact examples:

    AVD session hosts

    • Agent/bootloader downloads and updates
    • Host registration and service connectivity
    • Windows activation + KMS / public activation flows
    • Windows Update / Defender updates
    • App install flows that fetch from internet endpoints (MSIX, Winget, vendor CDNs, etc.)
    • Telemetry and management paths (depending on your architecture)

    Windows 365 (Azure Network Connection / ANC)

    Microsoft is explicit here: for Windows 365 ANC deployments using VNets created after March 31, 2026, Cloud PC provisioning will fail unless outbound internet access is explicitly configured.

    So the question becomes: what’s the cleanest, most repeatable outbound design for EUC networks?


    Your outbound options (EUC decision guide)

    Azure recognizes several “explicit outbound” patterns.
    For EUC, these are the common ones:

    1) NAT Gateway (recommended default for most EUC spokes)

    Best when:

    • You want simple, scalable outbound for session hosts / Cloud PCs
    • You need a predictable egress IP for allow-lists
    • You don’t need deep L7 inspection for all traffic (or you’re doing that elsewhere)

    2) Firewall/NVA + UDR (hub-and-spoke inspection)

    Best when:

    • You need central inspection, TLS break/inspect, egress filtering at scale
      Trade-offs:
      • Complexity and cost
      • SNAT scaling considerations
      • You may still use NAT Gateway with firewall designs (more on that below)

    3) Standard Load Balancer outbound rules

    Best when:

    • You already have SLB, and outbound rules are a deliberate part of your design
      Trade-offs:
    • More moving parts than NAT Gateway for a simple “give the subnet internet” outcome

    4) Public IP per VM (usually a “no” for EUC)

    Trade-offs:

    • Operational overhead
    • Increased attack surface
    • Harder to govern at scale for pooled hosts / Cloud PCs

    For most AVD and Windows 365 environments, the sweet spot is:
    ➡️ NAT Gateway for outbound simplicity and scale.

    And now we have a better version of it.


    Enter NAT Gateway v2: the “make it simple” fix

    Microsoft announced StandardV2 NAT Gateway and StandardV2 Public IPs to match it. The headline improvements are exactly what EUC architects care about:

    • Zone-redundant by default (in regions with Availability Zones)
    • Higher performance (Microsoft calls out up to 100 Gbps throughput and 10 million packets/sec)
    • IPv6 support
    • Flow logs support
    • Same price as Standard NAT Gateway (per Microsoft’s announcement)

    But know the gotchas

    From Microsoft’s NAT SKU guidance:

    • Requires StandardV2 Public IPs (Standard PIP won’t work)
    • No in-place upgrade from Standard → StandardV2 NAT Gateway (replace it)
    • Some regions don’t support StandardV2 NAT Gateway (check your target region list)

    If you’re designing for EUC scale + resilience, the zone redundancy alone is a big deal.


    Walkthrough: Deploy NAT Gateway v2 for AVD / Windows 365

    Below is a practical, EUC-focused setup using the Azure portal.

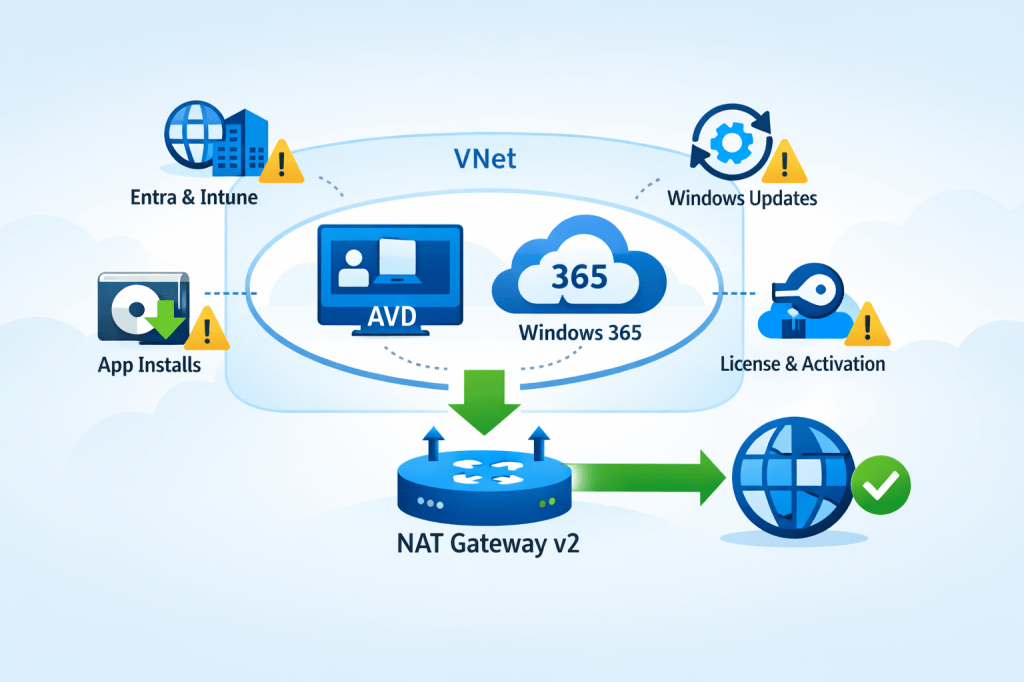
    Architecture target

    • You have a VNet with one or more EUC subnets (e.g., AVD-Hosts, CloudPCs)
    • You attach one NAT Gateway v2 to those subnets
    • All outbound traffic from those subnets egresses via the NAT’s public IP(s)

    NAT Gateway is associated at the subnet level, and a subnet can only use one NAT gateway at a time (so plan accordingly).


    Step 0: Confirm your subnet posture (private vs not)

    After March 31, 2026, new VNets will default to private subnets.

    In the subnet configuration in Azure:

    • Find Default outbound access
    • If you want the secure-by-default posture, set it Disabled (private subnet)
    • Then ensure you provide explicit outbound (NAT Gateway)

    Note: if you change an existing subnet’s default outbound access setting, existing VMs may need a stop/deallocate to fully apply the change.


    Step 1: Create a StandardV2 Public IP

    NAT Gateway v2 requires a StandardV2 Public IP.

    Azure portal:

    1. Create Public IP address
    2. Set:
      • SKU: StandardV2 (static)
      • IP version: IPv4 (or dual-stack if required)
    3. Create it

    Step 2: Create the NAT Gateway (StandardV2)

    Azure portal:

    1. Create NAT gateway
    2. Set:
      • SKU: StandardV2
      • TCP idle timeout: leave default unless you have a reason
    3. On Outbound IP, attach the StandardV2 Public IP you created
    4. Create

    Microsoft’s announcement emphasizes StandardV2 NAT Gateway is zone-redundant by default in AZ regions.


    Step 3: Attach NAT Gateway v2 to your EUC subnet(s)

    Now associate it with the subnets where your session hosts / Cloud PCs live.

    Option A (from NAT Gateway):

    • NAT Gateway → Networking → add VNet/subnet associations

    Option B (from Subnet):

    • VNet → Subnets → select subnet → set NAT gateway → Save

    Once attached:

    • VMs in that subnet gain outbound connectivity through the NAT Gateway
    • Your egress IP becomes the NAT’s public IP (useful for allow-listing)

    Step 4: Validate (don’t skip this)

    For EUC, I like three quick validations:

    1. Effective routes
    • Confirm the subnet has the expected path for internet-bound traffic (0.0.0.0/0) via the platform egress with NAT.
    1. Outbound IP check
    • From a session host / Cloud PC, verify outbound IP matches your NAT public IP.
    1. EUC-specific smoke tests
    • Windows activation / licensing behavior
    • Windows Update connectivity
    • Intune enrollment/sync (if applicable)
    • Any app deployment mechanisms that pull from vendor CDNs

    Remember: Microsoft explicitly warns that private subnets need explicit outbound for services like Windows activation/updates.


    Common EUC deployment patterns (what I recommend)

    Pattern A: “EUC spoke NAT” (simple + effective)

    • Each EUC spoke VNet has a NAT Gateway v2 attached to EUC subnets
    • Keep routing simple
    • Use NSGs for egress control + consider NAT flow logs for visibility (where needed)

    Pattern B: “Hub inspection + NAT scale”

    If you route everything through a firewall/NVA for inspection, NAT Gateway can still be relevant in designs where you need scalable SNAT characteristics for outbound (especially when you’ve seen firewall SNAT constraints in the wild). This becomes an architecture conversation, but the key is: private subnets force you to be explicit, and NAT Gateway is the simplest explicit egress building block.


    “Do this before March 31, 2026” checklist

    For AVD admins, Windows 365 admins, and EUC architects:

    • Identify where your org creates “new VNets” (projects, regions, subscriptions)
    • Update your EUC network templates to include explicit outbound (NAT Gateway v2 is the default pick)
    • Standardize an allow-listing approach using the NAT’s static public IP(s)
    • Decide logging posture (do you want NAT flow logs for troubleshooting/top talkers?)
    • Run a “new VNet” dry run now (don’t wait for the deadline)
    • For Windows 365 ANC: confirm your provisioning pipelines won’t fail on new VNets without explicit outbound

    Final thought: make your cloud consistent

    This change is “secure by default,” but operationally it creates a nasty split-brain risk: old VNets behave one way, new VNets behave another.

    The easiest way to keep EUC stable is to choose a consistent outbound pattern everywhere. For most AVD + Windows 365 environments, NAT Gateway v2 is the cleanest baseline: zone-resilient, scalable, and straightforward to operate.

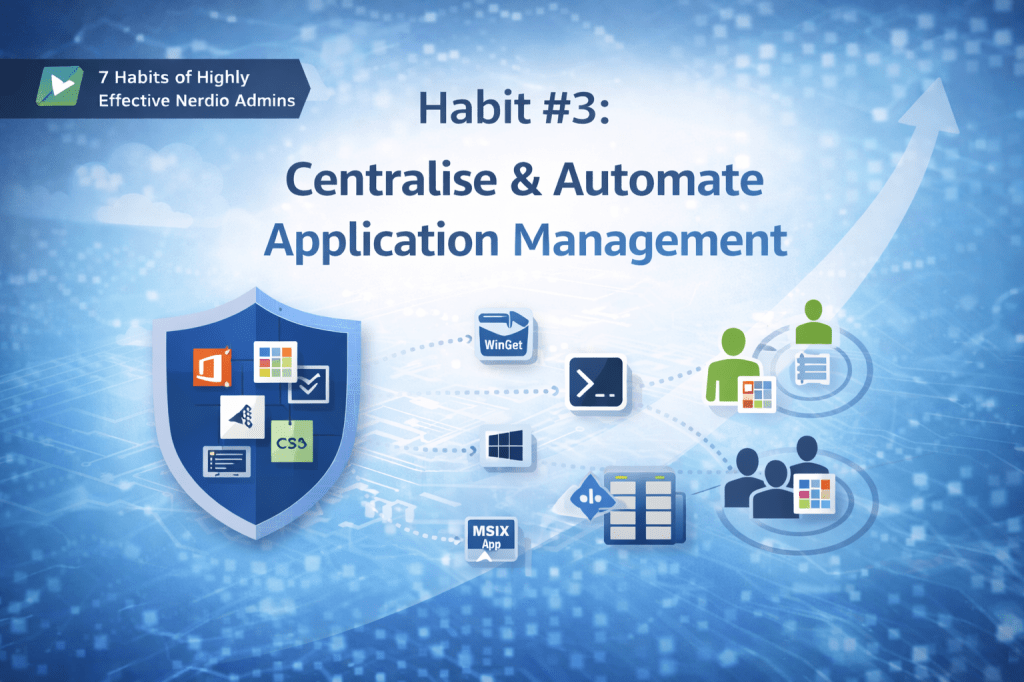
  • Habit #3: Centralise and Automate Application Management

    Habit #3: Centralise and Automate Application Management

    Once desktop images are standardised and patching is automated, many environments hit the next friction point: application management.

    This is often where complexity quietly creeps back in.

    Applications are installed in different ways, updated inconsistently, and tied to specific images or host pools “just to make things work.” Over time, this undermines the stability gained from good image and patch discipline.

    Highly effective admins avoid this by treating application management as a centralised, automated operating model — not a collection of one-off installs.

    This is Habit #3.


    Why application sprawl undermines otherwise well-run environments

    In less mature AVD environments, application delivery tends to evolve organically:

    • Some apps are baked into images
    • Others are installed manually
    • Updates are handled inconsistently
    • Different teams use different tools

    Initially, this can feel flexible. At scale, it becomes fragile.

    Common symptoms include:

    • Bloated desktop images
    • Longer image rebuild and testing cycles
    • Unclear ownership of applications
    • Increased support tickets following updates

    The issue isn’t the tools — it’s the lack of a consistent operating model.


    The mindset shift: applications should not define your images

    Highly effective admins make a deliberate separation:

    Images provide the foundation. Applications provide the functionality.

    When applications are tightly coupled to images:

    • Every app update forces an image change
    • Testing effort increases
    • Rollbacks become harder and riskier

    Decoupling applications from images allows teams to:

    • Keep images minimal and stable
    • Update applications independently
    • Reduce the blast radius when something breaks

    This is where Nerdio Manager for Enterprise becomes a control plane for application delivery — not just a place to manage hosts.


    The three pillars of Habit #3

    Highly effective admins consistently apply three principles when managing applications.


    Pillar 1: Decouple applications from desktop images

    Images should change slowly. Applications often don’t.

    Highly effective admins:

    • Avoid baking applications into images unless there’s a clear technical reason
    • Keep images focused on OS configuration, runtimes, and baseline security
    • Allow applications to evolve independently of the image lifecycle

    This results in:

    • Faster image rebuilds
    • Lower testing overhead
    • More predictable recovery and rollback

    Key idea:

    Images provide stability. Applications provide flexibility.


    Pillar 2: Centralise app delivery into a single operating model

    Modern AVD environments require flexibility. Different applications need different deployment approaches.

    Highly effective admins embrace this reality — but they manage it centrally, rather than allowing application delivery to fragment.

    This may include:

    • Public or private WinGet packages
    • Scripted installs using Shell Apps or Scripted Actions
    • Intune-managed applications
    • MSIX app attach (where it makes sense)
    • Legacy tooling where required, such as SCCM

    The critical point isn’t which method is used — it’s that:

    • The choice is intentional
    • Deployment is automated
    • Behaviour is predictable

    Centralisation provides:

    • Clear visibility into how applications are delivered
    • Consistent update behaviour across environments
    • Faster troubleshooting when issues arise

    The result is flexibility without fragmentation.

    Key idea:

    Different tools. One control plane.


    Pillar 3: Assign applications by intent, not infrastructure

    A common anti-pattern is allowing application differences to dictate:

    • New images
    • New host pools
    • Environment-specific workarounds

    Highly effective admins avoid this by assigning applications based on intent, such as:

    • User role
    • Team or department
    • Business requirement

    Instead of asking:

    “Which host gets this app?”

    They ask:

    “Who actually needs this app?”

    This approach:

    • Reduces image and host pool sprawl
    • Simplifies onboarding and offboarding
    • Keeps environments easier to reason about

    Importantly, this does not require App Attach. User- or group-based assignment can be achieved through multiple delivery methods, with App Attach used selectively where it provides clear value.

    Key idea:

    Apps should be delivered by need — not by where a user logs in.


    Automate application updates deliberately

    Application updates are one of the most common sources of instability.

    Highly effective admins:

    • Automate updates where appropriate
    • Control timing and scope
    • Avoid surprise changes during business hours

    Just like OS patching, application updates work best when treated as a repeatable workflow, not an ad-hoc task.

    Automation doesn’t remove control — it formalises it.


    The operational payoff

    When application management is centralised and automated:

    • Images remain lean
    • Updates become predictable
    • Rollbacks are simpler
    • Administrative effort drops significantly

    More importantly, teams gain confidence to:

    • Introduce new applications faster
    • Standardise environments
    • Scale without increasing complexity

    How Habit #3 builds on Habits #1 and #2

    Habit #3 only works because the earlier habits are already in place:

    • Habit #1 stabilises the image
    • Habit #2 stabilises the host lifecycle

    With those foundations:

    • Applications can be delivered independently
    • Updates don’t force image rebuilds
    • Failures are isolated and recoverable

    Each habit compounds the value of the last.


    Final thoughts

    Highly effective Nerdio admins don’t let applications drive infrastructure design.

    They:

    • Decouple applications from images
    • Centralise delivery
    • Assign applications by intent
    • Automate updates predictably

    This is how AVD environments remain flexible without becoming fragile.


    This article is part of an ongoing series exploring the 7 Habits of Highly Effective Nerdio Admins. Upcoming deep-dives will cover autoscale optimisation, right-sizing, and cost visibility.

  • Goodbye Hidden Single Points of Failure: AVD Regional Host Pools Explained

    Goodbye Hidden Single Points of Failure: AVD Regional Host Pools Explained

    What would you do if Azure went down in your region today?
    Not a total global outage — but a partial, messy one where your VMs are healthy, storage is fine, yet users still can’t connect.

    This scenario is why Microsoft has introduced Regional Host Pools for Azure Virtual Desktop, now available in public preview.

    This is not about making your session hosts multi-region.
    It is about removing a long-standing single point of failure in the AVD control plane.

    Let’s break down what’s changed, why it matters, and how to start using it.


    Azure resilience isn’t one thing — it’s layered

    Microsoft Azure resilience works across multiple layers:

    • Global geographies
    • Regions
    • Availability zones
    • Datacentres

    Some services (like Azure DNS or Front Door) are fully global.
    Others — virtual machines and storage — are tied to a region.

    AVD has always sat somewhere in between.

    • The control plane (metadata, brokering, app groups, workspaces) is globally distributed
    • But metadata databases were shared at a geography level

    That meant a database issue in one region could affect host pools in entirely different regions.

    Regional Host Pools are Microsoft’s fix for that architectural risk.


    What are Regional Host Pools?

    Historically, all AVD host pools used a geographical deployment model, where metadata was stored in a shared database for an entire Azure geography.

    With Regional Host Pools:

    • Each supported Azure region gets its own AVD metadata database
    • Metadata is still:
      • Replicated across availability zones
      • Replicated to a paired region for disaster recovery
    • But cross-region dependencies are removed

    The result:

    • Outages are isolated to a single region
    • The AVD control plane becomes significantly more resilient
    • You gain explicit control over where metadata lives

    This is especially important for:

    • Regulated industries
    • Public sector
    • Customers with strict data sovereignty requirements

    What actually changes when you deploy one?

    Functionally? Almost nothing.

    Architecturally? A lot.

    The only visible difference during deployment is a new field:

    Deployment Scope

    • Geographical (legacy)
    • Regional (new)

    Everything else — host pool type, validation environment, assignment type — stays the same.

    ⚠️ This does not:

    • Make session hosts multi-region
    • Replicate FSLogix profiles
    • Replace Azure Site Recovery

    It only hardens the AVD control plane.


    Public preview details (important)

    During preview:

    • Supported regions:
      • East US 2
      • Central US
    • Metadata is replicated between those paired regions
    • More regions will be added gradually as the service approaches GA

    Unsupported features (for now):

    • Session host configuration & updates
    • Dynamic autoscaling
    • Private Link
    • App Attach (still geographical only)
    • Log Analytics errors & checkpoints for regional hosts

    These will hopefully be fix by the time this feature goes GA.


    Enabling the preview

    Azure Portal

    1. Go to Subscriptions
    2. Select your subscription
    3. Settings → Preview features
    4. Register: AVD Regional Resources Public Preview

    PowerShell

    Register-AzProviderFeature `
    -ProviderNamespace Microsoft.DesktopVirtualization `
    -FeatureName AVDRegionalResourcesPublicPreview

    If you’re deploying via PowerShell, you’ll also need:

    • Az.DesktopVirtualization 5.4.5-preview
    • The -DeploymentScope Regional parameter

    Can you convert existing host pools?

    Not yet.

    Currently, you have three options:

    • Wait for Microsoft’s upcoming migration tooling
    • Create a new regional host pool, then:
      • Generate a new registration token
      • Reinstall the AVD agent
      • Move hosts across
    • Use this in testing and labs only (the safest option during preview)

    Also note:

    • Regional objects cannot be linked to geographical ones
    • Host pools, app groups, and workspaces must all share the same deployment scope

    Why this really matters

    Microsoft has been very clear:

    Regional host pools are the future of Azure Virtual Desktop.

    At some point:

    • Creating geographical host pools will be blocked
    • Geographical infrastructure will be retired
    • Regional will be the default — and the expectation

    This change:

    • Removes a hidden single point of failure
    • Improves outage isolation
    • Gives customers real control over metadata placement

    It’s one of the most meaningful architectural improvements AVD has had in years.


    Final thoughts

    If you’re running production workloads today:

    • Start planning your transition
    • Track feature parity as preview limitations close
    • Begin using regional host pools for new environments

    This isn’t a flashy feature — but it’s a foundational one.
    And those are usually the changes that matter most.