
If you want a stable, cost-efficient Azure Virtual Desktop environment, everything starts with the desktop image.
Before auto-scale tuning, before patch automation, before application strategy — the quality and consistency of your image determines how effective everything else can be.
In almost every inefficient AVD environment I’ve reviewed, image management is either:
- Manual
- Inconsistent
- Poorly documented
- Or all three
Highly effective admins treat image management as a repeatable, automated process, not a one-off task. This is where real operational and cost gains begin.
Why desktop image management is foundational
Your desktop image influences:
- How quickly can new session hosts be deployed
- How predictable the user experience is
- How easy it is to troubleshoot incidents
- How confidently can we automate later stages
If image management is inconsistent, every downstream optimisation becomes harder and more expensive.
The common anti-patterns
In less mature AVD environments, image management often looks like this:
- Images built manually in the Azure portal
- Multiple “golden images” with no clear owner
- No versioning or rollback strategy
- Apps are baked in inconsistently
- No naming or governance standards
These patterns increase:
- Operational risk
- Engineering effort
- Time to recover from issues
How highly effective admins manage images
Highly effective admins standardise and automate image management using Nerdio Manager for Enterprise as the control plane.
Their approach focuses on consistency, governance, and repeatability.
1. Create images directly in Nerdio
Images are created and managed inside Nerdio rather than manually in Azure.
This provides:
- A guided, repeatable workflow
- Built-in automation for image creation and sealing
- Clear visibility into image state and lifecycle
The goal is not speed — it is consistency.
Understanding how Nerdio captures images (and why it matters)
It’s worth briefly explaining how image capture works in Nerdio, as this directly impacts where applications, automations, and OS changes should be applied — and it’s one of the most common areas of confusion I see with customers.
When you create a desktop image in Nerdio, the process starts by creating a source image VM.
At this point, you have two paths.
Option 1: “Do not create image object” (recommended)
If you select Do not create image object during image creation, Nerdio will:
- Create the source image VM
- Stop the workflow at that point
No image object is captured yet.
This is useful when you want to:
- Install applications
- Run automations or scripted actions
- Apply OS or security configuration
…directly on the source VM before capturing the image.
This approach ensures the source VM is always:
- Fully up to date
- Free of security vulnerabilities
- Aligned with what admins expect to see when they later edit the image
Because of this, this is the approach I generally recommend.
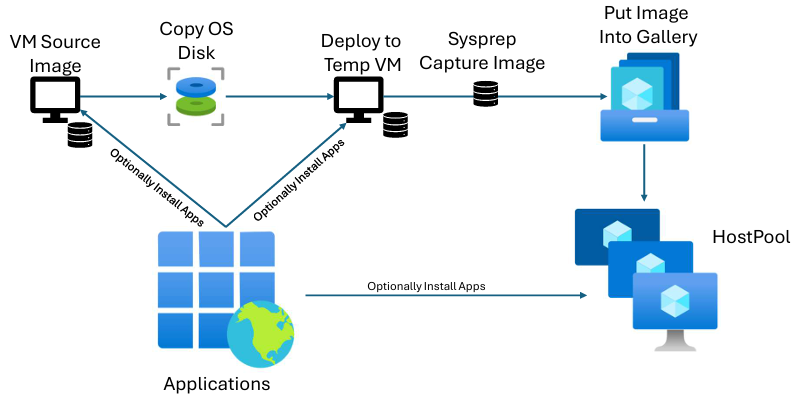
Option 2: Automatic image capture via a temporary VM
If you don’t select this option, Nerdio will:
- Take a copy of the source VM’s OS disk
- Create a temporary VM from that disk
- Run any configured automations or application deployments on the temp VM
- Sysprep the temp VM
- Capture the final image object
The key thing to understand here is:
Any configurations applied during image creation are applied only to the temporary VM, not the source VM.
This distinction is subtle but important — and it’s the single biggest cause of confusion I see when customers later expect to find changes on the source image VM.
Why this matters operationally
If admins later:
- Edit the source image VM
- Expect applications or settings to be present
- Or assume the source VM reflects the deployed image
They can be caught out if those changes were applied only to the temp VM.
For that reason, keeping the source image VM as the authoritative, up-to-date representation of the image avoids ambiguity and reduces operational risk.
Common image creation pitfalls to be aware of
Trusted Launch and BitLocker
Trusted Launch is a great security feature and one I generally recommend — but it’s important to understand its side effects.
- Enabling Trusted Launch automatically enables BitLocker
- If BitLocker is enabled when Sysprep runs, image capture will fail
To avoid this:
- Either disable BitLocker before capturing the image
- Or select Trusted Launch supported instead of Trusted Launch
The Trusted Launch supported option keeps the image compatible with Trusted Launch host pools without enabling BitLocker on the image VM.
Marketplace images and BitLocker (Windows 11 / 25H2)
When building a desktop image from newer marketplace images (such as Windows 11 25H2), BitLocker is enabled by default.
Before capturing an image, you must:
- Explicitly disable BitLocker on the source VM
Why does BitLocker sometimes re-enable itself
I’ve also seen cases where:
- BitLocker is disabled on the source VM
- An image is captured successfully
- Session hosts are deployed
- BitLocker later re-enables automatically
If this behaviour is not desired, you can prevent it by setting the following registry value on the image:
HKEY_LOCAL_MACHINE\SYSTEM\CurrentControlSet\Control\BitLockerPreventDeviceEncryption
This ensures BitLocker does not automatically re-enable on newly deployed hosts.
2. Maintain a single source-of-truth image per workload
Once image creation is standardised, the next critical step is controlling image sprawl.
Highly effective admins deliberately limit the number of desktop images they manage. Rather than creating bespoke images for every host pool or team, they define a single source-of-truth image per workload.
Examples might include:
- A core Office/knowledge worker image
- A Power BI or data analyst image
- A developer tooling image
Each image has a clear purpose, a defined owner, and a documented scope.
Why image sprawl is so expensive
In environments where image governance is weak, I often see:
- Slightly different images per host pool
- “Temporary” images that become permanent
- Multiple images solving the same problem in different ways
This quickly leads to:
- More patching effort
- More testing effort
- Inconsistent user experience
- Longer incident resolution times
Every additional image increases operational cost — even if Azure spend looks unchanged.
What “source of truth” actually means
A source-of-truth image is:
- The authoritative image for a workload
- Used consistently across environments
- Updated intentionally, not ad hoc
When something breaks in production, admins can immediately ask:
“Did this come from the image — or somewhere else?”
That clarity is invaluable during incidents and change reviews.
Shared images across environments
Highly effective admins use the same image version across:
- Test
- Validation
- Production
- (Where appropriate) DR
This does not mean skipping testing. It means:
- Test the image once
- Promote the same version forward
This dramatically reduces:
- Duplicate testing
- Configuration drift
- Environment-specific surprises
Avoiding the ‘one image per host pool’ trap
A common misconception is that:
“Each host pool needs its own image.”
In reality, most differences between host pools can be handled through:
- Application delivery mechanisms
- Configuration at host creation
- User or group targeting
Keeping the image itself generic and workload-focused preserves flexibility while keeping maintenance overhead low.
Operational benefits
Maintaining a single source-of-truth image per workload:
- Simplifies troubleshooting
- Reduces admin effort
- Improves predictability
- Makes audits and reviews easier
More importantly, it ensures image management scales with the business, not against it.
Where this fits in the bigger picture
Without this discipline:
- Patch automation becomes risky
- Reimaging becomes inconsistent
- Autoscale amplifies mistakes faster
With it:
- Every downstream automation becomes safer and easier to reason about
This is why source-of-truth images are a core maturity marker in well-run AVD environments using Nerdio Manager for Enterprise.
3. Keep desktop images intentionally minimal
One of the biggest differentiators between mature and immature AVD environments is what gets baked into the image.
Highly effective admins design desktop images to be intentionally minimal. The goal is not to create a “fully loaded” desktop, but a stable, predictable foundation that can be reused everywhere.
What belongs in the image
A well-designed image typically includes:
- Core OS configuration
- Required runtimes and frameworks (e.g., VC++ redistributables, .NET)
- Baseline security and system settings
These are components that:
- Change infrequently
- Are required for almost every user
- Would cause instability or performance issues if missing
What does not belong in the image
Equally important is what you intentionally exclude.
Highly effective admins avoid baking in:
- Frequently updated applications
- Department-specific tools
- User-driven or role-specific software
- Anything that requires frequent testing
Including these increases:
- Image rebuild frequency
- Testing effort
- Risk of regressions
And, over time, image management becomes a bottleneck rather than an enabler.
Why “fatter” images create operational drag
Images that try to do everything tend to:
- Take longer to build and validate
- Break more often
- Require more rollbacks
- Slow down troubleshooting
When something goes wrong, it becomes much harder to determine:
“Is this an app issue, or an image issue?”
Minimal images dramatically reduce that ambiguity.
Design images to change slowly
A good rule of thumb is:
If something changes weekly, it probably doesn’t belong in the image.
Highly effective admins treat the image as:
- A stable baseline
- Updated deliberately
- Changed only when there is a strong justification
This allows image updates to be:
- Planned
- Tested
- Communicated clearly
Minimal images enable flexibility later
Keeping images lean gives you more options downstream:
- Applications can be layered or targeted
- Different user groups can share the same image
- Host pools remain flexible without image duplication
This is what allows a single source-of-truth image to support multiple use cases without compromise.
The operational payoff
Minimal images result in:
- Faster image build times
- Easier validation
- Lower maintenance overhead
- Fewer production incidents
Over time, this translates directly into:
- Lower operational cost
- Higher platform confidence
- Easier scale
Why this matters before moving on
If images are overloaded:
- Patching becomes risky
- Reimaging becomes disruptive
- Automation amplifies mistakes
Minimal images are what make safe automation possible, which is why this step is a prerequisite for everything that follows.
4. Version images deliberately and manage them through Azure Compute Gallery
Once images are standardised, minimal, and controlled, the next maturity step is treating them as versioned assets rather than mutable objects.
Highly effective admins never modify images in place. Every meaningful change results in a new image version, managed and stored through Azure Compute Gallery (ACG).
Why in-place image changes are risky
Without proper versioning, image changes tend to:
- Overwrite working configurations
- Remove rollback options
- Obscure the root cause of issues
When something breaks, the question becomes:
“What changed — and when?”
If you can’t answer that confidently, versioning isn’t being used effectively.
What good image versioning looks like
Effective image versioning has a few consistent traits:
- Each image change produces a new version
- Versions are immutable once created
- There is a clear promotion path (test → prod)
- Old versions are retained only as long as they add value
This creates:
- Predictable change management
- Safer deployments
- Faster incident resolution
Why Azure Compute Gallery matters
Storing images in Azure Compute Gallery adds governance that manual image management simply can’t provide.
It enables:
- Native image versioning
- Controlled replication
- Cross-region reuse if required
- Lifecycle management of old versions
- Trusted Launch and Confidential VM support
For organisations with multiple regions or DR requirements, this becomes essential rather than optional.
Controlling image sprawl with retention policies
Highly effective admins don’t keep every image version forever.
They:
- Retain a defined number of previous versions
- Automatically clean up older images
- Keep enough history for rollback without creating clutter
This avoids:
- Unmanaged image growth
- Confusion during deployments
- Unnecessary storage overhead
Versioning without retention is just delayed sprawl.
Operational clarity during incidents
When images are versioned and centrally managed, incident response becomes much simpler.
Admins can immediately identify:
- Which image version is in use
- When it was introduced
- What changed compared to the previous version
This shortens:
- Mean time to identify issues
- Mean time to recover
- Overall impact on users
Why does this enable everything that follows
Image versioning is what makes:
- Patch automation safe
- Scheduled reimaging predictable
- Autoscale reliable
- Rollbacks low-risk
Without it, automation amplifies uncertainty. With it, automation becomes controlled and reversible.
The maturity signal
If you want a quick indicator of image maturity, ask:
Can we roll back our desktop image confidently and quickly?
If the answer is yes, versioning is working. If not, it isn’t.
5. Apply clear naming standards and lightweight image governance
By the time image creation, scope, minimalism, and versioning are in place, the final step is often the most overlooked — making images easy to understand and safe to operate.
Highly effective admins apply simple, consistent naming standards and lightweight governance to prevent mistakes before they happen.
Why naming matters more than it seems
In environments without naming standards, images quickly become:
- Hard to distinguish
- Easy to misuse
- Risky during changes or incidents
Admins end up asking:
“Is this the current image?” “Is this safe to deploy?” “What does this image actually contain?”
Those questions cost time — and time costs money.
What good image naming looks like
Effective naming conventions are:
- Predictable
- Descriptive
- Human-readable
A common and effective pattern is:
OS | Workload | Image Version | Build Date
For example:
Win11 | Office | v1.3 | 2025-01
From the name alone, anyone should be able to tell:
- What OS is it based on
- Who it’s intended for
- Whether it’s current or obsolete
Clearly distinguish active vs deprecated images
Highly effective admins make it obvious which images:
- Are approved for deployment
- Are retained for rollback only
- Should no longer be used
This can be achieved through:
- Naming conventions
- Descriptions or tags
- Controlled access – stage image as inactive
Ambiguity is one of the most common causes of accidental misconfiguration.
Keep governance intentionally lightweight
Image governance does not need to be heavy or bureaucratic.
In practice, it usually means:
- Defined ownership of each image
- Clear promotion criteria (e.g., tested, approved)
- Agreement on when images are retired
The goal is not process for its own sake — it’s operational safety.
Why this matters at scale
As environments grow:
- More admins get involved
- Changes happen more frequently
- The cost of mistakes increases
Clear naming and governance:
- Reduce human error
- Speed up troubleshooting
- Make handovers and audits easier
It’s one of the highest ROI habits you can adopt.
The final maturity check
A simple test:
Could a new admin confidently select the correct image without asking for help?
If the answer is yes, governance is working.
The cost optimisation impact
Standardised image management:
- Reduces build and provisioning time
- Lowers troubleshooting effort
- Prevents configuration drift
- Enables every downstream automation to work reliably
While image management alone won’t cut your Azure bill in half, it enables every other optimisation habit to work properly.
Final thoughts
If your image process is manual or inconsistent, no amount of auto-scale tuning will fully compensate for it.
Highly effective Nerdio admins:
- Standardise and automate image creation
- Govern image usage
- Version everything
- Let automation do the heavy lifting
- Treat images as managed assets
This is the foundation that makes all other AVD cost and performance optimisations possible.
Once image management is under control, you can safely move on to automating patching and host lifecycle, which is where Habit #2 begins.
This article is part of an ongoing series expanding on the 7 Habits of Highly Effective Nerdio Admins. Deep-dives into each habit will follow, with practical guidance you can apply directly to your environments.

Leave a comment