Category: Nerdio Manager for Enterprise

  • Nerdio Global Pools: From a Fixed Split to a Deliberate One

    Nerdio Global Pools: From a Fixed Split to a Deliberate One

    If you manage Azure Virtual Desktop at any real scale, you already know the uncomfortable truth about host pools: they don’t know who your users are. A host pool has capacity, a region, and a desktop image. It doesn’t have an opinion about whether the person connecting to it is in Manchester or Mumbai, whether they need the finance app set or the sales one, or whether the pool next door has spare capacity and this one doesn’t.

    For years the answer to “how do I place users properly across a large AVD estate” has been: manually, pool by pool, in a spreadsheet somewhere. Nerdio’s new Global Pools feature, currently in Public Preview for AVD Premium, is the first serious attempt to turn that into policy instead of a project. The preview lays the foundation of an MVP feature that has huge potential for how you manage your host pools.

    The feature you’re probably already running: Host Pool Business Continuity

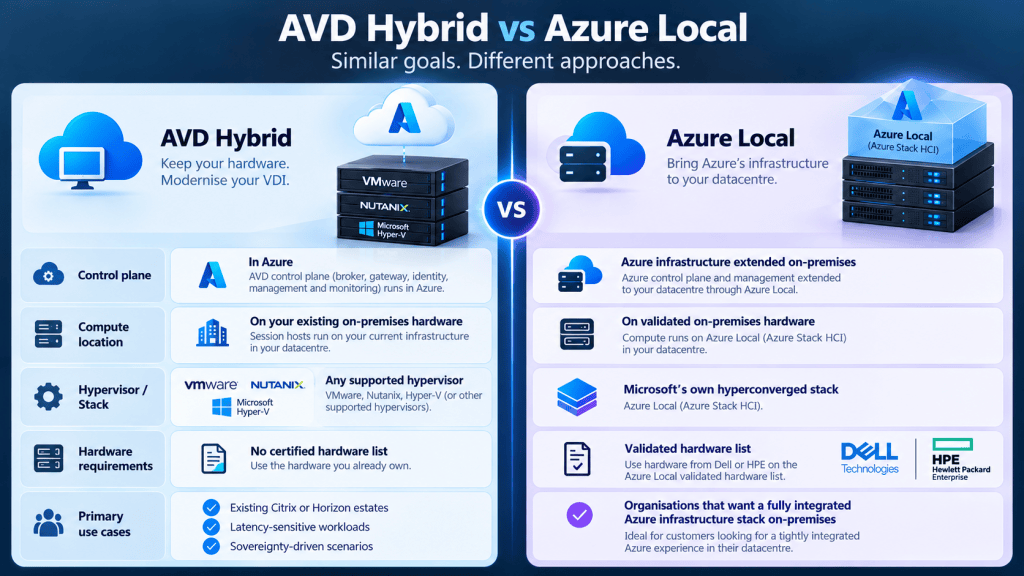
    Before Global Pools, there’s a feature most Premium customers already have switched on (or should): Host Pool Business Continuity Multi-Region Setup. It’s worth starting here, because it’s the feature Global Pools is quietly built to go beyond.

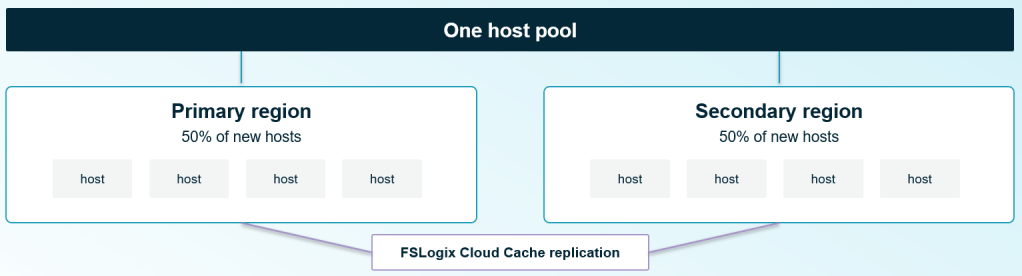
    It splits new VMs across a primary and secondary Azure region, evenly, and replicates FSLogix profiles between them using Cloud Cache. If a region goes down, users land in the surviving one. It’s a genuinely useful safety net, and it’s available today at host pool level.

    The catch is in that word “evenly.” The split is fixed at 50/50. There’s no weighting, and no way to choose which users go where. A user in Manchester has as much chance of landing in your secondary US region as a user based there already. The feature was built to survive a region failing, and it does that well, but it was never built to place people deliberately. It doesn’t know who the user is, or where they are; it just needs somewhere for them to land.

    That gap is exactly where Global Pools starts.

    What Global Pools actually is

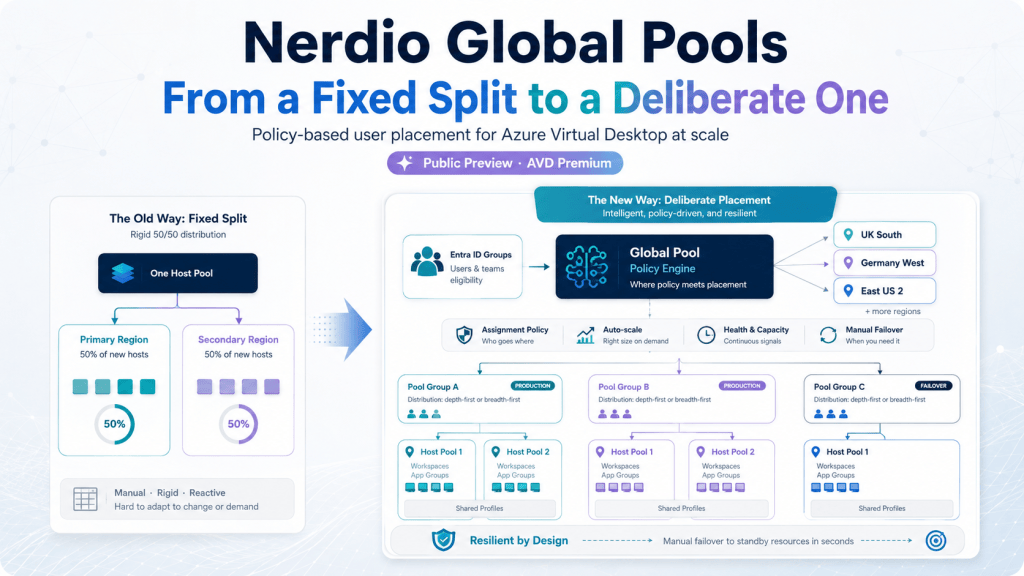
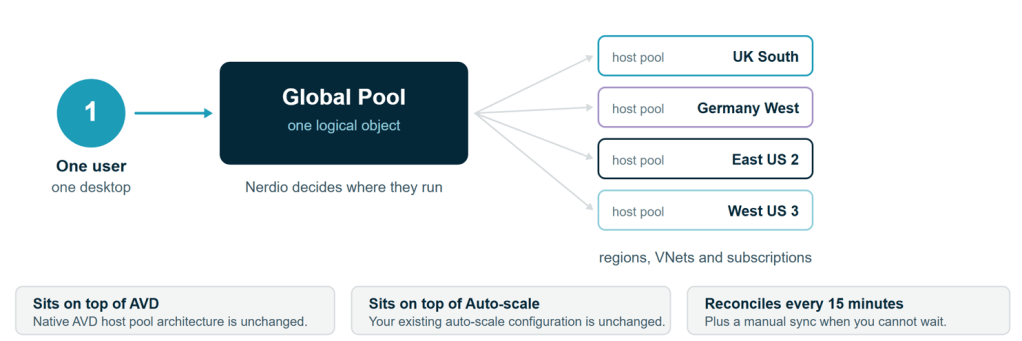
    Nerdio’s own description, from the published KB article: Global Pools let administrators group multiple AVD host pools under shared assignment and failover policies, so users are automatically routed to the right host pool instead of being managed one pool at a time.

    The important architectural point is what it doesn’t touch. Global Pools sits on top of native AVD host pool logic and on top of Nerdio’s own Auto-scale engine. Global Pools is a placement and policy layer, not a new kind of host pool.

    Two things worth knowing before you go looking for it: it’s currently Public Preview, and it’s Premium edition only.

    How it works, in practice

    Strip away the marketing and the mechanics are fairly plain:

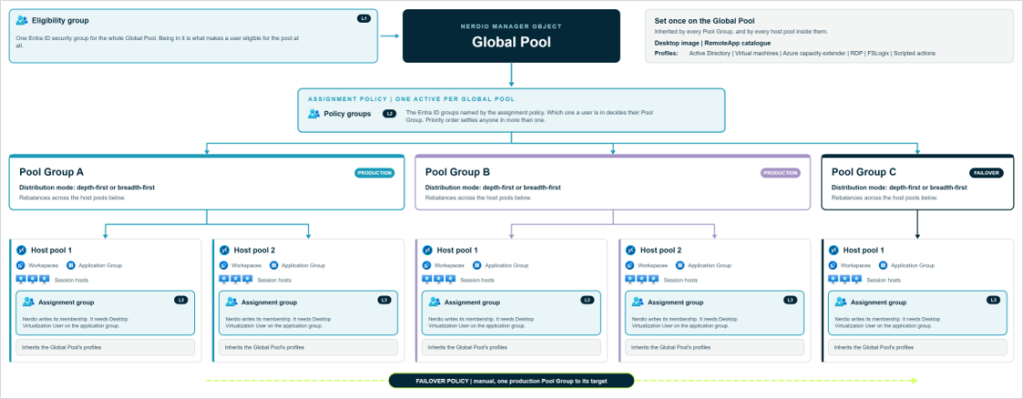
    • Assignment is driven by Entra ID group membership. You define policies that route members of specific Entra groups to specific Pool Groups (more on those in a second), with a configurable priority order for anyone who happens to sit in more than one group.
    • Pool Groups bundle one or more host pools together under a shared distribution mode (depth-first or breadth-first), and Nerdio automatically rebalances users across the host pools inside a Pool Group as capacity changes.
    • Sync runs every 15 minutes, automatically, with a manual sync button for when you don’t want to wait.
    • Auto-scale sizing can be percentage-based as well as the traditional fixed host count, useful if you want capacity to track the size of the pool rather than a hard number.
    • Failover policies redirect users from one Pool Group to another for planned maintenance or an outage. In the current release this is a manual cutover: an admin triggers it, it doesn’t happen on its own yet.
    • RemoteApps and the desktop image are defined once per Global Pool, not per Pool Group. The nice touch: you can build the RemoteApp catalogue as a placeholder before any host pool exists in the Global Pool at all. Native AVD doesn’t let you do that.

    None of that requires touching an API, incidentally, because there isn’t one yet. Everything is configured through the Nerdio Manager UI, and you’ll need the Nerdio Admin role to do it.

    Where this is meant to fit

    Nerdio names three scenarios for Global Pools, and they’re a reasonably honest description of who actually needs this:

    1. Large AVD deployments with enough host pools that manual per-pool assignment has stopped scaling.
    2. Failover between Pool Groups during planned maintenance or an outage.
    3. Organisations running multiple identity tenants who want one unified assignment model.

    What it doesn’t do yet

    Nerdio is upfront that this is Public Preview, and the documented gaps back that up:

    • Single-session desktops aren’t supported. If you’re running personal (1:1) host pools, Global Pools isn’t for them yet.
    • No import of existing host pools. Every host pool in a Pool Group has to be created fresh, one at a time, with its workspace and application group deployed manually. If you’re picturing dragging your current 200 host pools into a Global Pool this weekend, that’s not available yet.
    • Assignment is Entra group matching only. No percentage-based or attribute-based assignment, so you can’t yet say “60% of this group goes here, 40% goes there.” (Percentage-based auto-scale sizing is a separate feature and is available; don’t let the two get confused, because it’s an easy mix-up.)
    • Only core host pool profiles are supported inside a Global Pool: Active Directory, VM, and RDP/FSLogix. If your host pool profile relies on something outside that set, it’s not covered yet.
    • No public API yet. Everything is configured by hand in the Nerdio Manager UI.
    • Limited in-UI guardrails. Configuration issues like overlapping failover group membership aren’t flagged for you, so review your policy setup carefully before switching it on.

    None of that is a criticism. It’s a Preview feature, and Nerdio is treating it as one, which is the right call given how much is still moving underneath it.

    What to actually do about it

    If you’re running a handful of host pools, Global Pools probably isn’t solving a problem you have yet. If you’re managing dozens or hundreds across multiple regions, the shape of what Nerdio is building is worth understanding now, even before it’s something you’d put into production.

    Two practical steps:

    First, if you’re not already on it, check Azure Capacity Extender. It’s a separate, established Premium feature that lets you define fallback VM sizes when your preferred size runs out of capacity in a region. I’ve walked more than one customer through exactly that scenario this year, and it costs nothing unless it’s invoked, yet in a lot of estates it’s sitting there switched off. It solves a narrower problem than Global Pools (keeping a host pool running, not placing users across pools) but it’s available today and worth auditing regardless of where you land on Global Pools.

    Second, if you’re running enough host pools that manual assignment has become a real operational cost, get onto the Public Preview and give Nerdio feedback. The honest ask at this stage is “come and tell us what you need it to do,” not “go and build your architecture around this.” Preview features get shaped by the people willing to poke at them early. The gap between “staggered image rollout is listed as a scenario” and “staggered image rollout actually works” is exactly the kind of thing that gets closed faster when real admins are testing against real estates.

    Global Pools is trying to solve a problem that’s been genuinely unsolved in AVD: making user placement a policy decision instead of a spreadsheet. It’s not there yet. But the direction is right, and for anyone running AVD at real scale, it’s worth watching closely rather than waiting for the GA announcement to start paying attention.

    Found this useful? I’d be glad to hear how you’re thinking about host pool placement at scale. Drop a comment, or find me at the next Nerdio event.

  • FSLogix: What Belongs in a Profile, What Doesn’t, and How to Keep It That Way

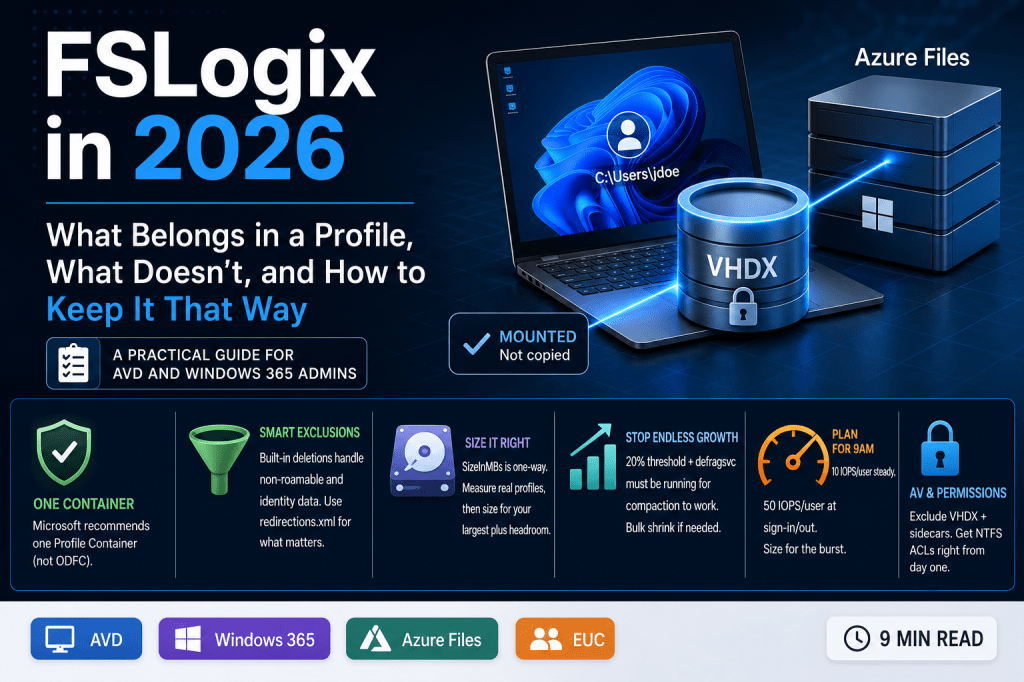
    FSLogix: What Belongs in a Profile, What Doesn’t, and How to Keep It That Way

    Four questions come up in nearly every FSLogix health check I run. What should be in the profile. What shouldn’t. How big it needs to be. And why it keeps growing even after someone swears they turned on cleanup.

    This week I’ve gone through the first three on LinkedIn: the beliefs that quietly cost money, what actually happens at logon, and the config I’d set before a single user signs in. This post is everything in one place, with the registry paths, so you can check your own environment against it rather than take my word for it.

    What FSLogix actually does

    Skip this if you already know it, but it’s worth thirty seconds because it explains almost everything downstream.

    FSLogix doesn’t copy a profile to the session host the way old-style roaming profiles did. It mounts a VHD or VHDX file from a network share and attaches it at the file system level using a kernel driver. Windows sees C:\Users\<username> and has no idea it’s actually a disk sitting on Azure Files or a file server somewhere else. No copy at logon, no copy at logoff. That’s why it’s fast, and it’s also why almost every strange failure traces back to that mounted disk: what’s inside it, how big it’s allowed to get, and whether the network path stays up for the whole session.

    What belongs in the container, and what doesn’t

    Microsoft’s own guidance has settled on a single answer here: use one Profile Container that holds everything, rather than splitting profile data from Office data into a separate ODFC container. ODFC exists for organisations already running a different profile solution and using FSLogix only for Office data. If that’s not your situation, one container is simpler, and it’s what Microsoft recommends.

    Inside that container, two things get handled for you automatically, and it’s worth knowing about them rather than assuming they don’t exist.

    Deletion-based exclusions. Non-roamable app data (MSIX package cache, temp state) gets stripped out at logoff so it never bloats the container. More importantly, identity data tied to the device itself — Entra broker tokens, TokenBroker, OneAuth, the AAD registry keys — is excluded by design. There’s a setting called RoamIdentity that looks like it would fix Entra sign-in quirks by roaming that data instead. Don’t touch it. Microsoft is explicit: never enable RoamIdentity on an Entra-joined or Intune-managed device. It ties identity to the wrong thing, and you’ll get worse authentication problems than whatever you were trying to fix.

    Custom exclusions via redirections.xml. If you need to exclude something Microsoft doesn’t already handle, this is the mechanism — an XML file, deployed centrally via RedirXMLSourceFolder, that lists paths to exclude or redirect. Microsoft’s own warning on this page is worth repeating verbatim: profile data isn’t designed to be removed, and unless you understand the application well, don’t exclude it. Every well-known FSLogix teardown agrees on the same short list worth actually redirecting: browser cache, the Outlook OST, OneDrive’s sync cache, and Teams. Beyond that, keep the file short. Every redirection is I/O overhead multiplied by every signed-in user.

    Two of Microsoft’s own defaults are worth knowing precisely because they surprise people. IncludeTeams in ODFC settings defaults to 0 — Teams data isn’t redirected unless you turn it on, and for the current MSIX-based Teams client you need this set for the app to even register correctly at sign-in. And RoamSearch, the setting that roams the Windows Search index inside the container, is something Microsoft now says isn’t needed on Windows Server 2019 (1809+), Windows 10, or Windows 11 multi-session. It solved a real problem years ago. On a modern image, it mostly adds I/O.

    Sizing that actually works

    SizeInMBs defaults to 30,000, roughly 30 GB, and it’s a one-way setting. Raise it and every existing container expands to match on next logon. Lower it and nothing happens — it has zero effect on containers that already exist. The only way down is compaction or rebuilding the container from scratch.

    Keep IsDynamic at its default of 1. A dynamic VHDX starts small and grows as data is written; a fixed one allocates the full size immediately and can never be compacted. There’s no scenario where fixed is the better choice for a profile container.

    Thirty gigabytes is a reasonable starting point, not a number to trust blindly. A light knowledge worker with a small OST and everything else in OneDrive might genuinely need 10 to 15 GB. Someone with a large mailbox and local app data can eat 60 GB without anything unusual happening. Measure actual profile sizes on your existing share before you commit to a number, and size for the largest real profile you have plus headroom, not for a round figure that felt safe when the host pool was built.

    Why containers grow and never shrink on their own

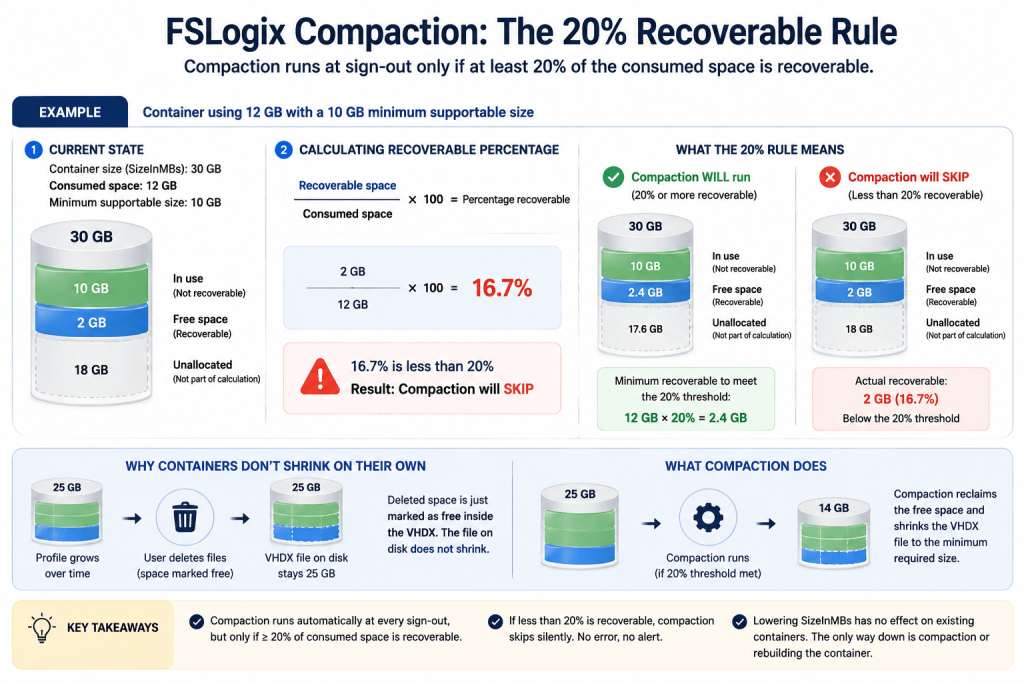
    This is the one that catches people out months after go-live. When a user deletes files inside their profile, FSLogix marks the space as free inside the VHDX. The file on the share stays exactly the same size. Nothing shrinks by itself. A profile that briefly ballooned to 25 GB during a big OneDrive sync stays at 25 GB on disk forever, even after the sync settles down.

    Built-in compaction exists to fix this and runs automatically at every sign-out, but it has two conditions that quietly stop it working, and neither produces an error when they do.

    First, it only runs if at least 20% of the consumed space is recoverable. A container using 12 GB with a 10 GB minimum supportable size has 2 GB recoverable, which is under the 2.4 GB threshold — so compaction skips it silently every time, and the profile never gets smaller.

    Second, compaction depends on the Windows Optimize Drives service, defragsvc. If that service is set to Disabled anywhere in your image, which is common in hardened builds, FSLogix can’t query the minimum supportable size, and compaction doesn’t run at all. No error, no log entry that jumps out. It just quietly does nothing every single sign-out.

    If you’re maintaining an older estate where containers have already ballooned past what per-sign-out compaction can claw back, both the community Invoke-FslShrinkDisk script and Nerdio Manager’s built-in “Shrink FSLogix Profiles” scripted action exist to do a bulk pass offline. Worth knowing the community script sits in the FSLogix GitHub organisation and isn’t a Microsoft-supported product feature — test it before you trust it against production data.

    One more setting worth turning on while you’re in there: CleanupInvalidSessions, which ships disabled. It has FSLogix clean up stale artefacts left behind by sessions that ended abruptly rather than signing out cleanly, and it’s a small thing that prevents a class of “why won’t this profile attach” tickets later.

    Storage, and the 9am problem

    Microsoft’s IOPS guidance for FSLogix is specific: budget 10 IOPS per user at steady state, and 50 IOPS per user during sign-in or sign-out. For 100 users, that’s roughly 1,000 IOPS most of the day and a burst toward 5,000 IOPS in the window everyone arrives at once. Size for the burst, not the average, or the first twenty minutes of every morning will be the worst part of your users’ day.

    On tier, Microsoft’s own workload table draws the line at 200 users for the “Light” category: under 200 light users, Azure Files Standard can work. Above that, or for anything heavier than light, Premium is the recommendation regardless of headcount. Standard is priced on transactions as well as capacity, which makes its performance genuinely variable under load — not what you want for something every user depends on to log in.

    The failure modes worth knowing before they bite

    Wrong FSLogix permissions are, by most practitioner accounts I trust, the single biggest generator of AVD support tickets. Get the NTFS ACLs on the share root right from day one: modify for the user group, full control for admins, and Creator Owner set to modify on subfolders and files only so each user’s own container inherits correctly. Exclude admin accounts from FSLogix profiles entirely — if something goes wrong, you want an unencumbered way in to fix it.

    Antivirus exclusions are the other classic. It’s not just the VHD or VHDX file itself. The small sidecar files sitting next to it on the share — .VHD.lock, .VHD.meta, .VHD.metadata and their VHDX equivalents — need the same exclusion, or AV locking them produces the exact same sharing violations and temp profiles as locking the disk file. A logon storm with twenty users all having their containers scanned at once is a fast way to bring a host to its knees.

    Two authentication issues are worth knowing about specifically because they’re recent and easy to miss. Microsoft’s Kerberos hardening, moving domain controllers to require AES-SHA1 instead of RC4 for objects with no encryption type explicitly set, took effect with the April 2026 cumulative update, and the audit-mode rollback that let you defer it was removed at the end of July. If your profiles sit on an on-premises SMB share, or on Azure Files using AD DS authentication, and anything in that chain is still RC4 or has no encryption type set, it breaks. Entra Kerberos authentication isn’t affected by this particular change.

    Entra Kerberos has its own separate limitation worth planning around if you’re cloud-native: the ticket that authorises access to Azure Files lasts about 10 hours, and Entra ID currently can’t renew it. Cross that mark in a single session and the container drops, usually with a bad username or password error that has nothing to do with the actual password. Microsoft’s documented fix is cloud trust, issuing tickets from AD DS instead — which isn’t an option if you’re genuinely Entra-only. If that’s your situation and you have users on long shifts, budget time to look at a scheduled ticket refresh as a workaround.

    Cloud Cache: when it earns the extra complexity

    Cloud Cache sits on top of the profile container and changes where the writes go. Instead of writing straight to the network share, it writes to a local cache on the session host first and syncs to one or more remote storage providers in the background. Microsoft positions it for multi-region deployments and for keeping users working through a storage outage — genuine high availability, not a substitute for backup and restore.

    It’s not free. It needs fast local storage for the cache, adds a few seconds to logon, and on non-persistent session hosts that get rebuilt regularly, the local cache is gone every time — meaning every logon rehydrates fully from remote storage anyway, which defeats the point. For a single-region deployment already sitting on Zone Redundant Azure Files Premium, the honest answer is usually that Cloud Cache adds complexity without adding much you didn’t already have.

    Where none of this applies

    Windows 365 Cloud PCs don’t use FSLogix profile containers, and this trips people up when they’ve spent years thinking in AVD terms. A Cloud PC is persistent and assigned 1:1 to one user. The profile lives on the Cloud PC itself between sessions, the same way it would on a physical laptop, so there’s nothing to roam.

    The same logic extends further than most people realise. AVD Personal host pools work the same way: one session host assigned persistently to one user. Microsoft’s own guidance on when a roamed profile is genuinely needed centres on pooled host pools, where a user might land on a different host every time they sign in — the scenario a persistent, dedicated assignment simply doesn’t create. I haven’t found a Microsoft page that states this as flatly as I’d like, so take it as my reading of how the mechanism works rather than a quoted policy: on a Personal host pool, FSLogix is there for convenience and portability, not because the architecture requires it the way a pooled deployment does.

    Doing this at scale

    Everything above is something you can configure by hand through Group Policy and the registry, and for a single host pool that’s entirely reasonable. Where it gets tedious is doing it consistently across a growing estate, and keeping it consistent as new host pools get added.

    Nerdio Manager applies FSLogix configuration as policy at the host pool level rather than per-image, and ships the offline compaction runbook mentioned above as a built-in scripted action rather than something you maintain yourself. If you’re already on NME, it’s worth checking those settings are actually being applied the way you think they are rather than assuming the defaults match what’s above.

    Where to start

    If you only do three things after reading this: check whether defragsvc is disabled anywhere in your image, add the sidecar file exclusions to your antivirus policy, and measure real profile sizes on your share before you next touch SizeInMBs. None of them take an afternoon, and each one is a support ticket you won’t get later.

  • Microsoft Just Packaged Azure Expertise into a Plugin. Here’s What It Means for AVD Admins.

    Microsoft Just Packaged Azure Expertise into a Plugin. Here’s What It Means for AVD Admins.

    Picture a normal AVD admin morning. A user can’t connect. You want to know which session host they’re on, whether that host is even healthy, how many other people are sharing it, and whether the host pool has spare capacity. None of that is hard. But answering it means a portal tab for the host pool, another for the session hosts, a PowerShell window for the session list, and possibly Cost Management in a fourth tab to check you’re not bleeding money on hosts nobody is using.

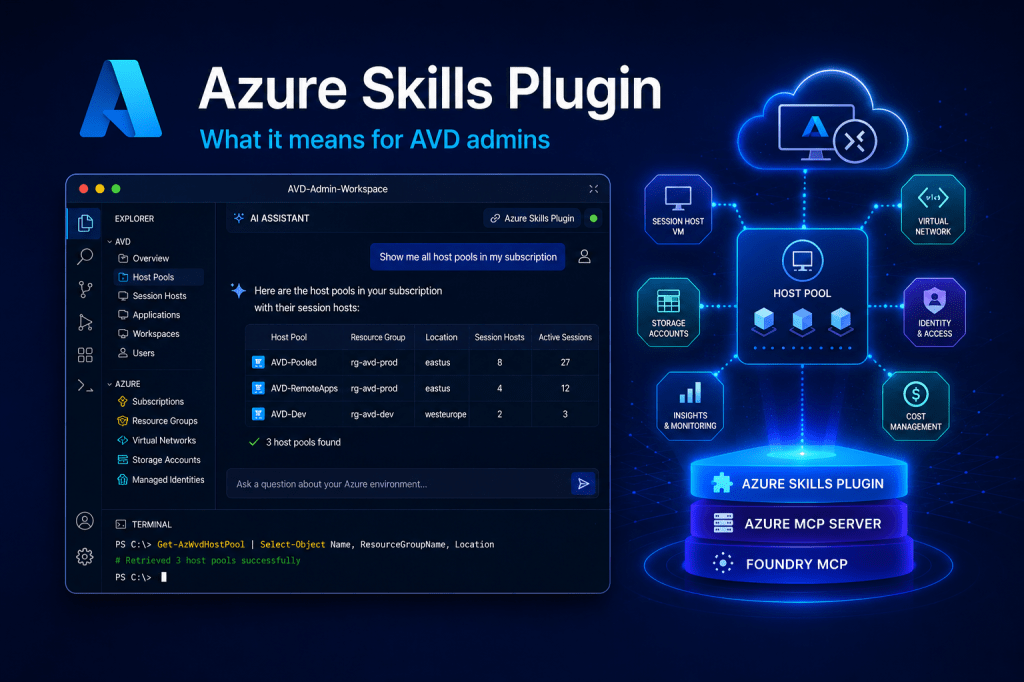
    Microsoft now has an answer to that, and it’s bigger than I expected. The Azure Skills Plugin, released in beta earlier this year and currently sitting at version 1.1.48, packages curated Azure expertise, the Azure MCP Server and the Foundry MCP server into a single install. You can drop it into Claude Code, GitHub Copilot, VS Code, the Copilot CLI or Cursor. One package, about a minute to install, and your AI agent suddenly knows how Azure work actually gets done.

    What the Azure Skills Plugin actually is

    Microsoft frames the launch this way: “Azure work is not just a code problem. It is a decision problem: which service fits this app, what needs to be validated before deployment, which tools should run, and what guardrails matter.”

    That’s a useful sentence, because it gets at what’s been missing. The Azure MCP Server, on its own, gives an agent the hands to operate Azure. 200+ tools across 40+ services, all callable through the Model Context Protocol. But hands without a brain produce confident nonsense. The agent can run a Resource Graph query, but it doesn’t know which query, or what to do with the result, or which guardrail you’d want checked first.

    The Azure Skills Plugin bundles three things into one install to fix that:

    • The skills layer. 19+ curated Azure skills covering build and deploy (azure-prepare, azure-validate, azure-deploy), troubleshoot and monitor (azure-diagnostics, azure-resource-lookup, azure-quotas), optimise (azure-cost, azure-compute, azure-resource-visualizer) and cross-domain work (azure-rbac, azure-storage, entra-app-registration). This is the expertise layer. Workflows Microsoft engineers actually use.
    • The Azure MCP Server. The 200+ tools that do the real work. The same server I’d previously have written about on its own.
    • The Foundry MCP server. Extra tools for Microsoft Foundry scenarios like model discovery and deployment. Less relevant for AVD work, but it’s in the box.

    Microsoft is explicit that this “is not a prompt pack. It is a packaged Azure capability layer”. The distinction matters. Prompt packs make an agent sound informed. This makes an agent actually competent at a set of Azure tasks, because the skills know what to check, in what order, and what tools to call.

    A note for anyone nervous about pointing this at production. Authentication is Entra ID, and every call runs in the context of the signed-in user, bound by Azure RBAC. The agent can’t do anything you couldn’t do yourself in the portal. If your account is read-only on a subscription, so is the agent.

    The part that matters for EUC

    The honest bit first: there is no dedicated AVD skill in the bundle today. The 19 curated skills are organised around general Azure work like cost, deployment and diagnostics, not the AVD lifecycle specifically. But the Azure MCP Server underneath does ship a dedicated Azure Virtual Desktop tool namespace, virtualdesktop, and it currently does three things, all of them about visibility:

    • List host pools in a subscription or resource group
    • List session hosts in a host pool
    • List user sessions on a specific session host

    So with the plugin installed you can type things like:

    “Show me all host pools in my subscription.”

    “List the session hosts in the production-hostpool host pool.”

    “What users are connected to session host avd-prod-04 in host pool production-pool?”

    You get a straight answer in the chat panel, with no portal navigation and no pausing to remember whether it’s Get-AzWvdSessionHost or Get-AzWvdUserSession this time.

    The AVD surface today is mostly a window onto your estate rather than a control panel for it. The agent can see everything: every host pool, every session host, who’s logged in where. It can also stop and start session hosts, since those are just virtual machines underneath. What it can’t do is the AVD lifecycle work you’d actually reach for, like draining a host before patching, signing out a stuck session, or scaling a pool up before Monday morning. None of that has shipped yet.

    That sounds like a limitation, and it is. But read-first is the right order. An AI agent with unattended write access to your session hosts is a genuinely bad failure mode, and “show me my estate accurately” is the capability you’d want to trust before any other.

    Where it gets useful: skills working together on your AVD estate

    The three AVD tools on their own are convenient. The reason the plugin format matters is what happens when the skills layer pulls those tools together with everything else.

    Take the questions you actually want answered about an AVD estate:

    • “Which session host VMs are running right now but have zero user sessions?” That’s an idle-capacity question, and idle capacity is wasted money. Without the plugin, an agent would need you to spell out the join between the virtualdesktop tools and the VM power state. With azure-cost and azure-resource-lookup in the picture, it knows to do that, and to express the answer in money rather than VM IDs.
    • “List every session host VM across all my subscriptions that isn’t on the current image version.” That’s a drift question. The azure-resource-lookup skill is built around exactly this pattern of Azure Resource Graph queries.
    • “Show me the monthly cost of each resource group that contains a host pool.” azure-cost plus the AVD tools, and it’s the question finance keeps asking you, answered in one sentence.
    • “Do any of my session host VMs have RDP open to the internet?” azure-compliance plus azure-rbac plus the VM tooling, and the answer is a list rather than an audit project.

    The point isn’t any one of these queries. It’s that the skills know which checks belong together, which tools to call, and what good output looks like. That’s the gap a raw MCP server leaves, and that’s the gap this plugin fills.

    This matters for AVD because the estate is rarely just AVD. A session host is a VM, behind a NIC, on a vNet, with a managed identity, pointed at an FSLogix storage account, scaled by an Automation Account, monitored by Log Analytics. Asking sensible questions about it means asking sensible questions across half a dozen Azure services. That’s exactly the surface area the skills cover.

    Bonus: turning a question into a diagram, for free

    One skill in the bundle is worth calling out on its own: azure-resource-visualizer. Ask the agent to “analyse this session host and show how it connects to the rest of the infrastructure” and you get back a real architecture diagram of the live environment: the VM, its NIC, the vNet, the public IP, the FSLogix storage account, the managed identity and what it can reach.

    For AVD that’s quietly valuable. Architecture documentation for a virtual desktop estate is almost always missing or badly out of date. Being able to regenerate an accurate diagram of a host pool and everything around it, on demand from the live environment, makes an audit or a handover meaningfully less painful. Previously you’d have wired up a separate community-built draw.io MCP server to get this. Now it’s just a skill in the box.

    Setting it up

    This is the part where the plugin format earns its keep. Setup is genuinely a minute. You install once, and the same package runs across whichever agent host you’re using: VS Code with GitHub Copilot, Claude Code, the Copilot CLI, Cursor, Gemini CLI, Codex CLI or IntelliJ. No separate config per tool, no duplicated setup work if your team uses more than one agent.

    For my Claude Code setup it was a single install command and a sign-in prompt the first time an Azure tool ran. The agent then operates as me, against my Entra ID, with my RBAC. Nothing else to configure. No service principal, no secret to store, no separate permissions to manage.

    Microsoft’s documentation has the current step-by-step for each host. Given this is beta, treat the docs as the source of truth rather than anything I’d write here.

    Where this fits, and where it doesn’t

    A few honest caveats, because this is a personal blog and not a product page.

    It’s beta and moving fast. The plugin is on its ninth release in a few months, and the MCP server underneath is on 3.0.0-beta.11 for a reason. Tools and skills are being added and changed release to release. Don’t build a process around a specific skill name until things settle.

    It’s a developer-side tool. Microsoft is explicit that this is intended for developer and admin use within your organisation, not for external applications or as a production automation backbone. It’s a smarter way to interact with Azure from your editor. It is not an unattended automation platform.

    There is no AVD-specific skill yet. The plugin gets you the virtualdesktop MCP tools and a lot of useful cross-domain skills around them, but the AVD lifecycle work (draining, scaling, image management) isn’t expressed as a curated skill. It’s the obvious next gap.

    And for AVD specifically, the actual AVD surface is read-only today. It will tell you about your estate. It won’t run your estate. It doesn’t replace whatever management layer, scaling automation or operational tooling your team already relies on to keep host pools healthy. It’s a fast way to ask questions. It sits alongside your existing tools, not on top of them.

    None of that makes it less interesting. It just means you should be precise about what it is.

    The takeaway

    The headline isn’t “AI now runs your AVD estate”. It doesn’t, and you wouldn’t want it to yet. The smaller, more useful headline is this: the distance between having a question about your Azure estate and having a sensible answer just got a lot shorter. And Microsoft’s curated Azure expertise now travels with your agent, whichever one you use.

    For an AVD admin, that distance has always been measured in portal tabs and half-remembered PowerShell. Swap that for a plain-English question, answered in the editor you already work in, against the permissions you already have. That’s a real quality-of-life improvement, even in a read-only beta.

    Read-only is where it starts. Deployment and validation skills already sit in the same plugin. The direction of travel is fairly obvious.

    Found this useful? Share it with whoever owns your AVD estate.


    Wayne Bellows is a Technical Account Manager at Nerdio. He writes about Azure Virtual Desktop, Windows 365, Intune and the EUC industry at modern-euc.com.


    Further reading

  • Habit #7: Optimise Log Analytics

    Habit #7: Optimise Log Analytics

    Visibility is essential — but it shouldn’t come at any cost.

    Monitoring is a critical part of running Azure Virtual Desktop.

    Without it, you’re blind to performance issues, login delays, and user experience problems.

    But there’s a trade-off that many teams don’t fully realise:

    Observability isn’t free.

    And in many environments, Log Analytics quietly becomes one of the largest — and least optimised — costs in Azure.

    That’s where Habit #7 comes in.

    Highly effective admins don’t just enable monitoring.
    They optimise it.


    The Hidden Cost of Visibility

    Log Analytics is incredibly powerful.

    It provides deep visibility into:

    • Session performance
    • User experience
    • Host health
    • Application behaviour

    But it works by ingesting data.

    And in Azure, you don’t pay for storing most of that data (at least initially).
    You pay for ingesting it.

    That means:

    The more frequently you collect data, the more you pay.

    In many AVD environments, default configurations collect data far more frequently than needed for day-to-day operations.

    The result?

    High ingestion volumes… and unexpectedly high costs.


    What Log Analytics Optimisation Really Means

    Optimising Log Analytics isn’t about turning monitoring off.

    It’s about collecting the right data, at the right frequency, for the right purpose.

    In Nerdio Manager for Enterprise, admins have control over how telemetry is collected and retained.

    This includes:

    • Data collection frequency (polling intervals)
    • Performance counters being captured
    • Retention periods

    The goal isn’t to reduce visibility.

    It’s to remove unnecessary noise.


    The Three Pillars of Habit #7

    Like every habit in this series, this comes down to consistent, repeatable behaviour.


    Pillar 1: Review What You’re Collecting

    Most environments collect far more data than they actually use.

    Highly effective admins regularly review:

    • Which performance counters are enabled
    • Whether those metrics are actively used
    • Which dashboards or reports depend on them

    A simple question helps guide this:

    “If we stopped collecting this data, would anyone notice?”

    If the answer is no, it’s likely unnecessary.


    Pillar 2: Adjust Collection Frequency

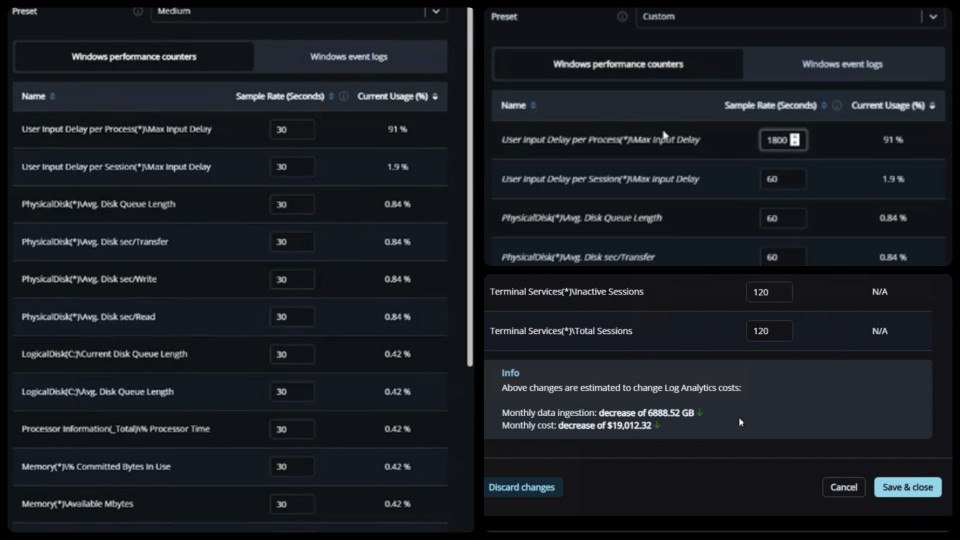
    One of the biggest cost drivers in Log Analytics is how frequently data is collected.

    By default, many metrics are captured every 30 seconds.

    For most environments, that level of granularity isn’t required.

    Adjusting polling intervals to:

    • 60 seconds
    • 120 seconds
    • Or even longer for certain metrics

    …can significantly reduce ingestion volume without materially impacting visibility.

    The data is still there.

    It’s just collected more efficiently.

    Log Analytics Optimisation in Nerdio Manager.

    Pillar 3: Align Retention with Real Needs

    Not all data needs to be kept forever.

    Highly effective admins:

    • Align retention periods with operational requirements
    • Keep short-term data for troubleshooting
    • Retain longer-term data only where it adds value

    For many teams, a 30-day retention window is more than sufficient for operational analysis.

    Anything beyond that should be intentional.


    What This Habit Enables

    When Log Analytics is optimised properly:

    • Monitoring costs drop significantly
    • Data ingestion becomes predictable
    • Dashboards remain effective
    • Troubleshooting capability is preserved

    Most importantly:

    You maintain visibility — without overpaying for it.


    Common Mistakes to Avoid

    Log Analytics optimisation is often overlooked or misunderstood.

    Some common pitfalls include:

    • Leaving default collection settings unchanged
    • Collecting high-frequency data that’s never used
    • Retaining data longer than necessary
    • Reducing data collection too aggressively without understanding impact

    The goal is balance.

    Too much data increases cost.
    Too little data reduces visibility.


    How Habit #7 Builds on the Previous Habits

    By this stage, the environment should already be well optimised:

    • Images are standardised
    • Patching is predictable
    • Applications are decoupled
    • Autoscale is tuned
    • VM sizing is aligned with demand

    Habit #7 completes the picture.

    It ensures that the monitoring layer itself is optimised, not just the infrastructure it observes.


    The Real Takeaway

    Monitoring is essential.

    But more data doesn’t always mean more value.

    Highly effective admins understand this.

    They don’t collect everything.

    They collect what matters.

    And they do it efficiently.


    Closing the Series

    That’s the final habit in the series.

    The 7 Habits of Highly Effective Nerdio Admins aren’t about individual features.

    They’re about operational discipline:

    • Build consistently
    • Patch predictably
    • Separate concerns
    • Optimise continuously
    • Use data to drive decisions

    Individually, each habit adds value.

    Together, they create environments that are:

    • Stable
    • Scalable
    • Cost-efficient
    • Predictable

    And ultimately — easier to manage.

  • Habit #6: Regularly Right-Size Using Nerdio Advisor

    Habit #6: Regularly Right-Size Using Nerdio Advisor

    The environment you designed six months ago probably isn’t the environment you’re running today.

    Most Azure Virtual Desktop environments start out well-designed.

    VM sizes are carefully chosen.
    Host pool capacity is planned.
    Autoscale is configured.

    At the beginning, everything fits.

    But environments rarely stay static.

    Users come and go.
    Applications change.
    Workloads evolve.

    Over time, what was once the right size often becomes the wrong size.

    That’s why Habit #6 exists.

    Highly effective admins don’t assume their original VM sizing decisions are still correct.

    They validate them regularly.


    Environment Drift Is Inevitable

    Even the most disciplined environments drift.

    Over time, you may see:

    • Increased user density on session hosts
    • New applications changing resource demands
    • Departments adopting new workflows
    • Seasonal fluctuations in usage

    None of this means that something was configured incorrectly.

    It simply means the environment evolved.

    The risk comes when sizing decisions stay frozen while everything else changes.

    That’s where right-sizing becomes essential.


    What Right-Sizing Actually Means

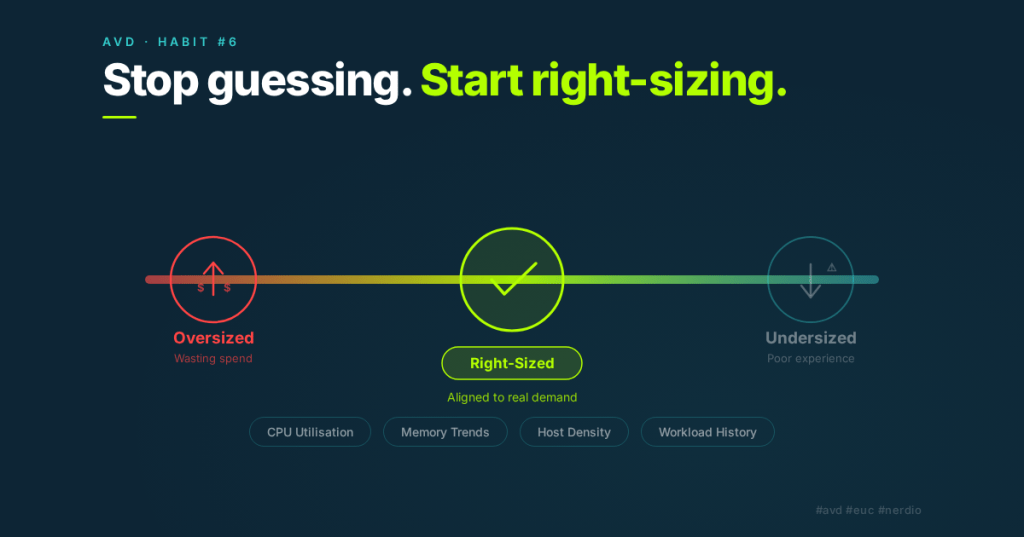
    Right-sizing isn’t about aggressively shrinking VM sizes.

    It’s about aligning infrastructure with real demand.

    In Nerdio Manager for Enterprise, Nerdio Advisor helps surface opportunities where VM sizes or host counts no longer match usage patterns.

    It analyses:

    • CPU utilisation trends
    • Memory utilisation
    • Host density
    • Historical workload behaviour

    From this data, it can highlight potential opportunities to:

    • Reduce VM size
    • Adjust host counts
    • Improve session density
    • Eliminate unused capacity

    Advisor doesn’t force changes.

    It simply shows where optimisation may exist.


    The Three Pillars of Habit #6

    Like the other habits in this series, right-sizing becomes effective when it’s treated as a repeatable behaviour rather than a one-time task.


    Pillar 1: Review Advisor Recommendations Regularly

    Right-sizing should be part of your operational rhythm.

    Highly effective admins review Advisor recommendations periodically to understand how their environment is evolving.

    These reviews help answer questions such as:

    Are hosts consistently underutilised?
    Are machines running close to resource limits?
    Has user demand changed since the environment was first deployed?

    Looking at these trends regularly prevents small inefficiencies from turning into long-term overspend.


    Pillar 2: Validate Host Pool Sizing Against Real Demand

    Advisor recommendations are a starting point.

    Before making changes, administrators should validate recommendations against how the environment is actually used.

    Important considerations include:

    • Login storms
    • Peak usage periods
    • Critical applications
    • Future growth expectations

    Right-sizing should always balance efficiency with user experience.

    The goal is optimisation — not risk.


    Pillar 3: Make Incremental Adjustments

    The most successful optimisation strategies are gradual.

    Highly effective admins:

    • Test smaller VM sizes in validation pools
    • Adjust session density carefully
    • Monitor performance after changes
    • Iterate based on real results

    This approach ensures improvements are sustainable and predictable.

    Large, aggressive changes introduce uncertainty.

    Small, measured adjustments build confidence.


    What This Habit Enables

    When environments are regularly right-sized, several things happen.

    First, infrastructure becomes more efficient.

    Unused capacity is eliminated, and VM sizes better match the workloads they support.

    Second, costs become more predictable.

    Right-sizing ensures organisations are paying for what they actually use — not what they once needed.

    Finally, operational confidence improves.

    Administrators know their environment reflects current demand rather than historical assumptions.


    Common Mistakes to Avoid

    Right-sizing is powerful, but it can be misunderstood.

    Some common pitfalls include:

    • Treating right-sizing as a one-time exercise
    • Blindly applying recommendations without validation
    • Optimising based on short-term usage spikes
    • Reducing VM sizes too aggressively

    Good optimisation is disciplined.

    It balances cost efficiency with stability.


    How Habit #6 Builds on the Previous Habits

    By the time organisations reach Habit #6, the earlier habits have already created a stable foundation.

    Images are standardised.
    Patching is predictable.
    Applications are decoupled from images.
    Autoscale behaviour is understood.

    Only once that foundation exists does right-sizing become safe.

    Without it, changing VM sizes can introduce instability.

    With it, right-sizing becomes one of the most powerful cost optimisation tools available.


    The Real Takeaway

    Infrastructure decisions age.

    What worked six months ago may not be optimal today.

    Highly effective admins recognise this.

    They don’t rely on past assumptions.

    They validate them.

    Regular right-sizing ensures that the environment you’re running today reflects the demands of today — not the design decisions of yesterday.

    That’s the essence of Habit #6.


    Next in the series:
    Habit #7 — Optimise Log Analytics

    Monitoring is essential for maintaining visibility into your environment, but unmanaged telemetry can quietly inflate Azure costs. The final habit explores how to maintain observability while keeping analytics costs under control.

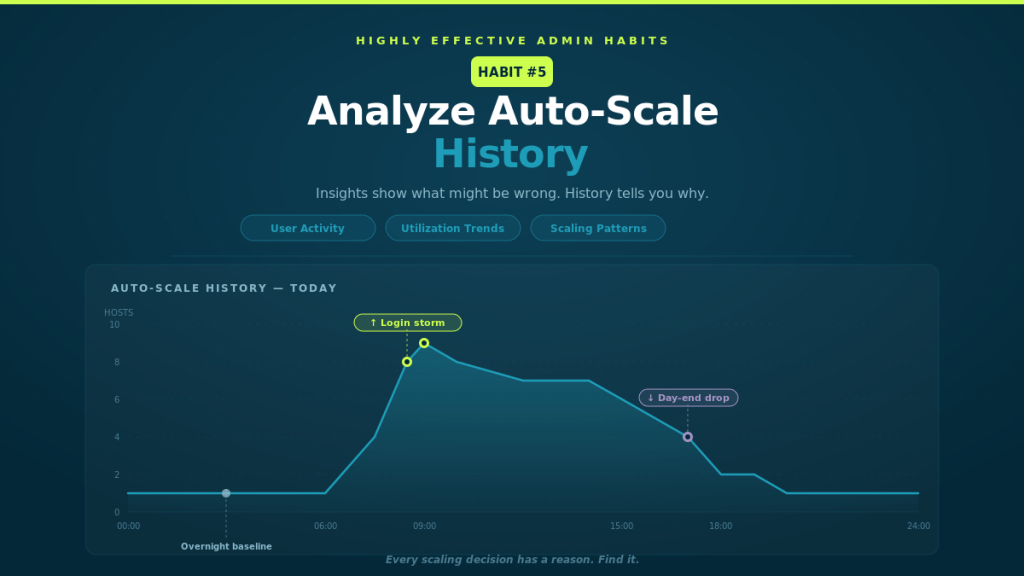
  • Habit #5: Analyse Auto-Scale History

    Habit #5: Analyse Auto-Scale History

    Insights show what might be wrong. History tells you why.

    Auto-scale is designed to react to demand.

    Users log in → hosts scale out.
    Users log off → hosts scale in.

    Simple in theory.

    But in the real world, Auto-Scale behaviour can sometimes look confusing:

    • Hosts scale out earlier than expected
    • Machines stay online when no users remain
    • Capacity spikes suddenly
    • Scaling appears inconsistent

    When this happens, many admins immediately start tweaking auto-Scale settings.

    The most effective admins do something different first.

    They look at the history.


    Auto-Scale Behaviour Often Tells a Story

    When Auto-Scale behaves in ways that seem unexpected, it’s rarely a bug.

    More often, it’s Auto-Scale doing exactly what it was configured to do — just reacting to signals you might not have noticed.

    Auto-Scale makes decisions based on inputs such as:

    • Active user sessions
    • CPU utilisation
    • Memory utilisation
    • Session limits
    • Time-based schedules

    If any of these signals change, Auto-Scale responds.

    Without reviewing historical behaviour, those responses can feel random.

    But once you analyse the history, patterns start to emerge.


    What Auto-Scale History Reveals

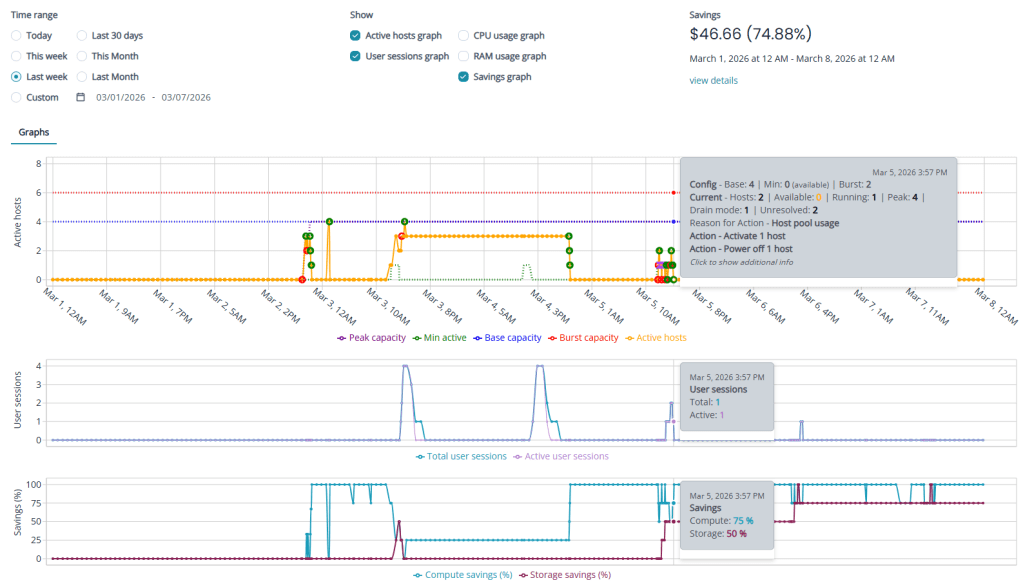
    Auto-Scale History in Nerdio Manager for Enterprise provides a timeline of scaling behaviour so you can understand exactly what happened.

    It allows administrators to see:

    • When scale-out events occurred
    • When hosts scaled back in
    • What triggered each scaling decision
    • How host capacity changed throughout the day

    Instead of guessing why Auto-Scale reacted, you can see the reasoning behind every action.

    This turns Auto-Scale from a black box into an explainable system.


    The Three Pillars of Habit #5

    Highly effective admins don’t just glance at Auto-Scale history when something goes wrong.

    They analyse it regularly.

    Three behaviours make this habit effective.


    Pillar 1: Correlate Scale Events with User Activity

    Auto-Scale should follow user demand.

    That means scale-out events should align closely with increases in user sessions.

    By reviewing Auto-Scale history alongside session activity, you can identify patterns such as:

    • Morning login storms
    • Midday workload peaks
    • Shift-based usage patterns
    • End-of-day session drop-offs

    When scaling events align with user behaviour, your Auto-Scale configuration is doing its job.

    If scaling happens too early or too late, it may indicate that thresholds or session limits need adjustment.

    The key is understanding how demand drives capacity.


    Pillar 2: Analyse Resource Utilisation Trends

    User sessions alone don’t tell the whole story.

    Resource utilisation often reveals why Auto-Scale behaves the way it does.

    Review historical trends for:

    • CPU utilisation
    • Memory utilisation
    • Average sessions per host

    These metrics help answer important questions:

    Are hosts consistently underutilised?
    Are machines running near capacity?
    Are session limits too conservative?

    In many environments, utilisation data quickly reveals opportunities to right-size VM families or adjust session density.

    Without this context, Auto-Scale decisions can appear unpredictable.

    With it, they become completely logical.


    Pillar 3: Identify Inefficient Scaling Patterns

    Auto-Scale history also helps reveal inefficiencies that quietly increase costs.

    Examples include:

    • Hosts running overnight with no active sessions
    • Scale-out events creating more hosts than needed
    • Frequent scale-in and scale-out oscillations
    • Burst hosts being created unnecessarily

    One-off events rarely matter.

    Patterns do.

    When these patterns appear repeatedly, they often indicate that scaling thresholds or schedules can be refined.

    Small adjustments can eliminate significant waste over time.


    What This Habit Enables

    When administrators regularly analyse Auto-Scale history, scaling becomes predictable.

    Instead of reacting to unexpected behaviour, teams gain:

    • Clear visibility into scaling decisions
    • Faster troubleshooting when anomalies occur
    • Evidence-based optimisation
    • Improved cost control
    • Greater confidence in Auto-Scale configuration

    Auto-Scale stops feeling mysterious.

    It becomes something you understand and control.


    Common Mistakes to Avoid

    Even experienced teams can misinterpret Auto-Scale behaviour.

    Some common pitfalls include:

    • Reviewing only one day of historical data
    • Optimising around short-term anomalies
    • Ignoring weekly or seasonal usage patterns
    • Adjusting Auto-Scale settings without understanding triggers

    Auto-Scale optimisation works best when decisions are based on consistent trends rather than isolated events.

    Looking at several weeks of history often reveals the true behaviour of an environment.


    How Habit #5 Builds on Habit #4

    Habit #4 focused on Auto-Scale Insights.

    Insights help surface potential optimisation opportunities — such as idle capacity or oversized VM SKUs.

    Habit #5 goes one step further.

    It explains why those opportunities exist.

    When you combine insights with historical analysis, you create a powerful feedback loop:

    Insights highlight optimisation opportunities.
    History explains the behaviour behind them.

    Together, they allow admins to refine Auto-Scale configurations with confidence.


    The Operational Discipline Behind Great Environments

    The most stable Azure Virtual Desktop (AVD) environments don’t rely on trial and error.

    They rely on observation.

    Highly effective teams treat Auto-Scale history as part of their operational routine.

    They review it:

    • During monthly environment reviews
    • When investigating performance issues
    • After major application or user changes
    • When evaluating cost optimisation opportunities

    Over time, this creates a deeper understanding of how the environment behaves.

    And that understanding leads to better decisions.


    The Real Takeaway

    Auto-Scale isn’t magic.

    It’s simply a system responding to signals.

    When those signals are understood, scaling becomes predictable.

    And predictable systems are easier to optimise.

    That’s the real value of Habit #5.


    Next in the series:
    Habit #6 — Regularly Right-Size Using Nerdio Advisor

    Even well-designed environments drift over time. The most effective admins continuously validate that their VM sizing still reflects real demand.

  • Habit #4: Act on Auto-Scale Insights

    Habit #4: Act on Auto-Scale Insights

    Don’t set it and forget it.

    Auto-scale is one of the most powerful features in Azure Virtual Desktop.

    It promises elasticity.
    It promises cost control.
    It promises performance stability.

    But here’s the reality:

    Most environments drift.

    Auto-scale gets configured once — often during deployment — and then quietly left alone. Months later, usage patterns have changed, user numbers have shifted, and application behaviour has evolved… but scaling logic hasn’t.

    That’s where Habit #4 comes in.

    Highly effective Nerdio admins don’t treat auto-scale as a static configuration.
    They treat it as a feedback loop.


    Auto-Scale Drift Is Normal

    Even well-designed environments don’t stay optimal forever.

    Over time:

    • Users join or leave
    • Working hours shift
    • Seasonal spikes come and go
    • Applications change resource profiles

    None of this means the original configuration was wrong.

    It just means the environment evolved.

    The problem isn’t drift.
    The problem is ignoring it.


    What Auto-Scale Insights Actually Do

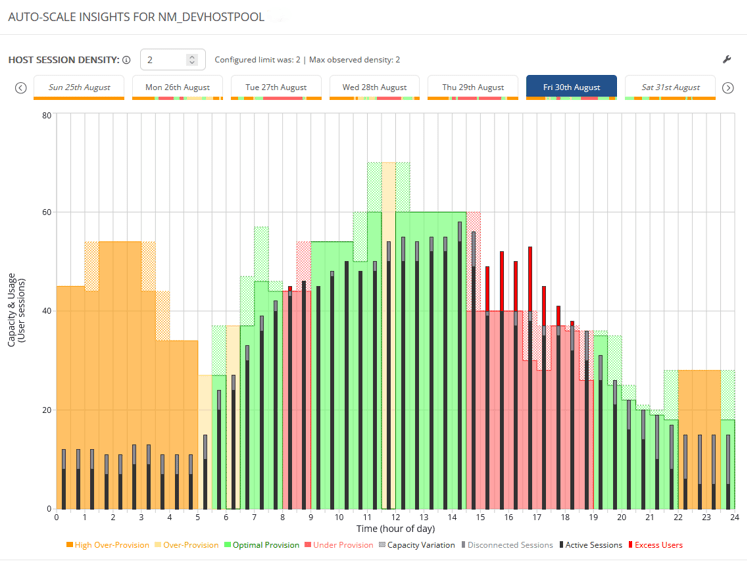
    Auto-Scale Insights in Nerdio Manager for Enterprise surface where your configuration no longer reflects reality.

    They highlight:

    • Idle capacity
    • Inefficient scaling schedules
    • Burst logic that may be too conservative — or too aggressive

    Insights don’t make changes for you.
    They show you where opportunity exists.

    They turn instinct into evidence.


    The Three Pillars of Habit #4

    Like the other habits, this one breaks down into repeatable behaviours.

    You don’t need a dramatic reconfiguration.
    You need a disciplined review.


    Pillar 1: Review Insights Regularly

    Auto-scale should have an operational cadence.

    Highly effective admins:

    • Review Insights monthly (or at minimum quarterly)
    • Look for trends, not one-off anomalies
    • Treat it like a performance and cost dashboard

    Small adjustments made regularly compound over time.

    What’s dangerous isn’t one imperfect configuration.
    It’s leaving it untouched for a year.


    Pillar 2: Validate Provisioning Against Real Usage

    The question isn’t “Is autoscale enabled?”

    The question is:

    Does our current provisioning reflect how the environment is actually being used?

    Review:

    • Active and disconnected sessions per host
    • Scale-out frequency
    • Ramp, peak, and taper events
    • Host counts during low-demand periods

    As a general rule of thumb, sustained utilisation below ~60% often signals overprovisioning. Sustained utilisation above ~80% may indicate constrained performance.

    The goal isn’t to chase perfect numbers.

    The goal is alignment between capacity and demand.


    Pillar 3: Optimise Safely, Not Aggressively

    Cost optimisation should be invisible to users.

    Highly effective admins:

    • Adjust VM size incrementally
    • Modify session limits gradually
    • Tune burst thresholds cautiously
    • Validate performance after changes

    Aggressive optimisation introduces risk.

    Disciplined optimisation builds confidence.


    What This Enables

    When Auto-Scale Insights are acted on consistently:

    • Compute costs drop meaningfully
    • Scaling becomes predictable
    • Surprise overruns decrease
    • Performance stabilises

    More importantly, optimisation becomes a data exercise — not guesswork.

    This aligns strongly with my broader emphasis on disciplined, data-driven decision making.


    Common Mistakes to Avoid

    Even experienced teams fall into these traps:

    • Blindly applying every recommendation without context
    • Optimising based on one week of data
    • Ignoring seasonal workload patterns
    • Tuning autoscale before stabilising images and applications

    Order matters.

    Autoscale optimisation works best when:

    • Images are consistent
    • Patching is predictable
    • Applications are disciplined

    That foundation makes scaling behaviour easier to interpret — and safer to adjust.


    How Habit #4 Builds on the Foundation

    Habit #4 doesn’t stand alone.

    It builds on:

    • Habit #1: Standardised image management
    • Habit #2: Predictable patching
    • Habit #3: Controlled application delivery

    Only when the environment is stable does autoscale optimisation become safe.

    Otherwise, you’re just scaling instability faster.


    The Real Takeaway

    Autoscale isn’t about turning machines on and off.

    It’s about continuously aligning capacity with reality.

    Set it.
    Measure it.
    Refine it.

    That’s the habit.


    Next up: Habit #5 — Analyse Auto-Scale History
    Insights show what might be wrong. History tells you why.

  • Habit #3: Centralise and Automate Application Management

    Habit #3: Centralise and Automate Application Management

    Once desktop images are standardised and patching is automated, many environments hit the next friction point: application management.

    This is often where complexity quietly creeps back in.

    Applications are installed in different ways, updated inconsistently, and tied to specific images or host pools “just to make things work.” Over time, this undermines the stability gained from good image and patch discipline.

    Highly effective admins avoid this by treating application management as a centralised, automated operating model — not a collection of one-off installs.

    This is Habit #3.


    Why application sprawl undermines otherwise well-run environments

    In less mature AVD environments, application delivery tends to evolve organically:

    • Some apps are baked into images
    • Others are installed manually
    • Updates are handled inconsistently
    • Different teams use different tools

    Initially, this can feel flexible. At scale, it becomes fragile.

    Common symptoms include:

    • Bloated desktop images
    • Longer image rebuild and testing cycles
    • Unclear ownership of applications
    • Increased support tickets following updates

    The issue isn’t the tools — it’s the lack of a consistent operating model.


    The mindset shift: applications should not define your images

    Highly effective admins make a deliberate separation:

    Images provide the foundation. Applications provide the functionality.

    When applications are tightly coupled to images:

    • Every app update forces an image change
    • Testing effort increases
    • Rollbacks become harder and riskier

    Decoupling applications from images allows teams to:

    • Keep images minimal and stable
    • Update applications independently
    • Reduce the blast radius when something breaks

    This is where Nerdio Manager for Enterprise becomes a control plane for application delivery — not just a place to manage hosts.


    The three pillars of Habit #3

    Highly effective admins consistently apply three principles when managing applications.


    Pillar 1: Decouple applications from desktop images

    Images should change slowly. Applications often don’t.

    Highly effective admins:

    • Avoid baking applications into images unless there’s a clear technical reason
    • Keep images focused on OS configuration, runtimes, and baseline security
    • Allow applications to evolve independently of the image lifecycle

    This results in:

    • Faster image rebuilds
    • Lower testing overhead
    • More predictable recovery and rollback

    Key idea:

    Images provide stability. Applications provide flexibility.


    Pillar 2: Centralise app delivery into a single operating model

    Modern AVD environments require flexibility. Different applications need different deployment approaches.

    Highly effective admins embrace this reality — but they manage it centrally, rather than allowing application delivery to fragment.

    This may include:

    • Public or private WinGet packages
    • Scripted installs using Shell Apps or Scripted Actions
    • Intune-managed applications
    • MSIX app attach (where it makes sense)
    • Legacy tooling where required, such as SCCM

    The critical point isn’t which method is used — it’s that:

    • The choice is intentional
    • Deployment is automated
    • Behaviour is predictable

    Centralisation provides:

    • Clear visibility into how applications are delivered
    • Consistent update behaviour across environments
    • Faster troubleshooting when issues arise

    The result is flexibility without fragmentation.

    Key idea:

    Different tools. One control plane.


    Pillar 3: Assign applications by intent, not infrastructure

    A common anti-pattern is allowing application differences to dictate:

    • New images
    • New host pools
    • Environment-specific workarounds

    Highly effective admins avoid this by assigning applications based on intent, such as:

    • User role
    • Team or department
    • Business requirement

    Instead of asking:

    “Which host gets this app?”

    They ask:

    “Who actually needs this app?”

    This approach:

    • Reduces image and host pool sprawl
    • Simplifies onboarding and offboarding
    • Keeps environments easier to reason about

    Importantly, this does not require App Attach. User- or group-based assignment can be achieved through multiple delivery methods, with App Attach used selectively where it provides clear value.

    Key idea:

    Apps should be delivered by need — not by where a user logs in.


    Automate application updates deliberately

    Application updates are one of the most common sources of instability.

    Highly effective admins:

    • Automate updates where appropriate
    • Control timing and scope
    • Avoid surprise changes during business hours

    Just like OS patching, application updates work best when treated as a repeatable workflow, not an ad-hoc task.

    Automation doesn’t remove control — it formalises it.


    The operational payoff

    When application management is centralised and automated:

    • Images remain lean
    • Updates become predictable
    • Rollbacks are simpler
    • Administrative effort drops significantly

    More importantly, teams gain confidence to:

    • Introduce new applications faster
    • Standardise environments
    • Scale without increasing complexity

    How Habit #3 builds on Habits #1 and #2

    Habit #3 only works because the earlier habits are already in place:

    • Habit #1 stabilises the image
    • Habit #2 stabilises the host lifecycle

    With those foundations:

    • Applications can be delivered independently
    • Updates don’t force image rebuilds
    • Failures are isolated and recoverable

    Each habit compounds the value of the last.


    Final thoughts

    Highly effective Nerdio admins don’t let applications drive infrastructure design.

    They:

    • Decouple applications from images
    • Centralise delivery
    • Assign applications by intent
    • Automate updates predictably

    This is how AVD environments remain flexible without becoming fragile.


    This article is part of an ongoing series exploring the 7 Habits of Highly Effective Nerdio Admins. Upcoming deep-dives will cover autoscale optimisation, right-sizing, and cost visibility.

  • Habit #2: Automate Windows Patching and Host Lifecycle

    Habit #2: Automate Windows Patching and Host Lifecycle

    Once desktop image management is standardised, most teams turn their attention to the next operational challenge: Windows patching.

    This is where many Azure Virtual Desktop environments begin to struggle.

    Manual patching is time-consuming, disruptive, and inconsistent. It often relies on individual knowledge, late-night maintenance windows, and a degree of luck. Highly effective admins take a different approach — they design patching as an automated, repeatable lifecycle, not a monthly fire drill.

    This is Habit #2.


    Why patching becomes a bottleneck at scale

    In smaller environments, manual patching can feel manageable. As environments grow, the cracks start to show.

    Common symptoms include:

    • Hosts patched at different times
    • Inconsistent patch levels across pools
    • Long or unpredictable maintenance windows
    • Uncertainty about what’s actually been updated

    The real issue isn’t effort — it’s risk. Inconsistent patching weakens security posture, complicates troubleshooting, and undermines confidence in automation elsewhere.


    The mindset shift: patching is a workflow, not a task

    Highly effective admins don’t think about patching as:

    “Applying updates to machines.”

    They think about it as:

    “A controlled workflow that updates images and hosts predictably.”

    That shift matters.

    When patching is treated as a workflow, you gain:

    • Predictability
    • Auditability
    • Confidence to automate safely

    This is where Nerdio Manager for Enterprise becomes an enabler rather than just a scheduling tool.


    One size does not fit all: patching strategy depends on host pool type

    One of the most common mistakes I see is applying the same patching strategy to every host pool, regardless of how it’s used.

    Highly effective admins make a clear distinction based on host pool type.


    Multi-session (pooled) host pools

    For multi-session environments, the recommended approach is simple:

    Patch the desktop image and re-image the session hosts

    This aligns naturally with how pooled AVD environments are designed.

    Why this works so well:

    • Session hosts are disposable by design
    • User data lives outside the VM (for example, FSLogix)
    • Re-imaging restores a clean, known-good baseline

    This approach delivers:

    • Consistent patch levels across all hosts
    • Faster recovery from issues
    • Cleaner environments over time

    In mature pooled environments, re-imaging is not disruptive — it’s expected.


    Personal host pools

    Personal desktops are fundamentally different.

    Because:

    • Each VM is tied to an individual user
    • Local applications or user-specific state may exist on the VM

    The recommended approach is:

    Patch the session hosts directly

    Re-imaging personal desktops can introduce unnecessary risk and user disruption. Patching hosts in place preserves:

    • User data
    • Personal configuration
    • Application state

    When combined with:

    • Drain mode
    • User notifications
    • Controlled scheduling

    …this approach keeps personal desktops secure without breaking the user experience.

    pooled vs personal patching

    The guiding principle

    Highly effective admins follow a simple rule:

    • If the host is disposable → patch the image and rebuild
    • If the host contains user state → patch the host directly

    This decision is baked into their operating model, not revisited every month.


    Why Patch Tuesday still matters

    Automation doesn’t mean patching at random.

    Highly effective admins align patching to:

    • Microsoft’s Patch Tuesday cadence
    • A predictable offset (for example, a few days later)
    • Known maintenance windows

    This creates:

    • Operational rhythm
    • Predictable change windows
    • Fewer surprises for users and support teams

    Automation doesn’t remove control — it formalises it.


    Automating the host lifecycle safely

    Patching doesn’t exist in isolation. It directly affects:

    • Host availability
    • User experience
    • Auto-scale behaviour

    That’s why effective admins automate patching together with host lifecycle controls, such as:

    • Draining sessions before maintenance
    • Controlling concurrency
    • Aborting safely after defined failures
    • Re-imaging hosts in a controlled sequence

    The objective isn’t speed — it’s controlled change at scale.


    The operational payoff

    When patching and host lifecycle management are automated correctly:

    • Hosts remain consistent
    • Security posture improves
    • Maintenance becomes predictable
    • Admin effort drops dramatically

    More importantly, teams gain confidence to:

    • Scale environments
    • Trust automation
    • Focus on optimisation rather than upkeep

    How this builds on Habit #1

    Habit #2 only works because Habit #1 exists.

    Without:

    • Standardised images
    • Versioning
    • Clear governance

    …patch automation becomes risky.

    With those foundations in place, patching becomes:

    • Safe
    • Repeatable
    • Boring (in the best possible way)

    Final thoughts

    Highly effective Nerdio admins don’t patch reactively.

    They:

    • Choose the right patching strategy per host pool
    • Align to predictable schedules
    • Automate patching as a lifecycle
    • Let the platform do the heavy lifting

    This is where operational maturity starts delivering real returns.


    This article is part of an ongoing series exploring the 7 Habits of Highly Effective Nerdio Admins. Upcoming deep-dives will cover application management, autoscale optimisation, right-sizing, and cost visibility.

  • Habit #1: Standardise and Automate Desktop Image Management

    Habit #1: Standardise and Automate Desktop Image Management

    If you want a stable, cost-efficient Azure Virtual Desktop environment, everything starts with the desktop image.

    Before auto-scale tuning, before patch automation, before application strategy — the quality and consistency of your image determines how effective everything else can be.

    In almost every inefficient AVD environment I’ve reviewed, image management is either:

    • Manual
    • Inconsistent
    • Poorly documented
    • Or all three

    Highly effective admins treat image management as a repeatable, automated process, not a one-off task. This is where real operational and cost gains begin.


    Why desktop image management is foundational

    Your desktop image influences:

    • How quickly can new session hosts be deployed
    • How predictable the user experience is
    • How easy it is to troubleshoot incidents
    • How confidently can we automate later stages

    If image management is inconsistent, every downstream optimisation becomes harder and more expensive.


    The common anti-patterns

    In less mature AVD environments, image management often looks like this:

    • Images built manually in the Azure portal
    • Multiple “golden images” with no clear owner
    • No versioning or rollback strategy
    • Apps are baked in inconsistently
    • No naming or governance standards

    These patterns increase:

    • Operational risk
    • Engineering effort
    • Time to recover from issues

    How highly effective admins manage images

    Highly effective admins standardise and automate image management using Nerdio Manager for Enterprise as the control plane.

    Their approach focuses on consistency, governance, and repeatability.


    1. Create images directly in Nerdio

    Images are created and managed inside Nerdio rather than manually in Azure.

    This provides:

    • A guided, repeatable workflow
    • Built-in automation for image creation and sealing
    • Clear visibility into image state and lifecycle

    The goal is not speed — it is consistency.


    Understanding how Nerdio captures images (and why it matters)

    It’s worth briefly explaining how image capture works in Nerdio, as this directly impacts where applications, automations, and OS changes should be applied — and it’s one of the most common areas of confusion I see with customers.

    When you create a desktop image in Nerdio, the process starts by creating a source image VM.

    At this point, you have two paths.


    Option 1: “Do not create image object” (recommended)

    If you select Do not create image object during image creation, Nerdio will:

    • Create the source image VM
    • Stop the workflow at that point

    No image object is captured yet.

    This is useful when you want to:

    • Install applications
    • Run automations or scripted actions
    • Apply OS or security configuration

    directly on the source VM before capturing the image.

    This approach ensures the source VM is always:

    • Fully up to date
    • Free of security vulnerabilities
    • Aligned with what admins expect to see when they later edit the image

    Because of this, this is the approach I generally recommend.


    Option 2: Automatic image capture via a temporary VM

    If you don’t select this option, Nerdio will:

    • Take a copy of the source VM’s OS disk
    • Create a temporary VM from that disk
    • Run any configured automations or application deployments on the temp VM
    • Sysprep the temp VM
    • Capture the final image object

    The key thing to understand here is:

    Any configurations applied during image creation are applied only to the temporary VM, not the source VM.

    This distinction is subtle but important — and it’s the single biggest cause of confusion I see when customers later expect to find changes on the source image VM.

    Nerdio Image Creation Process
    Nerdio Image Creation Process

    Why this matters operationally

    If admins later:

    • Edit the source image VM
    • Expect applications or settings to be present
    • Or assume the source VM reflects the deployed image

    They can be caught out if those changes were applied only to the temp VM.

    For that reason, keeping the source image VM as the authoritative, up-to-date representation of the image avoids ambiguity and reduces operational risk.


    Common image creation pitfalls to be aware of

    Trusted Launch and BitLocker

    Trusted Launch is a great security feature and one I generally recommend — but it’s important to understand its side effects.

    • Enabling Trusted Launch automatically enables BitLocker
    • If BitLocker is enabled when Sysprep runs, image capture will fail

    To avoid this:

    • Either disable BitLocker before capturing the image
    • Or select Trusted Launch supported instead of Trusted Launch

    The Trusted Launch supported option keeps the image compatible with Trusted Launch host pools without enabling BitLocker on the image VM.


    Marketplace images and BitLocker (Windows 11 / 25H2)

    When building a desktop image from newer marketplace images (such as Windows 11 25H2), BitLocker is enabled by default.

    Before capturing an image, you must:

    • Explicitly disable BitLocker on the source VM

    Why does BitLocker sometimes re-enable itself

    I’ve also seen cases where:

    • BitLocker is disabled on the source VM
    • An image is captured successfully
    • Session hosts are deployed
    • BitLocker later re-enables automatically

    If this behaviour is not desired, you can prevent it by setting the following registry value on the image:

    HKEY_LOCAL_MACHINE\SYSTEM\CurrentControlSet\Control\BitLocker
    PreventDeviceEncryption

    This ensures BitLocker does not automatically re-enable on newly deployed hosts.


    2. Maintain a single source-of-truth image per workload

    Once image creation is standardised, the next critical step is controlling image sprawl.

    Highly effective admins deliberately limit the number of desktop images they manage. Rather than creating bespoke images for every host pool or team, they define a single source-of-truth image per workload.

    Examples might include:

    • A core Office/knowledge worker image
    • A Power BI or data analyst image
    • A developer tooling image

    Each image has a clear purpose, a defined owner, and a documented scope.


    Why image sprawl is so expensive

    In environments where image governance is weak, I often see:

    • Slightly different images per host pool
    • “Temporary” images that become permanent
    • Multiple images solving the same problem in different ways

    This quickly leads to:

    • More patching effort
    • More testing effort
    • Inconsistent user experience
    • Longer incident resolution times

    Every additional image increases operational cost — even if Azure spend looks unchanged.


    What “source of truth” actually means

    A source-of-truth image is:

    • The authoritative image for a workload
    • Used consistently across environments
    • Updated intentionally, not ad hoc

    When something breaks in production, admins can immediately ask:

    “Did this come from the image — or somewhere else?”

    That clarity is invaluable during incidents and change reviews.


    Shared images across environments

    Highly effective admins use the same image version across:

    • Test
    • Validation
    • Production
    • (Where appropriate) DR

    This does not mean skipping testing. It means:

    • Test the image once
    • Promote the same version forward

    This dramatically reduces:

    • Duplicate testing
    • Configuration drift
    • Environment-specific surprises

    Avoiding the ‘one image per host pool’ trap

    A common misconception is that:

    “Each host pool needs its own image.”

    In reality, most differences between host pools can be handled through:

    • Application delivery mechanisms
    • Configuration at host creation
    • User or group targeting

    Keeping the image itself generic and workload-focused preserves flexibility while keeping maintenance overhead low.


    Operational benefits

    Maintaining a single source-of-truth image per workload:

    • Simplifies troubleshooting
    • Reduces admin effort
    • Improves predictability
    • Makes audits and reviews easier

    More importantly, it ensures image management scales with the business, not against it.


    Where this fits in the bigger picture

    Without this discipline:

    • Patch automation becomes risky
    • Reimaging becomes inconsistent
    • Autoscale amplifies mistakes faster

    With it:

    • Every downstream automation becomes safer and easier to reason about

    This is why source-of-truth images are a core maturity marker in well-run AVD environments using Nerdio Manager for Enterprise.


    3. Keep desktop images intentionally minimal

    One of the biggest differentiators between mature and immature AVD environments is what gets baked into the image.

    Highly effective admins design desktop images to be intentionally minimal. The goal is not to create a “fully loaded” desktop, but a stable, predictable foundation that can be reused everywhere.


    What belongs in the image

    A well-designed image typically includes:

    • Core OS configuration
    • Required runtimes and frameworks (e.g., VC++ redistributables, .NET)
    • Baseline security and system settings

    These are components that:

    • Change infrequently
    • Are required for almost every user
    • Would cause instability or performance issues if missing

    What does not belong in the image

    Equally important is what you intentionally exclude.

    Highly effective admins avoid baking in:

    • Frequently updated applications
    • Department-specific tools
    • User-driven or role-specific software
    • Anything that requires frequent testing

    Including these increases:

    • Image rebuild frequency
    • Testing effort
    • Risk of regressions

    And, over time, image management becomes a bottleneck rather than an enabler.


    Why “fatter” images create operational drag

    Images that try to do everything tend to:

    • Take longer to build and validate
    • Break more often
    • Require more rollbacks
    • Slow down troubleshooting

    When something goes wrong, it becomes much harder to determine:

    “Is this an app issue, or an image issue?”

    Minimal images dramatically reduce that ambiguity.


    Design images to change slowly

    A good rule of thumb is:

    If something changes weekly, it probably doesn’t belong in the image.

    Highly effective admins treat the image as:

    • A stable baseline
    • Updated deliberately
    • Changed only when there is a strong justification

    This allows image updates to be:

    • Planned
    • Tested
    • Communicated clearly

    Minimal images enable flexibility later

    Keeping images lean gives you more options downstream:

    • Applications can be layered or targeted
    • Different user groups can share the same image
    • Host pools remain flexible without image duplication

    This is what allows a single source-of-truth image to support multiple use cases without compromise.


    The operational payoff

    Minimal images result in:

    • Faster image build times
    • Easier validation
    • Lower maintenance overhead
    • Fewer production incidents

    Over time, this translates directly into:

    • Lower operational cost
    • Higher platform confidence
    • Easier scale

    Why this matters before moving on

    If images are overloaded:

    • Patching becomes risky
    • Reimaging becomes disruptive
    • Automation amplifies mistakes

    Minimal images are what make safe automation possible, which is why this step is a prerequisite for everything that follows.


    4. Version images deliberately and manage them through Azure Compute Gallery

    Once images are standardised, minimal, and controlled, the next maturity step is treating them as versioned assets rather than mutable objects.

    Highly effective admins never modify images in place. Every meaningful change results in a new image version, managed and stored through Azure Compute Gallery (ACG).


    Why in-place image changes are risky

    Without proper versioning, image changes tend to:

    • Overwrite working configurations
    • Remove rollback options
    • Obscure the root cause of issues

    When something breaks, the question becomes:

    “What changed — and when?”

    If you can’t answer that confidently, versioning isn’t being used effectively.


    What good image versioning looks like

    Effective image versioning has a few consistent traits:

    • Each image change produces a new version
    • Versions are immutable once created
    • There is a clear promotion path (test → prod)
    • Old versions are retained only as long as they add value

    This creates:

    • Predictable change management
    • Safer deployments
    • Faster incident resolution

    Why Azure Compute Gallery matters

    Storing images in Azure Compute Gallery adds governance that manual image management simply can’t provide.

    It enables:

    • Native image versioning
    • Controlled replication
    • Cross-region reuse if required
    • Lifecycle management of old versions
    • Trusted Launch and Confidential VM support

    For organisations with multiple regions or DR requirements, this becomes essential rather than optional.


    Controlling image sprawl with retention policies

    Highly effective admins don’t keep every image version forever.

    They:

    • Retain a defined number of previous versions
    • Automatically clean up older images
    • Keep enough history for rollback without creating clutter

    This avoids:

    • Unmanaged image growth
    • Confusion during deployments
    • Unnecessary storage overhead

    Versioning without retention is just delayed sprawl.


    Operational clarity during incidents

    When images are versioned and centrally managed, incident response becomes much simpler.

    Admins can immediately identify:

    • Which image version is in use
    • When it was introduced
    • What changed compared to the previous version

    This shortens:

    • Mean time to identify issues
    • Mean time to recover
    • Overall impact on users

    Why does this enable everything that follows

    Image versioning is what makes:

    • Patch automation safe
    • Scheduled reimaging predictable
    • Autoscale reliable
    • Rollbacks low-risk

    Without it, automation amplifies uncertainty. With it, automation becomes controlled and reversible.


    The maturity signal

    If you want a quick indicator of image maturity, ask:

    Can we roll back our desktop image confidently and quickly?

    If the answer is yes, versioning is working. If not, it isn’t.


    5. Apply clear naming standards and lightweight image governance

    By the time image creation, scope, minimalism, and versioning are in place, the final step is often the most overlooked — making images easy to understand and safe to operate.

    Highly effective admins apply simple, consistent naming standards and lightweight governance to prevent mistakes before they happen.


    Why naming matters more than it seems

    In environments without naming standards, images quickly become:

    • Hard to distinguish
    • Easy to misuse
    • Risky during changes or incidents

    Admins end up asking:

    “Is this the current image?” “Is this safe to deploy?” “What does this image actually contain?”

    Those questions cost time — and time costs money.


    What good image naming looks like

    Effective naming conventions are:

    • Predictable
    • Descriptive
    • Human-readable

    A common and effective pattern is:

    OS | Workload | Image Version | Build Date

    For example:

    Win11 | Office | v1.3 | 2025-01

    From the name alone, anyone should be able to tell:

    • What OS is it based on
    • Who it’s intended for
    • Whether it’s current or obsolete

    Clearly distinguish active vs deprecated images

    Highly effective admins make it obvious which images:

    • Are approved for deployment
    • Are retained for rollback only
    • Should no longer be used

    This can be achieved through:

    • Naming conventions
    • Descriptions or tags
    • Controlled access – stage image as inactive

    Ambiguity is one of the most common causes of accidental misconfiguration.


    Keep governance intentionally lightweight

    Image governance does not need to be heavy or bureaucratic.

    In practice, it usually means:

    • Defined ownership of each image
    • Clear promotion criteria (e.g., tested, approved)
    • Agreement on when images are retired

    The goal is not process for its own sake — it’s operational safety.


    Why this matters at scale

    As environments grow:

    • More admins get involved
    • Changes happen more frequently
    • The cost of mistakes increases

    Clear naming and governance:

    • Reduce human error
    • Speed up troubleshooting
    • Make handovers and audits easier

    It’s one of the highest ROI habits you can adopt.


    The final maturity check

    A simple test:

    Could a new admin confidently select the correct image without asking for help?

    If the answer is yes, governance is working.


    The cost optimisation impact

    Standardised image management:

    • Reduces build and provisioning time
    • Lowers troubleshooting effort
    • Prevents configuration drift
    • Enables every downstream automation to work reliably

    While image management alone won’t cut your Azure bill in half, it enables every other optimisation habit to work properly.


    Final thoughts

    If your image process is manual or inconsistent, no amount of auto-scale tuning will fully compensate for it.

    Highly effective Nerdio admins:

    • Standardise and automate image creation
    • Govern image usage
    • Version everything
    • Let automation do the heavy lifting
    • Treat images as managed assets

    This is the foundation that makes all other AVD cost and performance optimisations possible.

    Once image management is under control, you can safely move on to automating patching and host lifecycle, which is where Habit #2 begins.


    This article is part of an ongoing series expanding on the 7 Habits of Highly Effective Nerdio Admins. Deep-dives into each habit will follow, with practical guidance you can apply directly to your environments.