Category: Windows 365

  • FSLogix: What Belongs in a Profile, What Doesn’t, and How to Keep It That Way

    FSLogix: What Belongs in a Profile, What Doesn’t, and How to Keep It That Way

    Four questions come up in nearly every FSLogix health check I run. What should be in the profile. What shouldn’t. How big it needs to be. And why it keeps growing even after someone swears they turned on cleanup.

    This week I’ve gone through the first three on LinkedIn: the beliefs that quietly cost money, what actually happens at logon, and the config I’d set before a single user signs in. This post is everything in one place, with the registry paths, so you can check your own environment against it rather than take my word for it.

    What FSLogix actually does

    Skip this if you already know it, but it’s worth thirty seconds because it explains almost everything downstream.

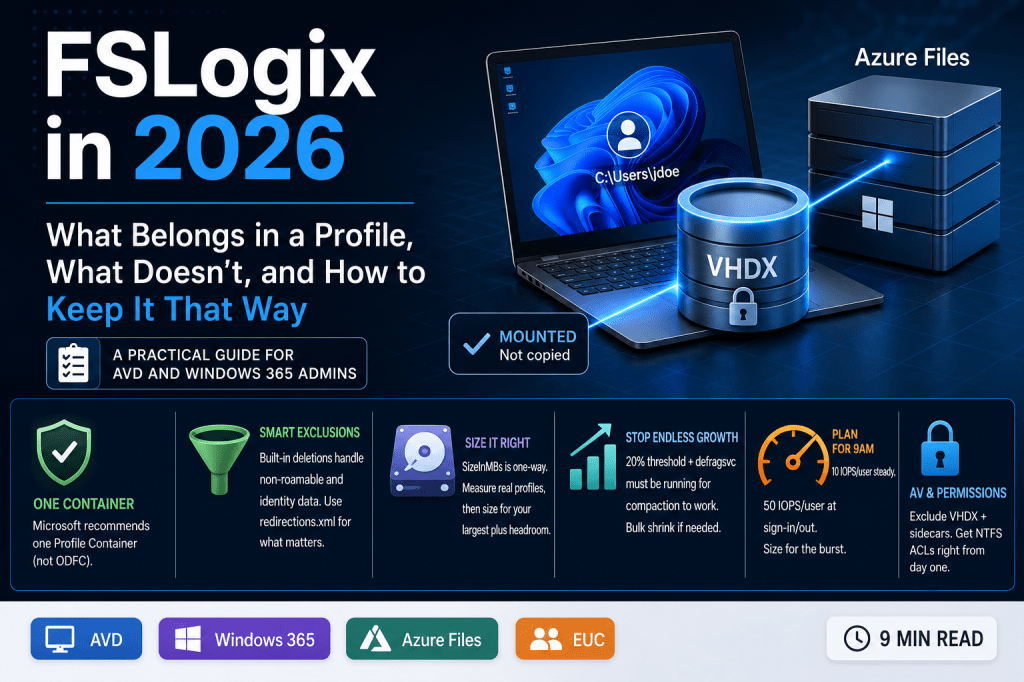
    FSLogix doesn’t copy a profile to the session host the way old-style roaming profiles did. It mounts a VHD or VHDX file from a network share and attaches it at the file system level using a kernel driver. Windows sees C:\Users\<username> and has no idea it’s actually a disk sitting on Azure Files or a file server somewhere else. No copy at logon, no copy at logoff. That’s why it’s fast, and it’s also why almost every strange failure traces back to that mounted disk: what’s inside it, how big it’s allowed to get, and whether the network path stays up for the whole session.

    What belongs in the container, and what doesn’t

    Microsoft’s own guidance has settled on a single answer here: use one Profile Container that holds everything, rather than splitting profile data from Office data into a separate ODFC container. ODFC exists for organisations already running a different profile solution and using FSLogix only for Office data. If that’s not your situation, one container is simpler, and it’s what Microsoft recommends.

    Inside that container, two things get handled for you automatically, and it’s worth knowing about them rather than assuming they don’t exist.

    Deletion-based exclusions. Non-roamable app data (MSIX package cache, temp state) gets stripped out at logoff so it never bloats the container. More importantly, identity data tied to the device itself — Entra broker tokens, TokenBroker, OneAuth, the AAD registry keys — is excluded by design. There’s a setting called RoamIdentity that looks like it would fix Entra sign-in quirks by roaming that data instead. Don’t touch it. Microsoft is explicit: never enable RoamIdentity on an Entra-joined or Intune-managed device. It ties identity to the wrong thing, and you’ll get worse authentication problems than whatever you were trying to fix.

    Custom exclusions via redirections.xml. If you need to exclude something Microsoft doesn’t already handle, this is the mechanism — an XML file, deployed centrally via RedirXMLSourceFolder, that lists paths to exclude or redirect. Microsoft’s own warning on this page is worth repeating verbatim: profile data isn’t designed to be removed, and unless you understand the application well, don’t exclude it. Every well-known FSLogix teardown agrees on the same short list worth actually redirecting: browser cache, the Outlook OST, OneDrive’s sync cache, and Teams. Beyond that, keep the file short. Every redirection is I/O overhead multiplied by every signed-in user.

    Two of Microsoft’s own defaults are worth knowing precisely because they surprise people. IncludeTeams in ODFC settings defaults to 0 — Teams data isn’t redirected unless you turn it on, and for the current MSIX-based Teams client you need this set for the app to even register correctly at sign-in. And RoamSearch, the setting that roams the Windows Search index inside the container, is something Microsoft now says isn’t needed on Windows Server 2019 (1809+), Windows 10, or Windows 11 multi-session. It solved a real problem years ago. On a modern image, it mostly adds I/O.

    Sizing that actually works

    SizeInMBs defaults to 30,000, roughly 30 GB, and it’s a one-way setting. Raise it and every existing container expands to match on next logon. Lower it and nothing happens — it has zero effect on containers that already exist. The only way down is compaction or rebuilding the container from scratch.

    Keep IsDynamic at its default of 1. A dynamic VHDX starts small and grows as data is written; a fixed one allocates the full size immediately and can never be compacted. There’s no scenario where fixed is the better choice for a profile container.

    Thirty gigabytes is a reasonable starting point, not a number to trust blindly. A light knowledge worker with a small OST and everything else in OneDrive might genuinely need 10 to 15 GB. Someone with a large mailbox and local app data can eat 60 GB without anything unusual happening. Measure actual profile sizes on your existing share before you commit to a number, and size for the largest real profile you have plus headroom, not for a round figure that felt safe when the host pool was built.

    Why containers grow and never shrink on their own

    This is the one that catches people out months after go-live. When a user deletes files inside their profile, FSLogix marks the space as free inside the VHDX. The file on the share stays exactly the same size. Nothing shrinks by itself. A profile that briefly ballooned to 25 GB during a big OneDrive sync stays at 25 GB on disk forever, even after the sync settles down.

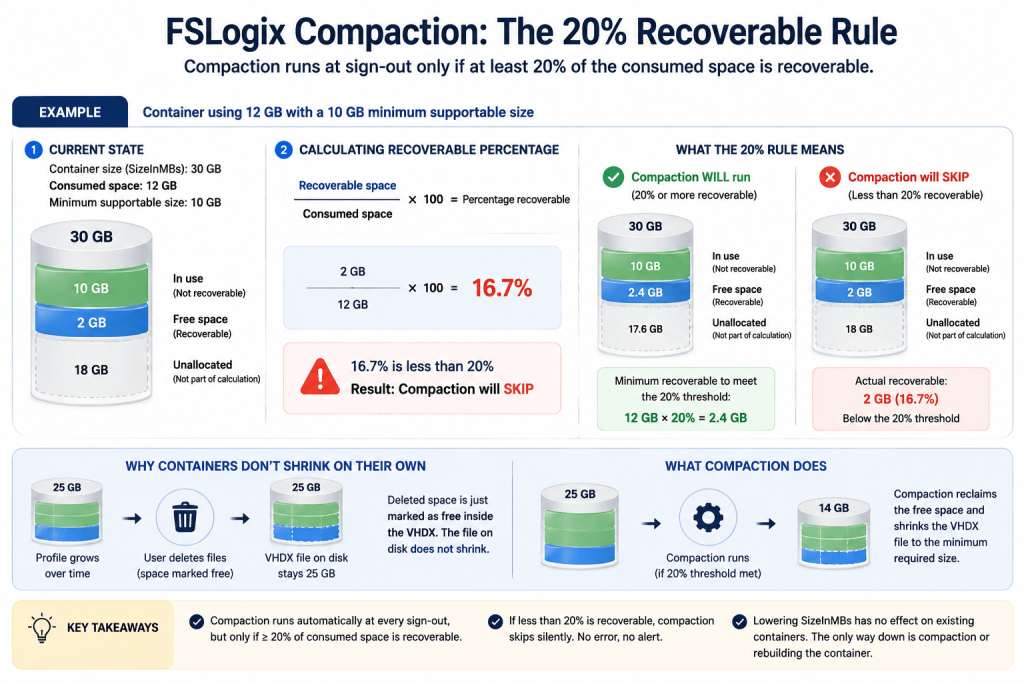
    Built-in compaction exists to fix this and runs automatically at every sign-out, but it has two conditions that quietly stop it working, and neither produces an error when they do.

    First, it only runs if at least 20% of the consumed space is recoverable. A container using 12 GB with a 10 GB minimum supportable size has 2 GB recoverable, which is under the 2.4 GB threshold — so compaction skips it silently every time, and the profile never gets smaller.
    Second, compaction depends on the Windows Optimize Drives service, defragsvc. If that service is set to Disabled anywhere in your image, which is common in hardened builds, FSLogix can’t query the minimum supportable size, and compaction doesn’t run at all. No error, no log entry that jumps out. It just quietly does nothing every single sign-out.

    If you’re maintaining an older estate where containers have already ballooned past what per-sign-out compaction can claw back, both the community Invoke-FslShrinkDisk script and Nerdio Manager’s built-in “Shrink FSLogix Profiles” scripted action exist to do a bulk pass offline. Worth knowing the community script sits in the FSLogix GitHub organisation and isn’t a Microsoft-supported product feature — test it before you trust it against production data.

    One more setting worth turning on while you’re in there: CleanupInvalidSessions, which ships disabled. It has FSLogix clean up stale artefacts left behind by sessions that ended abruptly rather than signing out cleanly, and it’s a small thing that prevents a class of “why won’t this profile attach” tickets later.

    Storage, and the 9am problem

    Microsoft’s IOPS guidance for FSLogix is specific: budget 10 IOPS per user at steady state, and 50 IOPS per user during sign-in or sign-out. For 100 users, that’s roughly 1,000 IOPS most of the day and a burst toward 5,000 IOPS in the window everyone arrives at once. Size for the burst, not the average, or the first twenty minutes of every morning will be the worst part of your users’ day.

    On tier, Microsoft’s own workload table draws the line at 200 users for the “Light” category: under 200 light users, Azure Files Standard can work. Above that, or for anything heavier than light, Premium is the recommendation regardless of headcount. Standard is priced on transactions as well as capacity, which makes its performance genuinely variable under load — not what you want for something every user depends on to log in.

    The failure modes worth knowing before they bite

    Wrong FSLogix permissions are, by most practitioner accounts I trust, the single biggest generator of AVD support tickets. Get the NTFS ACLs on the share root right from day one: modify for the user group, full control for admins, and Creator Owner set to modify on subfolders and files only so each user’s own container inherits correctly. Exclude admin accounts from FSLogix profiles entirely — if something goes wrong, you want an unencumbered way in to fix it.

    Antivirus exclusions are the other classic. It’s not just the VHD or VHDX file itself. The small sidecar files sitting next to it on the share — .VHD.lock, .VHD.meta, .VHD.metadata and their VHDX equivalents — need the same exclusion, or AV locking them produces the exact same sharing violations and temp profiles as locking the disk file. A logon storm with twenty users all having their containers scanned at once is a fast way to bring a host to its knees.

    Two authentication issues are worth knowing about specifically because they’re recent and easy to miss. Microsoft’s Kerberos hardening, moving domain controllers to require AES-SHA1 instead of RC4 for objects with no encryption type explicitly set, took effect with the April 2026 cumulative update, and the audit-mode rollback that let you defer it was removed at the end of July. If your profiles sit on an on-premises SMB share, or on Azure Files using AD DS authentication, and anything in that chain is still RC4 or has no encryption type set, it breaks. Entra Kerberos authentication isn’t affected by this particular change.

    Entra Kerberos has its own separate limitation worth planning around if you’re cloud-native: the ticket that authorises access to Azure Files lasts about 10 hours, and Entra ID currently can’t renew it. Cross that mark in a single session and the container drops, usually with a bad username or password error that has nothing to do with the actual password. Microsoft’s documented fix is cloud trust, issuing tickets from AD DS instead — which isn’t an option if you’re genuinely Entra-only. If that’s your situation and you have users on long shifts, budget time to look at a scheduled ticket refresh as a workaround.

    Cloud Cache: when it earns the extra complexity

    Cloud Cache sits on top of the profile container and changes where the writes go. Instead of writing straight to the network share, it writes to a local cache on the session host first and syncs to one or more remote storage providers in the background. Microsoft positions it for multi-region deployments and for keeping users working through a storage outage — genuine high availability, not a substitute for backup and restore.

    It’s not free. It needs fast local storage for the cache, adds a few seconds to logon, and on non-persistent session hosts that get rebuilt regularly, the local cache is gone every time — meaning every logon rehydrates fully from remote storage anyway, which defeats the point. For a single-region deployment already sitting on Zone Redundant Azure Files Premium, the honest answer is usually that Cloud Cache adds complexity without adding much you didn’t already have.

    Where none of this applies

    Windows 365 Cloud PCs don’t use FSLogix profile containers, and this trips people up when they’ve spent years thinking in AVD terms. A Cloud PC is persistent and assigned 1:1 to one user. The profile lives on the Cloud PC itself between sessions, the same way it would on a physical laptop, so there’s nothing to roam.

    The same logic extends further than most people realise. AVD Personal host pools work the same way: one session host assigned persistently to one user. Microsoft’s own guidance on when a roamed profile is genuinely needed centres on pooled host pools, where a user might land on a different host every time they sign in — the scenario a persistent, dedicated assignment simply doesn’t create. I haven’t found a Microsoft page that states this as flatly as I’d like, so take it as my reading of how the mechanism works rather than a quoted policy: on a Personal host pool, FSLogix is there for convenience and portability, not because the architecture requires it the way a pooled deployment does.

    Doing this at scale

    Everything above is something you can configure by hand through Group Policy and the registry, and for a single host pool that’s entirely reasonable. Where it gets tedious is doing it consistently across a growing estate, and keeping it consistent as new host pools get added.

    Nerdio Manager applies FSLogix configuration as policy at the host pool level rather than per-image, and ships the offline compaction runbook mentioned above as a built-in scripted action rather than something you maintain yourself. If you’re already on NME, it’s worth checking those settings are actually being applied the way you think they are rather than assuming the defaults match what’s above.

    Where to start

    If you only do three things after reading this: check whether defragsvc is disabled anywhere in your image, add the sidecar file exclusions to your antivirus policy, and measure real profile sizes on your share before you next touch SizeInMBs. None of them take an afternoon, and each one is a support ticket you won’t get later.
  • Teams WebRTC optimisation is retiring: what AVD and Windows 365 admins need to check before October

    Teams WebRTC optimisation is retiring: what AVD and Windows 365 admins need to check before October

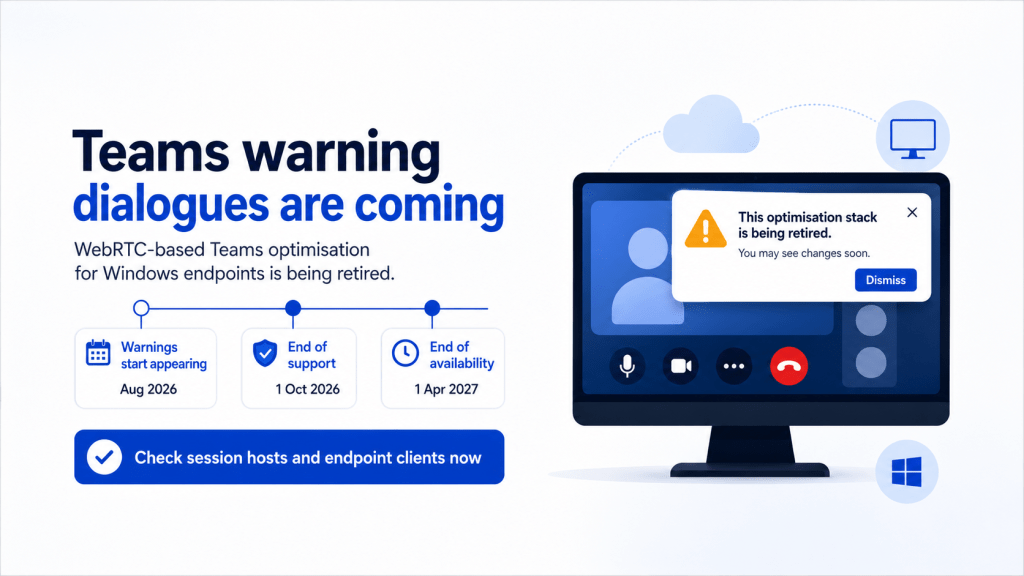
    Sometime in early August, some of your users are going to open Teams inside their session and get a dialogue box they’ve never seen before. It’s dismissible, so most of them will close it and carry on. A few will raise a ticket.

    That dialogue is the first visible step in retiring the WebRTC-based Teams optimisation for Windows endpoints. Microsoft set it out in Message Center post MC1239928, and it covers Azure Virtual Desktop, Windows 365 and Citrix.

    What what makes this different from most deprecations? The work isn’t really on the session host. It’s on the endpoint. And endpoints are usually the part of the estate you control least, especially if you’ve got thin clients, contractors, or people connecting from their own machines.

    This post covers what’s changing, the requirements at both ends, how to check where you actually stand today, and what stops the new stack working in locked-down environments.

    The two milestones

    The dates straight from the documentation.

    1 October 2026, End of Support. WebRTC-based optimisation carries on working, but Microsoft and Citrix no longer support it when the connection comes from a Windows endpoint. Two months before this, users see dismissible dialogues at application launch. That’s the August dialogue.

    1 April 2027, End of Availability. WebRTC stops working and the new optimisation is enforced. Two months before this one, the warning becomes a modal dialogue rather than a dismissible one. Legacy optimisation policies stop taking effect entirely.

    So there’s a six month window where the old stack still works but nobody will help you if it breaks. Plan for April. Treat October as the date support disappears, not the date you start looking at it.

    What replaces it, and why it’s actually worth having

    The new optimisation is built on SlimCore, a media engine that ships as an MSIX package and runs on the endpoint rather than inside the session.

    The feature gap is wider than I expected when I first read through it. Things the new stack does that WebRTC never did:

    • 1080p video
    • Hardware acceleration on the endpoint
    • Gallery view at 3×3 and 7×7
    • Quality of Service
    • Presenter mode
    • User-uploaded background effects, and organisational custom backgrounds with a Teams Premium licence
    • Media bypass, location-based routing and Operator Connect
    • Full Call Quality Dashboard and Teams admin center reporting, where WebRTC only gave you limited data

    The last one is the most useful for anyone running a service desk. If you’ve ever had a call quality complaint from a virtual desktop user and had almost no telemetry to work with, that changes.

    So this isn’t a deprecation that costs you features. It’s a deprecation that gives you a better product, provided you get the prerequisites lined up.

    The requirements sit at both ends

    This is where teams can get caught out. There are two version floors, and they’re in different places managed by different people.

    On the session host or Cloud PC, you need Microsoft Teams 24193.1805.3040.8975 or higher for Azure Virtual Desktop and Windows 365. If you’re patching Teams as part of your image pipeline, you’re probably fine already.

    On the endpoint, you need Windows App for Windows 2.0.352.0 or higher. The Remote Desktop client for Windows is no longer supported at all; the guidance is to move to Windows App. The endpoint also needs Windows 10 1809 as an absolute floor, four cores at 1.10 GHz, and 4 GB of RAM.

    Two details worth pulling out.

    Thin clients are explicitly covered. Windows 10 LTSC 2019 and 2021, and Windows 11 LTSC 2024, are supported as endpoints. So a thin client estate isn’t a blocker on OS grounds, though the CPU and RAM minimums are worth checking against whatever you bought three years ago. Note that this is an endpoint allowance only; LTSC is a different story on the session host side, where the Teams desktop app isn’t supported on it.

    Mac endpoints have a trap in them. You need Windows App for Mac 11.3.4 or higher, and it must be the non-App Store version, the standalone .pkg. The App Store build doesn’t bundle the plugin, so those users stay on WebRTC no matter what else you do. If you’ve got Mac users who installed Windows App themselves from the App Store because that was the obvious route, they’re on the wrong build and nothing in your management tooling will tell you.

    The plugin itself, MsTeamsPluginAvd.dll, comes bundled with Windows App. You don’t deploy it separately for AVD or Windows 365.

    How to find out where you actually stand

    Before you plan anything, get the current state. There are a few ways in, and they answer different questions.

    Inside a session, the VDI Status Indicator sits at the top left of the Teams interface. You can also go to the ellipsis, then Settings, then About. What you’re looking for is one of two strings:

    • AVD SlimCore Media Optimized means you’re on the new stack
    • AVD Media Optimized means you’re still on WebRTC

    That’s your quickest sanity check, and the one to give your service desk. If a user rings up in September asking about a dialogue box, the engineer can read the indicator and know immediately which side of the migration that user sits on.

    On the endpoint itself, SlimCore installs as an MSIX package into C:\Program Files\WindowsApps, which is locked down. Don’t go changing ACLs to look inside it. List the packages instead:

    Get-AppxPackage Microsoft.Teams.SlimCore*

    On a working endpoint with the current split package architecture you’ll get back two entries, something like Microsoft.Teams.SlimCoreVdiHost.win-x64 and Microsoft.Teams.SlimCoreVdiFwk.win-x64.<version>. Nothing returned means SlimCore never installed, and that’s your signal to look at the next section.

    Neither of those scales, though. For a fleet view, if your endpoints are Intune-managed then the Windows App version is discoverable, and that’s the number that gates everything else. Start there rather than trying to survey Teams sessions one at a time.

    The MSIX trap in locked-down estates

    This is the part I’d flag hardest, because it fails quietly and it fails specifically in the environments that are most tightly managed. Which is to say, the ones most likely to be running virtual desktops in the first place.

    SlimCore is fetched by the plugin and staged onto the endpoint as an MSIX package. That happens with no admin rights, no reboot, and no prompt. It relies on the App Readiness Service on the endpoint.

    If AppLocker, WDAC, or Group Policy blocks non-admin packaged app installation, the staging fails and Teams falls back to WebRTC. The user sees nothing; the failure lands in Event Viewer on the endpoint, as an install error. So unless someone is looking there, they simply don’t get optimised, and after April they get server-side rendering instead.

    The specific policy to look for is the one that prevents non-admin users installing packaged Windows apps. If you’ve got BlockNonAdminUserInstall enabled, you can still allow SlimCore through, but you need a recent enough Windows build for the allow-list policy to exist: KB5052094 for Windows 11 23H2 and 22H2, KB5052093 for Windows 11 24H2, KB5055612 for Windows 10 22H2, or anything later.

    That introduces a Group Policy called “Allowed package family names for non-admin user install”, under Computer Configuration, Administrative Templates, Windows Components, App Package Deployment. Allow-list the SlimCore package family names. There are two of them now, because the installer was split into a Host package and a Framework package, so a regex is cleaner than listing them:

    Microsoft.Teams.SlimCoreVdi*.*_8wekyb3d8bbwe

    If you’re running kiosk or assigned access configurations with a per-application AllAppList, SlimCore follows the UWP model, so it needs an entry there too:

    <App AppUserModelId="Microsoft.Teams.SlimCoreVdiHost.win-x64_8wekyb3d8bbwe!MsTeamsVdi" />

    This isn’t too difficult. It’s just invisible until you go looking, and it sits with whoever owns endpoint policy, who may not be the person reading the Teams Message Center post.

    What “not optimised” actually costs you

    Worth being precise about the failure mode, because it changes how you prioritise this.

    After End of Availability, if Teams can’t optimise, it falls back to server-side rendering. All the multimedia processing happens on the virtual machine.

    So it isn’t only a user experience problem. It’s a capacity problem. Media processing on the session host eats CPU you sized for something else, and on a pooled host that cost is shared with everyone else on the box. A handful of unoptimised users on a busy host pool will be felt by people who did nothing wrong.

    If you’ve done any careful sizing work, or you’re running auto-scaling with tuned thresholds, this is the bit to take seriously. Unoptimised Teams calls change the shape of your load.

    A staged plan that fits in the time available

    You’ve got until April, and the work splits reasonably cleanly.

    Start now, before the August dialogues, by getting your Windows App version distribution. That single number tells you the size of the problem. While you’re there, check the Teams version on your images so you can rule the session host side in or out.

    Before October, brief the service desk. Give them the two status indicator strings and a one-line explanation of the dialogue, so the first wave of tickets closes in thirty seconds instead of escalating to you.

    Before Christmas, deal with the awkward cohorts. Mac users on the App Store build. Thin clients that might not meet the CPU or RAM floor. Anything still on the old Remote Desktop client. These take longer than they look, because they usually involve someone else’s budget or someone else’s device.

    Then in Q1, validate the MSIX path in your locked-down configurations and confirm end to end on a real endpoint of each type you support. Get-AppxPackage plus the status indicator is enough evidence.

    Wrapping up

    The headline is a deprecation, but the substance is an upgrade. SlimCore brings 1080p, QoS, hardware acceleration and proper call quality telemetry to virtual desktops, and those are things people have been asking for on AVD for years.

    The risk isn’t the technology. It’s that this deprecation lands on the endpoint rather than the session host, so it can fall between two teams and get discovered by users instead of by you. Two months of dismissible dialogues is a generous warning, and it’s aimed at your users rather than your inbox, which is exactly why it’s worth getting ahead of.

    If you only do one thing this week, pull your Windows App version numbers. Everything else follows from that.

    Have you started auditing your endpoints for this yet? I’d be interested to hear whether the Mac App Store build has caught anyone else out, because I suspect that one is more common than people realise.

  • Context-Based Redirection in Azure Virtual Desktop and Windows 365: A Practical Guide

    Context-Based Redirection in Azure Virtual Desktop and Windows 365: A Practical Guide

    For years, redirection in end-user computing has been a light switch. Clipboard redirection: on or off. Drive redirection: on or off. Printer and USB: same deal. You set it at the host pool or the Cloud PC, and that was the experience for every user, on every device, from everywhere.

    That made sense when “everywhere” meant the office and maybe a corporate laptop at home. It makes a lot less sense now. The same user connects from a managed, compliant laptop in the morning and a personal tablet on the train an hour later. One policy can’t tell the difference, so you end up choosing: lock everything down and annoy people on trusted devices, or open things up and accept the data leakage risk on the ones you don’t control.

    Microsoft’s answer is context-based redirection, now in public preview for Azure Virtual Desktop and Windows 365. This post covers what it is, why it’s worth your attention, and the exact steps to configure it for both platforms, including the gotchas that’ll trip you up if you go in cold.

    What context-based redirection actually changes

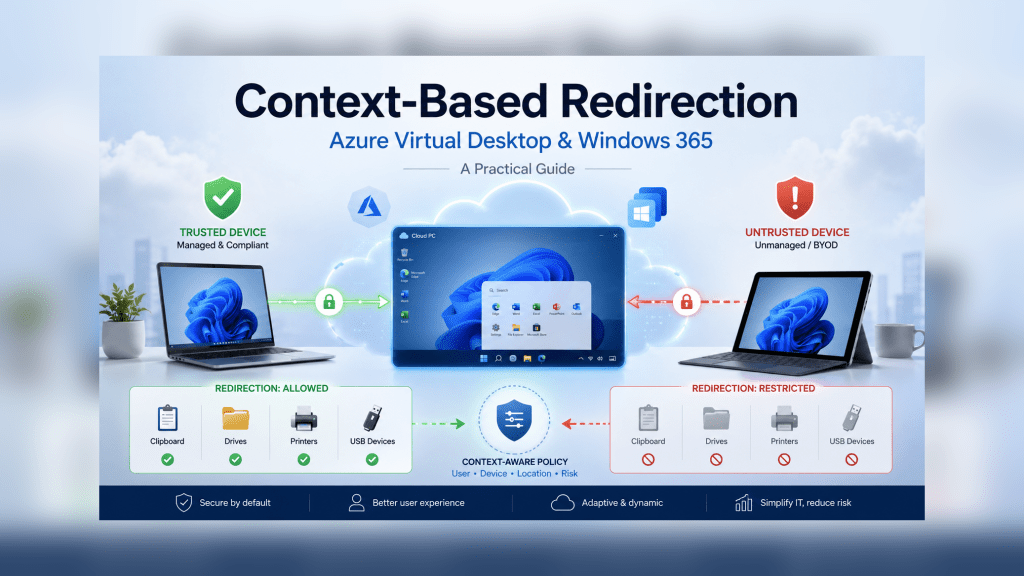
    The shift is small to describe and big in practice. Instead of asking “should clipboard redirection be allowed?”, you can now ask “should clipboard redirection be allowed for this session?” — where the session carries context like who the user is, whether their device is compliant, and where they’re connecting from.

    It works by tying a redirection setting to a Microsoft Entra authentication context, which in turn is governed by a Conditional Access policy. The Conditional Access policy is where the actual decision lives: require a compliant device, require a trusted location, whatever your risk appetite calls for. The redirection setting just points at that context and says, “follow those rules.”

    The four redirections you can control this way today are:

    • Clipboard
    • Drive
    • Printer
    • USB

    So a managed, compliant device connecting from a known location can get full clipboard and drive redirection, while the same user on an unmanaged personal device gets neither. Same user, same host pool, different trust, different experience. That’s the whole point.

    Why you’d actually use it

    The honest answer is data leakage control without the usual usability tax.

    Most organisations that care about data exfiltration end up blocking clipboard and drive redirection outright, because the alternative is trusting every endpoint equally. Context-based redirection lets you stop punishing your well-managed estate for the existence of BYOD. Compliant devices get a frictionless experience; everything else gets the locked-down one. You’re matching the control to the actual risk of the session rather than the lowest common denominator.

    It’s the same Zero Trust thinking that’s already shaping authentication, finally applied to device redirection. Less static policy, more dynamic trust.

    Before you start: prerequisites and one big gotcha

    A few things need to be true before any of this works.

    You need Microsoft Entra ID Premium (P1 or P2). Authentication contexts and Conditional Access policies are premium features. If your tenant has no premium licences, the “New authentication context” button is simply greyed out and you’ll go no further. Worth checking first, under Entra ID > Licenses, before you waste twenty minutes.

    It’s still rolling out. This is public preview, and the configuration options are appearing tenant by tenant. If you open your host pool’s RDP properties and don’t see the new dropdown option yet, you’re not doing anything wrong; it just hasn’t reached you. Keep checking back.

    The most restrictive policy wins. This is the one that’ll catch you. If you already manage redirections through other Intune settings or Group Policy, those existing policies can override your context-based configuration, because Windows applies the most restrictive setting. Before testing, set the redirections you want to control to Not configured or Enabled in any existing policies. Otherwise, you’ll configure everything correctly, test it, see nothing change, and lose an afternoon working out why.

    Step 1: Create the authentication context and Conditional Access policy

    This part is identical for both AVD and Windows 365. You’re building the rule that everything else points at.

    1. Sign in to the Azure Portal and search for Microsoft Entra Conditional Access.
    2. Go to Manage > Authentication contexts.
    3. Select New authentication context.
    4. Give it a name and description, something you’ll recognise later, like Compliant devices — full redirection.
    5. Tick Publish to apps and pick a value from the ID dropdown.
    6. Select Save.

    Now, create the Conditional Access policy that gives the context its meaning:

    1. Still in Conditional Access, go to Policies and select New policy.
    2. Name it clearly.
    3. Under Users or agents, include All users (scope this to a pilot group while you test).
    4. Under Target resources, change the dropdown to Authentication context and select the context you just created.
    5. Under Grant, choose Grant access and tick Require device to be marked as compliant, then select.
    6. Set Enable policy to On and select Create.

    That’s the trust decision defined. Compliant device, access granted to the context; non-compliant, denied. Everything downstream now inherits that logic.

    Step 2 (AVD): Map the context in host pool RDP properties

    For Azure Virtual Desktop, the mapping happens at the host pool level, so it applies to every session host in that pool.

    1. In the Azure Portal, search for Azure Virtual Desktop and open it.
    2. Select Host pools and choose your host pool.
    3. Open RDP Properties, then the Device redirection tab.
    4. Find the redirection you want to control — say, Clipboard redirection.
    5. In its dropdown, select Dynamically configure using authentication context.
    6. An Authentication context selector appears. Choose the context from Step 1.
    7. Select Save.

    Repeat for any of the other three redirections you want governed the same way. The Device redirection tab is also where you’ll confirm the preview has reached you: if the dropdown only offers the old static choices (available / isn’t available / not configured), the dynamic option hasn’t rolled out to your tenant yet.

    Step 2 (Windows 365): Map the context in Intune

    For Cloud PCs, the mapping lives in Intune through a Remote Connection Experience policy.

    1. In Intune, go to Devices > Manage Windows 365 Cloud PCs > Cloud PC Settings.
    2. Select Create > Remote Connection Experience (preview).
    3. Give it a name and description.
    4. Under Configuration settings > Device redirections, find your target redirection and select Authentication context: Context-based redirection.
    5. Choose your authentication context in the selector that appears.
    6. Set any scope tags, then move to Assignments.

    This is the second gotcha worth burning into memory: assign the Remote Connection Experience policy to device groups (your Cloud PCs), not user groups. Context-based redirection for Windows 365 is enforced at the device level. Assign it to users, and it simply won’t apply. Finish with Review + create.

    Step 3: Validate it works

    Testing needs two devices at different trust levels, which is the only honest way to prove it’s working.

    1. Connect from a managed, compliant device that satisfies your Conditional Access policy. Confirm the configured redirections are available in the session.
    2. Connect to the same host pool or Cloud PC from a BYOD or non-compliant device. Confirm the redirections are restricted or gone.

    If the behaviour isn’t what you expect, work through this list before assuming the feature is broken:

    • Check the Conditional Access policy assignment and the authentication context configuration.
    • Check the device’s compliance status in Microsoft Entra ID / Intune.
    • Check the host pool RDP property (AVD) or the Remote Connection Experience policy assignment (Windows 365).
    • Check for any existing redirection policy that might be overriding it — remember, most restrictive wins.

    That last point is, nine times out of ten, the culprit.

    Where this fits

    Context-based redirection won’t change your architecture, but it does close a gap that’s been awkward for a long time: the gap between “trust this endpoint completely” and “trust it not at all.” Most real estates live somewhere in the middle, and until now, the tooling didn’t.

    It’s preview, so treat it as preview — pilot it, don’t roll it across production on day one, and keep an eye on the docs as the configuration surfaces light up across tenants. But it’s the kind of incremental, sensible control that’s genuinely useful the moment it lands. If you run Azure Virtual Desktop or Windows 365 and you’ve ever had the BYOD-versus-data-leakage argument, this is one to test.

    Found this useful? I’d be interested to hear how you’re approaching device trust in your own EUC estate — drop a comment.

  • Windows 365 Business: What It Is, Who It’s For, and How to Get Started

    Windows 365 Business: What It Is, Who It’s For, and How to Get Started

    Microsoft will cut Windows 365 Business prices by 20%, effective 1 May 2026. If you’ve been sitting on the fence about Cloud PCs for your organisation, this is a good moment to revisit the conversation. But before you can decide whether Windows 365 Business is the right fit, you need to understand what it actually is, what it isn’t, and where it makes sense to deploy it.

    This post covers all of that, plus a quick-start guide to get your first Cloud PC provisioned.


    What Is Windows 365 Business?

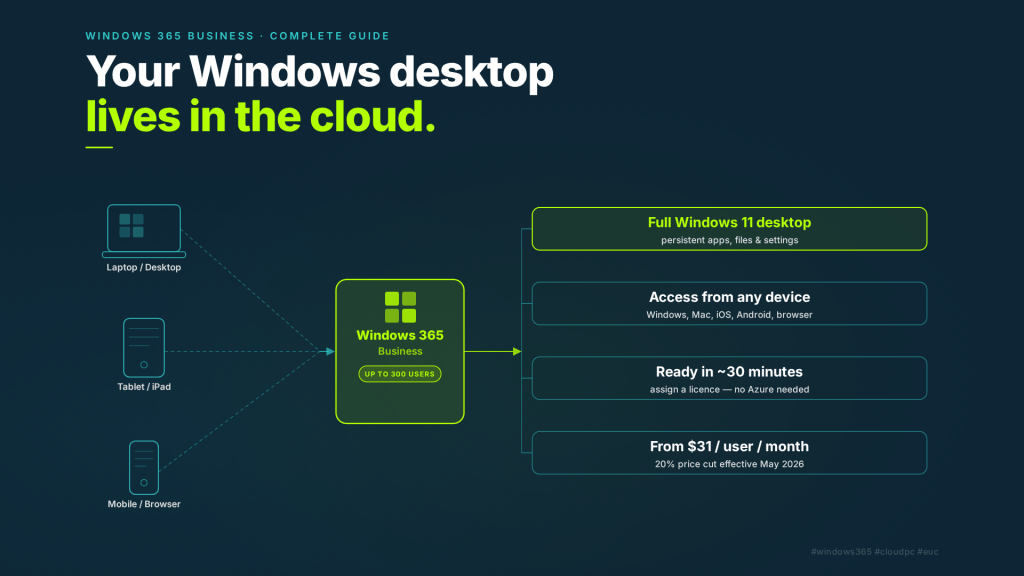
    Windows 365 Business is Microsoft’s Cloud PC offering for smaller organisations — specifically, tenants with up to 300 users. It delivers a full Windows 11 desktop, hosted in Microsoft’s cloud, streamed to virtually any device a user already owns: Windows, macOS, iOS, Android, or a web browser.

    Unlike Azure Virtual Desktop (AVD), which requires you to manage Azure infrastructure, session hosts, and networking, Windows 365 Business is fully managed by Microsoft. You buy a license, assign it to a user, and within about 30 minutes, they have a Cloud PC waiting for them at windows365.microsoft.com. No Azure subscription required. No virtual network to configure. No infrastructure to maintain.

    The trade-off for that simplicity is control — more on that shortly.


    Who Should Use Windows 365 Business?

    Windows 365 Business is built for small to medium-sized businesses with up to 300 users that want the benefits of a cloud-hosted desktop without the complexity of a traditional VDI deployment or the licensing overhead of Windows 365 Enterprise.

    It’s particularly well suited to:

    Businesses without a dedicated IT team. If there’s no one managing Intune policies or Azure environments, Windows 365 Business gives you a manageable Cloud PC through the familiar Microsoft 365 Admin Center. Setup is genuinely straightforward.

    Organisations with high contractor or seasonal worker turnover. Instead of imaging laptops, shipping hardware, and reclaiming devices, you assign a license and revoke it when the engagement ends. The Cloud PC is ready in minutes and leaves no data on the contractor’s personal device.

    Remote or hybrid teams. Users can pick up exactly where they left off from any device, anywhere. The full desktop experience — apps, files, settings — is persistent and consistent regardless of what endpoint they’re connecting from.

    BYOD environments. Windows 365 Business lets users run a corporate Windows environment on their personal Mac or Windows laptop without any corporate management touching their personal device. The Cloud PC is isolated in the cloud.

    Disaster recovery and business continuity. If a laptop dies or an office becomes inaccessible, users can log into their Cloud PC from any available device and keep working. Hardware failure becomes a minor inconvenience rather than a productivity outage.


    Windows 365 Business vs Windows 365 Enterprise: Know the Difference

    This is the question that trips most people up. Here’s the short version:

    Windows 365 BusinessWindows 365 Enterprise
    User limitUp to 300Unlimited
    Licensing prereqsNoneRequires Windows 10/11 Enterprise + Intune + Entra ID P1
    ManagementMicrosoft 365 Admin CenterMicrosoft Intune admin center
    Policy management (GPO/MDM)Not supportedFully supported
    Custom imagesNot supportedSupported
    Monitoring & analyticsNot supportedEndpoint Analytics via Intune
    Conditional AccessEntra ID P1 requiredSupported via Intune or Entra
    Microsoft Defender for EndpointRequires separate E5 licenseIntegrated with E5

    The headline: Windows 365 Business is for simplicity; Windows 365 Enterprise is for control. If you need to push apps, enforce security baselines, deploy compliance policies, or manage more than 300 Cloud PCs, Enterprise is your path. If you need to get a small team productive quickly without building out an Intune environment, Business is the right fit.


    Pricing (prediction – Updated May 2026)

    Microsoft’s 20% price cut brings Windows 365 Business down to three clean tiers:

    PlanSpecsPrice per user/month
    Basic2 vCPU, 4 GB RAM, 128 GB storage$25
    Standard2 vCPU, 8 GB RAM, 128 GB storage$33
    Premium4 vCPU, 16 GB RAM, 128 GB storage$53

    Basic suits light productivity users: web browsing, email, Teams calls, and basic Microsoft 365 apps. Standard is the sweet spot for most knowledge workers running a full suite of productivity tools and line-of-business applications. Premium is for users running heavier workloads — data processing, software development, or resource-intensive line-of-business apps.

    If your organisation already licenses Windows 10 or Windows 11 Pro, you may also qualify for additional discounts through Windows Hybrid Benefit. Worth checking before you buy.


    Quick Start: Setting Up Your First Windows 365 Business Cloud PC

    No Azure subscription. No virtual network. Here’s all you need to do.

    Step 1 — Check your Entra device settings.
    Before anything else, make sure Users may join devices to Microsoft Entra ID is set to All in your Entra admin center. Cloud PCs will fail to provision if this is locked down.

    Step 2 — Purchase licenses.
    Go to the Windows 365 Business pricing page or navigate to Billing > Purchase services in the Microsoft 365 Admin Center and search for Windows 365 Business. Select your tier based on user workload needs, enter the number of seats, and complete the purchase.

    Step 3 — Assign a license to a user.
    In the Microsoft 365 Admin Center, go to Billing > Licenses, find your Windows 365 Business subscription, and assign it to a user. Alternatively, assign directly from windows365.microsoft.com under Quick actions > Manage your organisation.

    Step 4 — Wait ~30 minutes.
    Windows 365 automatically provisions the Cloud PC using a standard Windows 11 gallery image. No further action needed from you.

    Step 5 — User connects.
    The user visits windows365.microsoft.com, signs in with their Microsoft 365 credentials, and their Cloud PC is waiting. They can also connect via the Windows App or Microsoft Remote Desktop client on any platform.

    That’s genuinely it. No imaging, no infrastructure, no VNet configuration.


    Is Windows 365 Business Right for You?

    If you’re running a business with fewer than 300 users, your team is remote or hybrid, you have BYOD challenges, or you’re spending too much time on endpoint management — Windows 365 Business is worth a serious look, especially at the new pricing.

    The 20% price reduction makes the TCO case significantly more compelling. Gartner noted in April 2026 that cloud-hosted PCs now offer lower total cost of ownership than traditional laptops when you factor in hardware refresh cycles, IT support overhead, and device management costs. At $25–$53 per user per month, Windows 365 Business is squarely in that conversation.

    The simplicity is real, but so are the limitations. If your organisation needs Intune-based policy management, custom images, or advanced security integration, you’ll want to evaluate Windows 365 Enterprise or Azure Virtual Desktop instead.

    For most small businesses and SMBs looking to modernise their desktop estate without a large IT investment, Windows 365 Business is a clean, low-friction option. And right now, it’s the cheapest it’s ever been.


    Have questions about sizing Cloud PCs for your team, or whether Business or Enterprise is the right fit for your environment? Drop a comment below or reach out directly.

  • Windows 365 Cloud Apps Just Got Serious: APPX and MSIX Support Changes Everything for Frontline

    Windows 365 Cloud Apps Just Got Serious: APPX and MSIX Support Changes Everything for Frontline

    Windows 365 Cloud Apps went generally available in November 2025, and the concept is compelling: stream individual apps from a Cloud PC to a user’s device, without giving them a full desktop. Think RemoteApp, but cloud-native and managed entirely through Intune.

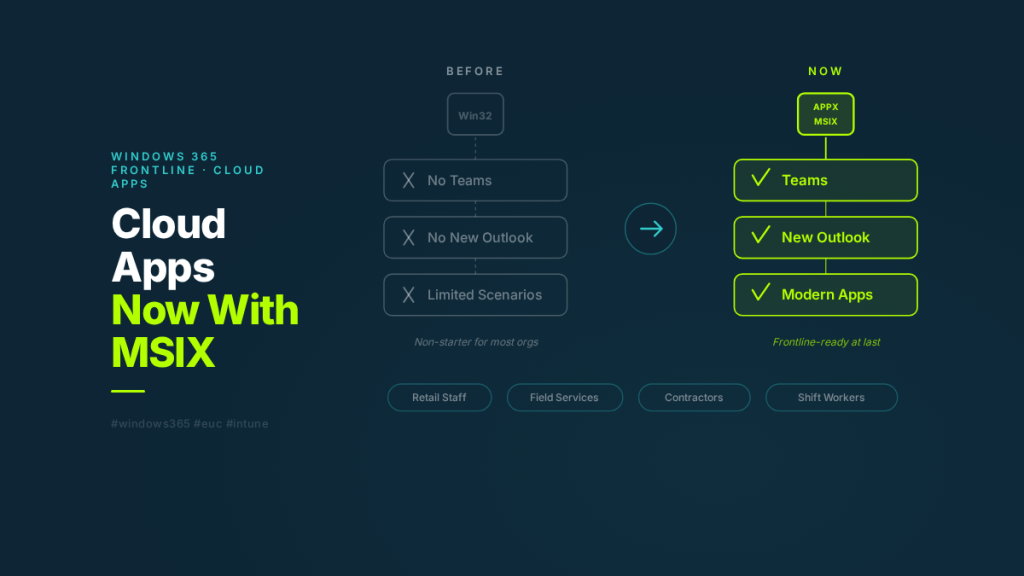
    The problem? Until this week, Cloud Apps only supported Win32 applications. That meant Microsoft Teams and the new Outlook — both packaged as APPX or MSIX — couldn’t be published through it. For most real-world scenarios, that was a deal-breaker.

    As of the week of March 23, 2026, Microsoft added APPX and MSIX application support to Cloud Apps. It sounds like a packaging update. In practice, it removes the single biggest barrier to Cloud Apps adoption.

    This post covers what Cloud Apps is, how it works architecturally, what this update actually changes, and where it fits alongside a full Cloud PC deployment.

    What Are Windows 365 Cloud Apps?

    Cloud Apps is a delivery model within Windows 365 Frontline that lets you publish individual applications to users instead of provisioning a full Cloud PC desktop for each person.

    The experience from the user’s perspective: they open Windows App, see only the specific apps that have been published to them, and click to launch. The app opens in its own window on their local device — no desktop, no taskbar, no Start menu. Just the app.

    From an architecture perspective, Cloud Apps runs on top of Windows 365 Frontline Cloud PCs operating in shared mode. When a user launches a Cloud App, it initiates a RemoteApp connection to one of the shared Cloud PCs in the pool. The Windows UI is stripped away so only the application window is rendered in the remote session. The user sees an app. Under the hood, it’s a Cloud PC running in shared mode, with concurrency tied to the number of Frontline licences assigned to the provisioning policy.

    The key distinction from a full Cloud PC: users don’t get a persistent desktop environment. There’s no personal desktop, no file explorer, no Start menu. They get access to the specific applications IT has published — nothing more.

    How App Discovery and Publishing Works

    This is where it gets interesting, and where the APPX/MSIX limitation was most painful.

    Cloud Apps discovers available applications by scanning the Start Menu of the underlying Cloud PC image. When you create a provisioning policy with the experience type set to “Access only apps,” Windows 365 enumerates every application that has a Start Menu entry on the image. Those apps are then listed in the Intune admin centre as “Ready to publish.”

    Admins select which apps to publish, and those apps become available in Windows App for all users assigned to the provisioning policy. You can edit display names, descriptions, and icons — but the core app discovery is driven by what’s on the image.

    Here’s the catch that tripped up the original release: the discovery and publishing pipeline only supported Win32 executables. APPX and MSIX packages register themselves differently in Windows — they use the modern app model with package identity, containerised execution, and different Start Menu registration paths. The Cloud Apps discovery engine simply didn’t know how to find them.

    That’s what changed this week. The discovery pipeline now supports APPX and MSIX packages alongside Win32 apps. Any application on the image that creates a Start Menu entry — regardless of packaging format — can now be discovered and published as a Cloud App.

    Why This Matters More Than It Sounds

    If you’re not deep in Windows packaging, “we added APPX/MSIX support” might sound like a minor technical improvement. Here’s why it’s not.

    Microsoft has been steadily moving its own applications to modern packaging formats. Teams is an MSIX package. The new Outlook is an APPX package. Many apps delivered through the Microsoft Store and via Intune’s app catalogue are MSIX. The direction of travel is clear: MSIX is the future of Windows app packaging.

    A Cloud Apps deployment that can only publish Win32 apps is a deployment that can’t publish Microsoft’s own flagship productivity tools. That’s not a niche gap — it’s a fundamental limitation that made Cloud Apps impractical for most organisations.

    With APPX and MSIX support, a Cloud Apps deployment can now publish Teams, the new Outlook, and any other modern-packaged app that’s on the image. The feature goes from “interesting concept with a big asterisk” to “genuinely viable for production frontline scenarios.”

    A Quick Primer: Win32 vs APPX vs MSIX

    For context on why these packaging formats matter and what makes them different:

    Win32 is the traditional application model that’s been around for decades. MSI installers, EXE files, and applications that write directly to Program Files, the registry, and shared system locations. They’re flexible but messy — installs can leave residual files, uninstalls aren’t always clean, and conflicts between applications sharing system resources are common.

    APPX was introduced with Windows 8 for Universal Windows Platform (UWP) apps. APPX packages run in a containerised environment with their own virtualised filesystem and registry. They install cleanly, uninstall completely, and can’t interfere with other apps. The trade-off: they were originally designed for UWP-only, limiting their usefulness for traditional desktop applications.

    MSIX is the evolution that bridges both worlds. It brings the clean install/uninstall behaviour and containerisation of APPX to traditional Win32 and .NET Framework applications. MSIX supports differential updates (only downloading what changed), mandatory digital signing for security, and a 99.96% install success rate according to Microsoft’s data. It’s designed to be the single packaging format for all Windows app types going forward.

    The reason Cloud Apps struggled without APPX/MSIX support is that Microsoft has been packaging its own apps in these formats for years. Teams, the new Outlook, and many Store-delivered apps aren’t Win32 — they’re MSIX or APPX. If your app delivery platform can’t see them, you can’t publish them.

    Cloud Apps vs Full Cloud PC: When to Use Which

    Cloud Apps doesn’t replace a full Cloud PC. They solve different problems for different user personas. Here’s how to think about when each model fits.

    Cloud Apps makes sense when:

    The user needs access to a small number of specific applications — typically two or three. They don’t need a full desktop environment, file management, or the ability to install additional software. Think frontline retail workers who need a POS system and Teams. Field service staff who need a single line-of-business app on shared devices. Contractors who need controlled access to specific tools without a full managed desktop. Seasonal or temporary staff where provisioning and deprovisioning full Cloud PCs per person would be operationally heavy.

    A full Cloud PC makes sense when:

    The user needs a persistent desktop environment with their own files, settings, and application state. They work with multiple applications simultaneously and switch between them throughout the day. They need the ability to open apps ad hoc — not just pre-published ones. Their workflow involves file management, browser-based tools alongside desktop apps, or other activities that need a complete Windows desktop.

    The shared licensing model underneath:

    Both Cloud Apps and shared-mode Frontline Cloud PCs use the same Windows 365 Frontline licensing. The licence model allows unlimited user assignments per licence, but only one concurrent active session per licence at a time. So if you have 50 Frontline licences assigned to a Cloud Apps provisioning policy, up to 50 users can have active Cloud App sessions simultaneously.

    This makes Frontline significantly more cost-effective than Enterprise Cloud PCs for shift-based or part-time workers. You’re not paying for a dedicated Cloud PC per user — you’re paying for concurrent capacity.

    Security Consideration: Published Apps Can Launch Other Apps

    There’s one architectural detail worth flagging that catches some admins off guard.

    When a user launches a published Cloud App, that app runs on a full Cloud PC under the hood. The published app can launch other applications that exist on the Cloud PC image, even if those other apps haven’t been published as Cloud Apps.

    For example: if you publish Outlook as a Cloud App and a user clicks a link in an email, it can launch Edge — even if Edge isn’t published. If an app has a “Open in Explorer” option, it could launch File Explorer.

    For many scenarios, this is fine and even expected behaviour. But if you’re in a regulated environment or need strict application control, you should layer Application Control for Windows (formerly Windows Defender Application Control) on top of Cloud Apps to enforce exactly which executables can run on the underlying Cloud PC.

    Don’t assume that publishing three apps means only three apps can run. The published app list controls what the user can launch directly — not what can execute on the session host.

    What’s Still in Preview

    A few things to be aware of that are still in preview or coming soon:

    Enhanced user experiences for Cloud Apps are in public preview. This includes improved Windows Snap support, full-screen mode, better DPI handling, and visual refinements like borders, shadows, and theme integration. These improvements use the same RemoteApp enhancements available in Azure Virtual Desktop.

    Autopilot Device Preparation support for Cloud Apps is also in public preview. This gives you an alternative to custom images for getting apps onto the underlying Cloud PCs — you can use Autopilot Device Preparation policies to install apps during provisioning, and Cloud Apps will discover them once installed.

    User Experience Sync allows app settings and data to persist between user sessions on shared Cloud PCs. Since Cloud Apps runs on shared-mode Frontline Cloud PCs, user state would normally be lost when a session ends. User Experience Sync preserves settings and data, which is important for apps that store user preferences locally.

    The Bigger Picture

    Cloud Apps has been a “watch this space” feature since it launched. The concept was right — not every user needs a full desktop, and app-only delivery is often the better fit for frontline and contractor scenarios. But the Win32 limitation made it hard to recommend for production use when you couldn’t even publish Teams.

    With APPX and MSIX support, that changes. The feature is now capable of delivering the apps that most organisations actually need in frontline scenarios. Combined with the Frontline shared licensing model, it’s a genuinely cost-effective alternative to provisioning full Cloud PCs for users who only need a handful of apps.

    If you evaluated Cloud Apps earlier and parked it because of app support gaps, it’s worth taking another look. The gap that mattered most is now closed.


    Wayne Bellows is a Technical Account Manager at Nerdio. He writes about Azure Virtual Desktop, Windows 365, Intune, and the EUC industry at modern-euc.com.

  • March 31, 2026, is coming: New Azure VNets won’t have outbound internet by default — here’s the EUC-ready fix (NAT Gateway v2)

    March 31, 2026, is coming: New Azure VNets won’t have outbound internet by default — here’s the EUC-ready fix (NAT Gateway v2)

    The change that won’t hurt… until it does

    If you run Azure Virtual Desktop (AVD) or Windows 365 (Cloud PCs) in Azure, you’ve probably relied on a quiet convenience for years:

    Deploy a VM in a subnet and—without doing anything special—it can reach the internet.

    That “it just works” behavior is going away by default for new networks.

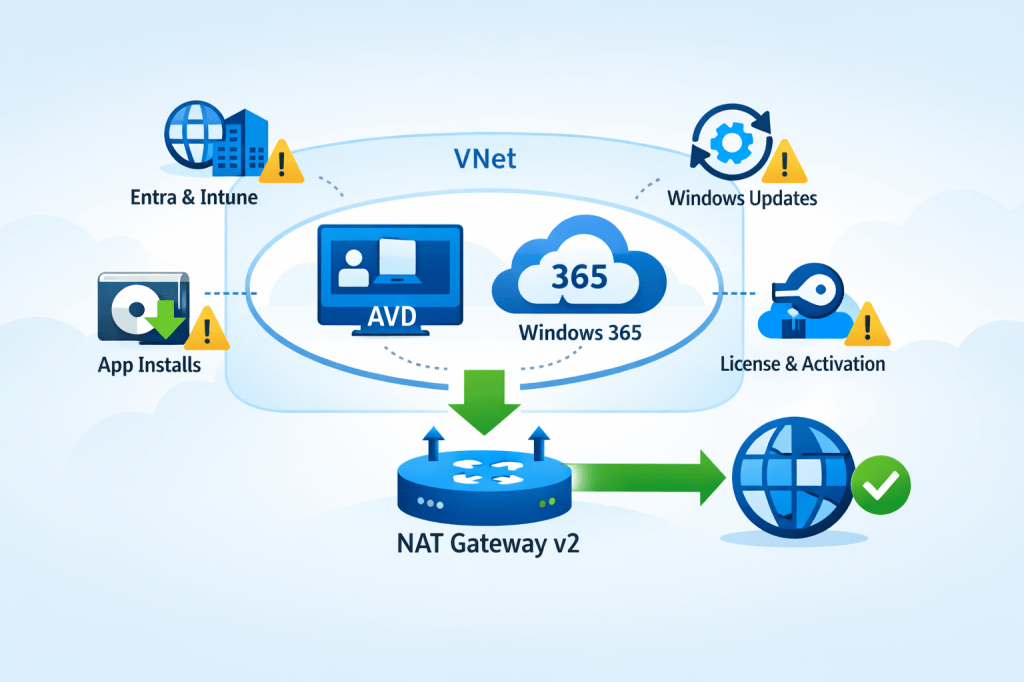
    Microsoft has confirmed that after March 31, 2026, newly created Azure Virtual Networks will default to private subnets, meaning no default outbound internet access unless you explicitly configure an outbound method.

    And here’s the trap: nothing breaks on day one. Your existing VNets keep working as they do today. Then, weeks later, someone builds a new VNet (or a new subnet), tries to deploy AVD session hosts or provision Cloud PCs… and suddenly:

    • Hosts can’t download what they need
    • Windows activation and updates don’t behave
    • Intune enrollment/sync gets weird
    • Provisioning workflows fail in ways that look like “AVD is broken” (it’s not)

    Microsoft explicitly notes that certain services (including Windows activation and Windows updates) won’t function in a private subnet unless you add explicit outbound connectivity.

    So, let’s make this change boring—in a good way. ✅


    What exactly is changing on March 31, 2026?

    ✅ What changes

    • New VNets created after March 31, 2026 will default to private subnets (Azure sets the subnet property defaultOutboundAccess = false by default).
    • Private subnets mean VMs do not get “default outbound access” to the internet or public Microsoft endpoints unless you configure an explicit egress method.

    ✅ What does not change

    • Existing VNets are not automatically modified.
    • New VMs deployed into existing VNets will continue to behave as those subnets are configured today, unless you change those subnets.

    Also important: you still have control

    Microsoft’s guidance is “secure by default,” but you can still configure subnets as non-private if you truly need to keep the default outbound behavior for a period of time.
    That said… for EUC, the better long-term move is to standardize on explicit outbound now.


    Why AVD and Windows 365 teams should care (more than most)

    EUC workloads have a long list of dependencies on outbound connectivity. A few high-impact examples:

    AVD session hosts

    • Agent/bootloader downloads and updates
    • Host registration and service connectivity
    • Windows activation + KMS / public activation flows
    • Windows Update / Defender updates
    • App install flows that fetch from internet endpoints (MSIX, Winget, vendor CDNs, etc.)
    • Telemetry and management paths (depending on your architecture)

    Windows 365 (Azure Network Connection / ANC)

    Microsoft is explicit here: for Windows 365 ANC deployments using VNets created after March 31, 2026, Cloud PC provisioning will fail unless outbound internet access is explicitly configured.

    So the question becomes: what’s the cleanest, most repeatable outbound design for EUC networks?


    Your outbound options (EUC decision guide)

    Azure recognizes several “explicit outbound” patterns.
    For EUC, these are the common ones:

    1) NAT Gateway (recommended default for most EUC spokes)

    Best when:

    • You want simple, scalable outbound for session hosts / Cloud PCs
    • You need a predictable egress IP for allow-lists
    • You don’t need deep L7 inspection for all traffic (or you’re doing that elsewhere)

    2) Firewall/NVA + UDR (hub-and-spoke inspection)

    Best when:

    • You need central inspection, TLS break/inspect, egress filtering at scale
      Trade-offs:
      • Complexity and cost
      • SNAT scaling considerations
      • You may still use NAT Gateway with firewall designs (more on that below)

    3) Standard Load Balancer outbound rules

    Best when:

    • You already have SLB, and outbound rules are a deliberate part of your design
      Trade-offs:
    • More moving parts than NAT Gateway for a simple “give the subnet internet” outcome

    4) Public IP per VM (usually a “no” for EUC)

    Trade-offs:

    • Operational overhead
    • Increased attack surface
    • Harder to govern at scale for pooled hosts / Cloud PCs

    For most AVD and Windows 365 environments, the sweet spot is:
    ➡️ NAT Gateway for outbound simplicity and scale.

    And now we have a better version of it.


    Enter NAT Gateway v2: the “make it simple” fix

    Microsoft announced StandardV2 NAT Gateway and StandardV2 Public IPs to match it. The headline improvements are exactly what EUC architects care about:

    • Zone-redundant by default (in regions with Availability Zones)
    • Higher performance (Microsoft calls out up to 100 Gbps throughput and 10 million packets/sec)
    • IPv6 support
    • Flow logs support
    • Same price as Standard NAT Gateway (per Microsoft’s announcement)

    But know the gotchas

    From Microsoft’s NAT SKU guidance:

    • Requires StandardV2 Public IPs (Standard PIP won’t work)
    • No in-place upgrade from Standard → StandardV2 NAT Gateway (replace it)
    • Some regions don’t support StandardV2 NAT Gateway (check your target region list)

    If you’re designing for EUC scale + resilience, the zone redundancy alone is a big deal.


    Walkthrough: Deploy NAT Gateway v2 for AVD / Windows 365

    Below is a practical, EUC-focused setup using the Azure portal.

    Architecture target

    • You have a VNet with one or more EUC subnets (e.g., AVD-Hosts, CloudPCs)
    • You attach one NAT Gateway v2 to those subnets
    • All outbound traffic from those subnets egresses via the NAT’s public IP(s)

    NAT Gateway is associated at the subnet level, and a subnet can only use one NAT gateway at a time (so plan accordingly).


    Step 0: Confirm your subnet posture (private vs not)

    After March 31, 2026, new VNets will default to private subnets.

    In the subnet configuration in Azure:

    • Find Default outbound access
    • If you want the secure-by-default posture, set it Disabled (private subnet)
    • Then ensure you provide explicit outbound (NAT Gateway)

    Note: if you change an existing subnet’s default outbound access setting, existing VMs may need a stop/deallocate to fully apply the change.


    Step 1: Create a StandardV2 Public IP

    NAT Gateway v2 requires a StandardV2 Public IP.

    Azure portal:

    1. Create Public IP address
    2. Set:
      • SKU: StandardV2 (static)
      • IP version: IPv4 (or dual-stack if required)
    3. Create it

    Step 2: Create the NAT Gateway (StandardV2)

    Azure portal:

    1. Create NAT gateway
    2. Set:
      • SKU: StandardV2
      • TCP idle timeout: leave default unless you have a reason
    3. On Outbound IP, attach the StandardV2 Public IP you created
    4. Create

    Microsoft’s announcement emphasizes StandardV2 NAT Gateway is zone-redundant by default in AZ regions.


    Step 3: Attach NAT Gateway v2 to your EUC subnet(s)

    Now associate it with the subnets where your session hosts / Cloud PCs live.

    Option A (from NAT Gateway):

    • NAT Gateway → Networking → add VNet/subnet associations

    Option B (from Subnet):

    • VNet → Subnets → select subnet → set NAT gateway → Save

    Once attached:

    • VMs in that subnet gain outbound connectivity through the NAT Gateway
    • Your egress IP becomes the NAT’s public IP (useful for allow-listing)

    Step 4: Validate (don’t skip this)

    For EUC, I like three quick validations:

    1. Effective routes
    • Confirm the subnet has the expected path for internet-bound traffic (0.0.0.0/0) via the platform egress with NAT.
    1. Outbound IP check
    • From a session host / Cloud PC, verify outbound IP matches your NAT public IP.
    1. EUC-specific smoke tests
    • Windows activation / licensing behavior
    • Windows Update connectivity
    • Intune enrollment/sync (if applicable)
    • Any app deployment mechanisms that pull from vendor CDNs

    Remember: Microsoft explicitly warns that private subnets need explicit outbound for services like Windows activation/updates.


    Common EUC deployment patterns (what I recommend)

    Pattern A: “EUC spoke NAT” (simple + effective)

    • Each EUC spoke VNet has a NAT Gateway v2 attached to EUC subnets
    • Keep routing simple
    • Use NSGs for egress control + consider NAT flow logs for visibility (where needed)

    Pattern B: “Hub inspection + NAT scale”

    If you route everything through a firewall/NVA for inspection, NAT Gateway can still be relevant in designs where you need scalable SNAT characteristics for outbound (especially when you’ve seen firewall SNAT constraints in the wild). This becomes an architecture conversation, but the key is: private subnets force you to be explicit, and NAT Gateway is the simplest explicit egress building block.


    “Do this before March 31, 2026” checklist

    For AVD admins, Windows 365 admins, and EUC architects:

    • Identify where your org creates “new VNets” (projects, regions, subscriptions)
    • Update your EUC network templates to include explicit outbound (NAT Gateway v2 is the default pick)
    • Standardize an allow-listing approach using the NAT’s static public IP(s)
    • Decide logging posture (do you want NAT flow logs for troubleshooting/top talkers?)
    • Run a “new VNet” dry run now (don’t wait for the deadline)
    • For Windows 365 ANC: confirm your provisioning pipelines won’t fail on new VNets without explicit outbound

    Final thought: make your cloud consistent

    This change is “secure by default,” but operationally it creates a nasty split-brain risk: old VNets behave one way, new VNets behave another.

    The easiest way to keep EUC stable is to choose a consistent outbound pattern everywhere. For most AVD + Windows 365 environments, NAT Gateway v2 is the cleanest baseline: zone-resilient, scalable, and straightforward to operate.