For years, redirection in end-user computing has been a light switch. Clipboard redirection: on or off. Drive redirection: on or off. Printer and USB: same deal. You set it at the host pool or the Cloud PC, and that was the experience for every user, on every device, from everywhere.
That made sense when “everywhere” meant the office and maybe a corporate laptop at home. It makes a lot less sense now. The same user connects from a managed, compliant laptop in the morning and a personal tablet on the train an hour later. One policy can’t tell the difference, so you end up choosing: lock everything down and annoy people on trusted devices, or open things up and accept the data leakage risk on the ones you don’t control.
Microsoft’s answer is context-based redirection, now in public preview for Azure Virtual Desktop and Windows 365. This post covers what it is, why it’s worth your attention, and the exact steps to configure it for both platforms, including the gotchas that’ll trip you up if you go in cold.
What context-based redirection actually changes
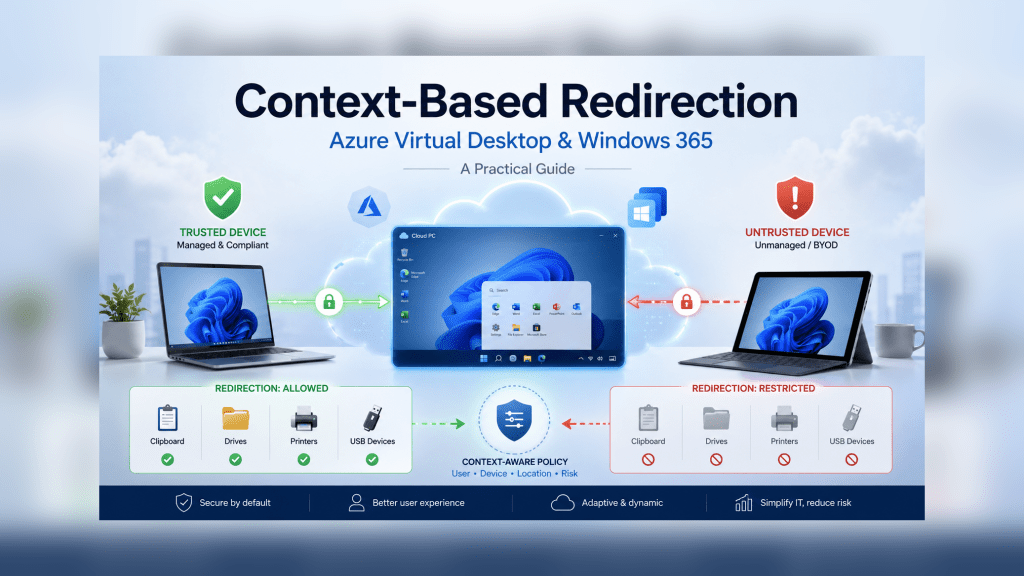
The shift is small to describe and big in practice. Instead of asking “should clipboard redirection be allowed?”, you can now ask “should clipboard redirection be allowed for this session?” — where the session carries context like who the user is, whether their device is compliant, and where they’re connecting from.
It works by tying a redirection setting to a Microsoft Entra authentication context, which in turn is governed by a Conditional Access policy. The Conditional Access policy is where the actual decision lives: require a compliant device, require a trusted location, whatever your risk appetite calls for. The redirection setting just points at that context and says, “follow those rules.”
The four redirections you can control this way today are:
- Clipboard
- Drive
- Printer
- USB
So a managed, compliant device connecting from a known location can get full clipboard and drive redirection, while the same user on an unmanaged personal device gets neither. Same user, same host pool, different trust, different experience. That’s the whole point.
Why you’d actually use it
The honest answer is data leakage control without the usual usability tax.
Most organisations that care about data exfiltration end up blocking clipboard and drive redirection outright, because the alternative is trusting every endpoint equally. Context-based redirection lets you stop punishing your well-managed estate for the existence of BYOD. Compliant devices get a frictionless experience; everything else gets the locked-down one. You’re matching the control to the actual risk of the session rather than the lowest common denominator.
It’s the same Zero Trust thinking that’s already shaping authentication, finally applied to device redirection. Less static policy, more dynamic trust.
Before you start: prerequisites and one big gotcha
A few things need to be true before any of this works.
You need Microsoft Entra ID Premium (P1 or P2). Authentication contexts and Conditional Access policies are premium features. If your tenant has no premium licences, the “New authentication context” button is simply greyed out and you’ll go no further. Worth checking first, under Entra ID > Licenses, before you waste twenty minutes.
It’s still rolling out. This is public preview, and the configuration options are appearing tenant by tenant. If you open your host pool’s RDP properties and don’t see the new dropdown option yet, you’re not doing anything wrong; it just hasn’t reached you. Keep checking back.
The most restrictive policy wins. This is the one that’ll catch you. If you already manage redirections through other Intune settings or Group Policy, those existing policies can override your context-based configuration, because Windows applies the most restrictive setting. Before testing, set the redirections you want to control to Not configured or Enabled in any existing policies. Otherwise, you’ll configure everything correctly, test it, see nothing change, and lose an afternoon working out why.
Step 1: Create the authentication context and Conditional Access policy
This part is identical for both AVD and Windows 365. You’re building the rule that everything else points at.
- Sign in to the Azure Portal and search for Microsoft Entra Conditional Access.
- Go to Manage > Authentication contexts.
- Select New authentication context.
- Give it a name and description, something you’ll recognise later, like Compliant devices — full redirection.
- Tick Publish to apps and pick a value from the ID dropdown.
- Select Save.
Now, create the Conditional Access policy that gives the context its meaning:
- Still in Conditional Access, go to Policies and select New policy.
- Name it clearly.
- Under Users or agents, include All users (scope this to a pilot group while you test).
- Under Target resources, change the dropdown to Authentication context and select the context you just created.
- Under Grant, choose Grant access and tick Require device to be marked as compliant, then select.
- Set Enable policy to On and select Create.
That’s the trust decision defined. Compliant device, access granted to the context; non-compliant, denied. Everything downstream now inherits that logic.
Step 2 (AVD): Map the context in host pool RDP properties
For Azure Virtual Desktop, the mapping happens at the host pool level, so it applies to every session host in that pool.
- In the Azure Portal, search for Azure Virtual Desktop and open it.
- Select Host pools and choose your host pool.
- Open RDP Properties, then the Device redirection tab.
- Find the redirection you want to control — say, Clipboard redirection.
- In its dropdown, select Dynamically configure using authentication context.
- An Authentication context selector appears. Choose the context from Step 1.
- Select Save.
Repeat for any of the other three redirections you want governed the same way. The Device redirection tab is also where you’ll confirm the preview has reached you: if the dropdown only offers the old static choices (available / isn’t available / not configured), the dynamic option hasn’t rolled out to your tenant yet.
Step 2 (Windows 365): Map the context in Intune
For Cloud PCs, the mapping lives in Intune through a Remote Connection Experience policy.
- In Intune, go to Devices > Manage Windows 365 Cloud PCs > Cloud PC Settings.
- Select Create > Remote Connection Experience (preview).
- Give it a name and description.
- Under Configuration settings > Device redirections, find your target redirection and select Authentication context: Context-based redirection.
- Choose your authentication context in the selector that appears.
- Set any scope tags, then move to Assignments.
This is the second gotcha worth burning into memory: assign the Remote Connection Experience policy to device groups (your Cloud PCs), not user groups. Context-based redirection for Windows 365 is enforced at the device level. Assign it to users, and it simply won’t apply. Finish with Review + create.
Step 3: Validate it works
Testing needs two devices at different trust levels, which is the only honest way to prove it’s working.
- Connect from a managed, compliant device that satisfies your Conditional Access policy. Confirm the configured redirections are available in the session.
- Connect to the same host pool or Cloud PC from a BYOD or non-compliant device. Confirm the redirections are restricted or gone.
If the behaviour isn’t what you expect, work through this list before assuming the feature is broken:
- Check the Conditional Access policy assignment and the authentication context configuration.
- Check the device’s compliance status in Microsoft Entra ID / Intune.
- Check the host pool RDP property (AVD) or the Remote Connection Experience policy assignment (Windows 365).
- Check for any existing redirection policy that might be overriding it — remember, most restrictive wins.
That last point is, nine times out of ten, the culprit.
Where this fits
Context-based redirection won’t change your architecture, but it does close a gap that’s been awkward for a long time: the gap between “trust this endpoint completely” and “trust it not at all.” Most real estates live somewhere in the middle, and until now, the tooling didn’t.
It’s preview, so treat it as preview — pilot it, don’t roll it across production on day one, and keep an eye on the docs as the configuration surfaces light up across tenants. But it’s the kind of incremental, sensible control that’s genuinely useful the moment it lands. If you run Azure Virtual Desktop or Windows 365 and you’ve ever had the BYOD-versus-data-leakage argument, this is one to test.
Found this useful? I’d be interested to hear how you’re approaching device trust in your own EUC estate — drop a comment.

Leave a comment