Tag: EUC

  • How to run Azure Virtual Desktop with cloud-only and external identities using FSLogix

    How to run Azure Virtual Desktop with cloud-only and external identities using FSLogix

    If you’ve ever tried to stand up Azure Virtual Desktop in a properly cloud-native tenant, with no on-premises Active Directory and no Entra Domain Services, you’ll know where it falls over. Not the session hosts. Not the networking. The profiles.

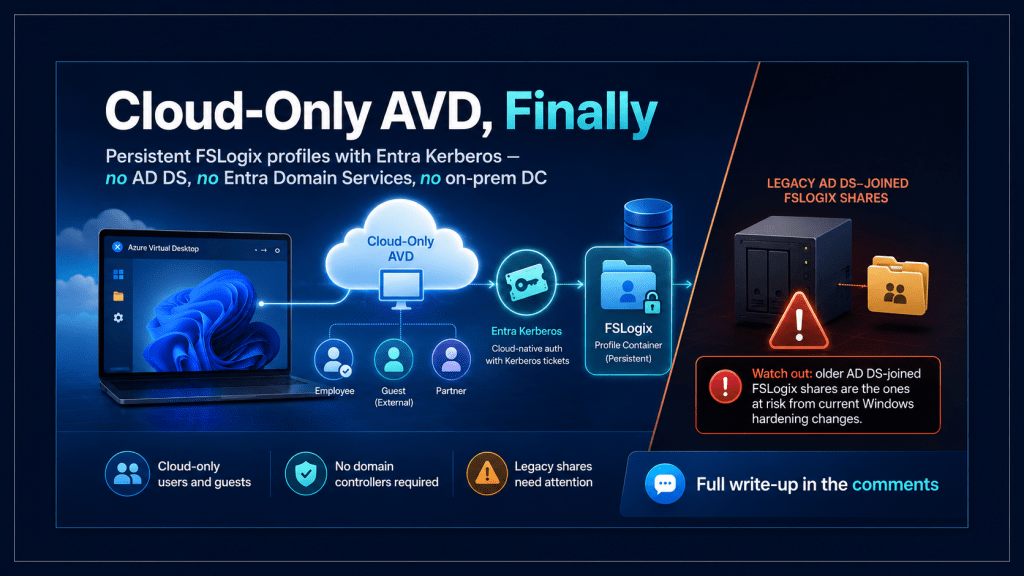
    FSLogix has needed some form of Active Directory for years, which made it the one component that kept dragging a “cloud-only” AVD design back towards a domain controller. That’s now changed. FSLogix profile containers on Azure Files can authenticate with Microsoft Entra Kerberos, which means cloud-only users, and even external guest users, can get a real, persistent profile with no domain controller anywhere in the picture.

    This post covers how to set that up end-to-end. It also covers the part that isn’t in the announcement posts: a Windows Kerberos hardening change landing in 2026 that can break FSLogix profile access on Active Directory-integrated storage, including shares you built years ago. It’s a good reason to understand the cloud-only path, because that path sidesteps the whole problem. Read that section before you touch production.

    The problem cloud-only AVD always hit

    FSLogix works by redirecting the user’s profile into a VHD(X) container on an SMB file share, then attaching it at sign-in. On a pooled host pool, that’s what gives a user the same desktop, settings, and Outlook cache on whichever session host they land on.

    The catch was always authentication to that file share. Azure Files historically required on-premises AD DS or Entra Domain Services to handle the Kerberos side. In a tenant that had neither, your options were ugly: stand up Entra Domain Services purely to host profiles, or accept that cloud-only and guest users got a fresh temporary profile every session. No roaming, no persistence, no cached sign-ins. For a genuinely cloud-first organisation, that was the line item that stopped the whole design from being clean.

    What Entra Kerberos changes

    Microsoft Entra Kerberos lets Entra ID issue the Kerberos tickets needed to reach an Azure Files share over SMB, without any domain controller involved. Applied to FSLogix, which unlocks three identity types on Azure Files:

    • Hybrid identities from Entra joined, or Entra hybrid joined session hosts, with no network line-of-sight to a domain controller. Supported in Azure commercial, Azure for US Government, and Azure operated by 21Vianet.
    • Cloud-only identities (users who only exist in Entra ID and never in an on-premises AD).
    • External identities (B2B guests invited into your tenant).

    The cloud-only and external paths are supported in the Azure commercial cloud only. If you’re running in US Gov or 21Vianet, only the hybrid path is available to you, so don’t design around cloud-only profiles there.

    The practical upshot: a pure Entra-joined session host can now load a persistent FSLogix profile for a user who has never existed in an on-premises directory. That’s the missing piece for cloud-native AVD, and it’s genuinely useful for any estate that hands desktops to contractors or partners as guests.

    Read this first: the RC4 to AES-SHA1 change

    Here’s the bit that isn’t in the launch coverage, and the reason I’d check your existing estate before building anything new.

    Starting with the April 2026 Windows cumulative update, Kerberos default behaviour changes. When an Active Directory object’s encryption type is left unset (null), Windows defaults to AES-SHA1 instead of the legacy behaviour that often landed on RC4. This is a Windows platform security change tied to CVE-2026-20833, and to be clear, the Azure Virtual Desktop service itself isn’t being modified.

    The thing to understand is what’s actually in scope. This affects FSLogix profile storage that authenticates over SMB integrated with Active Directory: on-premises AD, a NAS, a file server, or Azure Files joined to AD DS, where the relevant AD objects or service accounts are RC4-only or have encryption left null. If a dependent system doesn’t support AES-SHA1 for Kerberos, authentication can fail, and profiles can stop loading.

    Notice what’s not on that list: a pure Entra Kerberos, cloud-only share. Entra Kerberos isn’t AD Kerberos, so by the mechanism described, the cloud-only path in this post sidesteps this particular change. The deployments most exposed are the older, domain-joined FSLogix shares, exactly the ones a cloud-native design is trying to move away from. If you’re migrating off a hybrid AD DS setup, the legacy share is the thing to remediate before you decommission it.

    One caveat on that, because the two Microsoft sources don’t word it identically. The FSLogix product documentation states the warning more broadly: file shares hosting FSLogix containers that aren’t upgraded to AES-SHA1 might have access issues, and customers who have already moved to AES-SHA1 aren’t affected. The detailed hardening blog is the one that ties the actual mechanism to AD object encryption and AD-integrated SMB storage. I read the technical scope as AD-Kerberos paths, which is why I’m calling out the domain-joined shares specifically, but the safe operational rule Microsoft is pushing is simpler: make sure any Azure Files share holding FSLogix profiles is on AES-SHA1, and validate it, rather than assuming you’re exempt. If you’re not certain which Kerberos path a given share uses, treat it as in scope and check.

    The timeline matters. From April 2026, enforcement mode is the default on domain controllers, with audit mode available as a manual rollback until July 2026. From July 2026, audit mode is removed, and enforcement is the only option. Microsoft recommends remediating by the end of June 2026, especially for non-Azure Files SMB storage and Azure Files with AD DS.

    So before anything else: identify RC4 usage and null encryption settings on the AD objects tied to your FSLogix storage, move them to AES-SHA1, and validate sign-in and profile load end-to-end. Microsoft’s FSLogix blog (“Action required: Windows Kerberos hardening (RC4) may affect FSLogix profiles on SMB storage”) is worth ten minutes before any of the steps below.

    Setting it up: the storage account

    With that warning logged, here’s the build. Start with the Azure Files side.

    First, a constraint that catches people out: a storage account can authenticate with one identity method only. Entra Kerberos, or AD DS, or Entra Domain Services, not a mix. If your account is already wired to AD DS for an existing share, you can’t bolt Entra Kerberos onto the same account.

    The sequence on the storage account is:

    1. Create the storage account and an Azure Files share for the profiles, if you don’t already have them.
    2. Enable Microsoft Entra Kerberos authentication on the storage account. This creates the Entra ID app registration for the account and lets you assign permissions to Entra groups.
    3. Assign share-level permissions, either through the default share-level permission on the identity source page or with Azure RBAC roles.
    4. Configure the directory and file-level permissions for the profile containers, following Microsoft’s recommended FSLogix permission set, so users can create and use their own profile while admins retain management access. For cloud-only and external users, you do this through the Manage access control on the share.
    5. Grant admin consent to the new service principal, so users can request Entra tokens for the storage account.
    6. Disable multifactor authentication on the storage account.

    That last one always raises an eyebrow, so it’s worth being clear about why. The Kerberos ticket is acquired silently during sign-in, and there’s no interface at that point to perform a step-up MFA prompt. If MFA is enforced on the storage account, the silent ticket request fails, and the profile won’t mount. You’re not weakening user sign-in MFA here; Conditional Access on the user still applies. You’re allowing the storage account’s own token acquisition to complete without a step-up, it has no way to satisfy.

    Setting it up: the session host

    Now the session host. The profile won’t attach until the host knows to fetch a cloud Kerberos ticket at logon.

    Enable CloudKerberosTicketRetrievalEnabled using whichever of these fits your management approach:

    • Intune Settings Catalog (the modern route): the Kerberos Policy CSP setting CloudKerberosTicketRetrievalEnabled. Worth noting that Windows multi-session client editions now support this setting when it’s applied through the Settings Catalog, which wasn’t always the case.
    • Group Policy: Administrative Templates\System\Kerberos\Allow retrieving the cloud kerberos ticket during the logon.
    • Registry, if you’re baking it into an image:
    reg add HKLM\SYSTEM\CurrentControlSet\Control\Lsa\Kerberos\Parameters /v CloudKerberosTicketRetrievalEnabled /t REG_DWORD /d 1

    Next, let the FSLogix credential keys roam. When you use Entra ID with a roaming profile, the Credential Manager keys have to belong to the profile that’s currently loading, otherwise you’re effectively pinned to one machine. Set:

    reg add HKLM\Software\Policies\Microsoft\AzureADAccount /v LoadCredKeyFromProfile /t REG_DWORD /d 1

    Then the FSLogix configuration itself. If your session hosts were built by the Azure Virtual Desktop service, FSLogix is already installed. Set the usual two values:

    • Enabled = 1
    • VHDLocations = \\<storage-account-name>.file.core.windows.net\<file-share-name>

    Sign in with a test account that’s been assigned to an app group on the host pool and has permission to the share. If it’s worked, you’ll see a directory on the share named like <user SID>_<username>. Use a fresh test account, or enable DeleteLocalProfileWhenVHDShouldApply, so an existing local profile doesn’t mask whether the container is actually mounted.

    The cloud-only step everyone misses

    If your users are cloud-only and you assign share access by Entra group, there’s one more step that is easy to skip and fails silently when you do.

    You have to add an app manifest tag to the storage account’s Entra app registration so that Entra includes cloud-only group SIDs in the Kerberos ticket. Without it, Entra only puts on-premises group SIDs in the ticket; your cloud-only groups never appear, and group-based permissions to the share simply don’t take effect. No error that points to the cause, just access that doesn’t work.

    In the app registration manifest, add kdc_enable_cloud_group_sids to the tags array. This step is mandatory for cloud-only identities. Hybrid identities don’t need it, which is exactly why it catches people moving from a hybrid design to a cloud-only one. The thing that worked before now quietly doesn’t, and the difference is one manifest tag.

    External identities: real, but mind the preview line

    External (guest) identity support is the newest part of this story, and it’s worth being precise about what’s actually shipped. Connecting to Azure Virtual Desktop and Windows 365 with an external identity is generally available. Using FSLogix to give those external identities a persistent profile is still in public preview.

    That distinction matters if you’re planning a rollout. A contractor can sign in to your AVD environment today on a fully supported path. Giving them a roaming FSLogix profile that follows them across session hosts is the preview part, so treat it accordingly: pilot it with a small guest cohort, don’t promise it in a contract yet.

    A few requirements specific to external identities are easy to miss. Microsoft Entra single sign-on must be configured for the connection. The session host has to be Entra joined and running Windows 11, version 24H2 or later with the September 2025 cumulative update (KB5065789) or newer. And for Azure Virtual Desktop, you also have to assign the Virtual Machine User Login Azure RBAC role to the external identity on the VMs they’ll sign in to, which you don’t have to think about for your own member users. It’s commercial-cloud only, like the cloud-only path.

    Wrapping up

    Cloud-only and external identity support for FSLogix removes the last real reason a cloud-native AVD design had to drag a domain controller, or Entra Domain Services, along for the ride. For genuinely cloud-first organisations, that’s a meaningful simplification, and for anyone serving guests, it opens a door that used to be shut.

    Just sequence it correctly. If you’ve still got legacy FSLogix storage joined to AD DS, sort out the RC4 to AES-SHA1 migration on it before the Windows enforcement deadlines force the issue, because that’s the part that affects deployments you’ve already got running. The cloud-only Entra Kerberos path you’re building towards doesn’t carry that particular baggage, which is one more reason to make the move. And if your use case is external guests, remember the FSLogix profile piece is still in preview, so pilot before you promise.

    If you’re running cloud-only AVD already, or about to, I’d genuinely like to know how the external-identity profiles are holding up for you. Drop a comment.

  • Context-Based Redirection in Azure Virtual Desktop and Windows 365: A Practical Guide

    Context-Based Redirection in Azure Virtual Desktop and Windows 365: A Practical Guide

    For years, redirection in end-user computing has been a light switch. Clipboard redirection: on or off. Drive redirection: on or off. Printer and USB: same deal. You set it at the host pool or the Cloud PC, and that was the experience for every user, on every device, from everywhere.

    That made sense when “everywhere” meant the office and maybe a corporate laptop at home. It makes a lot less sense now. The same user connects from a managed, compliant laptop in the morning and a personal tablet on the train an hour later. One policy can’t tell the difference, so you end up choosing: lock everything down and annoy people on trusted devices, or open things up and accept the data leakage risk on the ones you don’t control.

    Microsoft’s answer is context-based redirection, now in public preview for Azure Virtual Desktop and Windows 365. This post covers what it is, why it’s worth your attention, and the exact steps to configure it for both platforms, including the gotchas that’ll trip you up if you go in cold.

    What context-based redirection actually changes

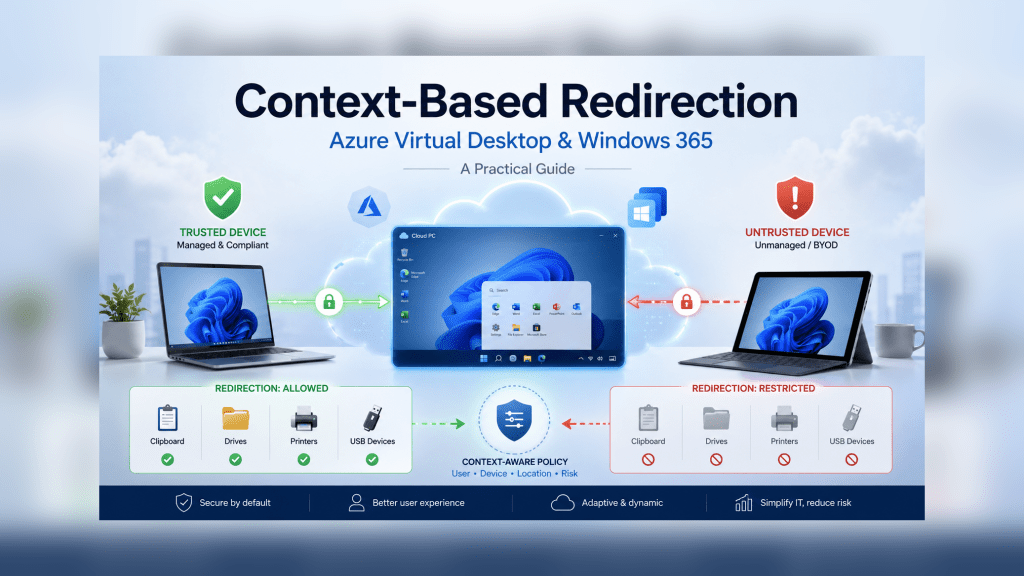
    The shift is small to describe and big in practice. Instead of asking “should clipboard redirection be allowed?”, you can now ask “should clipboard redirection be allowed for this session?” — where the session carries context like who the user is, whether their device is compliant, and where they’re connecting from.

    It works by tying a redirection setting to a Microsoft Entra authentication context, which in turn is governed by a Conditional Access policy. The Conditional Access policy is where the actual decision lives: require a compliant device, require a trusted location, whatever your risk appetite calls for. The redirection setting just points at that context and says, “follow those rules.”

    The four redirections you can control this way today are:

    • Clipboard
    • Drive
    • Printer
    • USB

    So a managed, compliant device connecting from a known location can get full clipboard and drive redirection, while the same user on an unmanaged personal device gets neither. Same user, same host pool, different trust, different experience. That’s the whole point.

    Why you’d actually use it

    The honest answer is data leakage control without the usual usability tax.

    Most organisations that care about data exfiltration end up blocking clipboard and drive redirection outright, because the alternative is trusting every endpoint equally. Context-based redirection lets you stop punishing your well-managed estate for the existence of BYOD. Compliant devices get a frictionless experience; everything else gets the locked-down one. You’re matching the control to the actual risk of the session rather than the lowest common denominator.

    It’s the same Zero Trust thinking that’s already shaping authentication, finally applied to device redirection. Less static policy, more dynamic trust.

    Before you start: prerequisites and one big gotcha

    A few things need to be true before any of this works.

    You need Microsoft Entra ID Premium (P1 or P2). Authentication contexts and Conditional Access policies are premium features. If your tenant has no premium licences, the “New authentication context” button is simply greyed out and you’ll go no further. Worth checking first, under Entra ID > Licenses, before you waste twenty minutes.

    It’s still rolling out. This is public preview, and the configuration options are appearing tenant by tenant. If you open your host pool’s RDP properties and don’t see the new dropdown option yet, you’re not doing anything wrong; it just hasn’t reached you. Keep checking back.

    The most restrictive policy wins. This is the one that’ll catch you. If you already manage redirections through other Intune settings or Group Policy, those existing policies can override your context-based configuration, because Windows applies the most restrictive setting. Before testing, set the redirections you want to control to Not configured or Enabled in any existing policies. Otherwise, you’ll configure everything correctly, test it, see nothing change, and lose an afternoon working out why.

    Step 1: Create the authentication context and Conditional Access policy

    This part is identical for both AVD and Windows 365. You’re building the rule that everything else points at.

    1. Sign in to the Azure Portal and search for Microsoft Entra Conditional Access.
    2. Go to Manage > Authentication contexts.
    3. Select New authentication context.
    4. Give it a name and description, something you’ll recognise later, like Compliant devices — full redirection.
    5. Tick Publish to apps and pick a value from the ID dropdown.
    6. Select Save.

    Now, create the Conditional Access policy that gives the context its meaning:

    1. Still in Conditional Access, go to Policies and select New policy.
    2. Name it clearly.
    3. Under Users or agents, include All users (scope this to a pilot group while you test).
    4. Under Target resources, change the dropdown to Authentication context and select the context you just created.
    5. Under Grant, choose Grant access and tick Require device to be marked as compliant, then select.
    6. Set Enable policy to On and select Create.

    That’s the trust decision defined. Compliant device, access granted to the context; non-compliant, denied. Everything downstream now inherits that logic.

    Step 2 (AVD): Map the context in host pool RDP properties

    For Azure Virtual Desktop, the mapping happens at the host pool level, so it applies to every session host in that pool.

    1. In the Azure Portal, search for Azure Virtual Desktop and open it.
    2. Select Host pools and choose your host pool.
    3. Open RDP Properties, then the Device redirection tab.
    4. Find the redirection you want to control — say, Clipboard redirection.
    5. In its dropdown, select Dynamically configure using authentication context.
    6. An Authentication context selector appears. Choose the context from Step 1.
    7. Select Save.

    Repeat for any of the other three redirections you want governed the same way. The Device redirection tab is also where you’ll confirm the preview has reached you: if the dropdown only offers the old static choices (available / isn’t available / not configured), the dynamic option hasn’t rolled out to your tenant yet.

    Step 2 (Windows 365): Map the context in Intune

    For Cloud PCs, the mapping lives in Intune through a Remote Connection Experience policy.

    1. In Intune, go to Devices > Manage Windows 365 Cloud PCs > Cloud PC Settings.
    2. Select Create > Remote Connection Experience (preview).
    3. Give it a name and description.
    4. Under Configuration settings > Device redirections, find your target redirection and select Authentication context: Context-based redirection.
    5. Choose your authentication context in the selector that appears.
    6. Set any scope tags, then move to Assignments.

    This is the second gotcha worth burning into memory: assign the Remote Connection Experience policy to device groups (your Cloud PCs), not user groups. Context-based redirection for Windows 365 is enforced at the device level. Assign it to users, and it simply won’t apply. Finish with Review + create.

    Step 3: Validate it works

    Testing needs two devices at different trust levels, which is the only honest way to prove it’s working.

    1. Connect from a managed, compliant device that satisfies your Conditional Access policy. Confirm the configured redirections are available in the session.
    2. Connect to the same host pool or Cloud PC from a BYOD or non-compliant device. Confirm the redirections are restricted or gone.

    If the behaviour isn’t what you expect, work through this list before assuming the feature is broken:

    • Check the Conditional Access policy assignment and the authentication context configuration.
    • Check the device’s compliance status in Microsoft Entra ID / Intune.
    • Check the host pool RDP property (AVD) or the Remote Connection Experience policy assignment (Windows 365).
    • Check for any existing redirection policy that might be overriding it — remember, most restrictive wins.

    That last point is, nine times out of ten, the culprit.

    Where this fits

    Context-based redirection won’t change your architecture, but it does close a gap that’s been awkward for a long time: the gap between “trust this endpoint completely” and “trust it not at all.” Most real estates live somewhere in the middle, and until now, the tooling didn’t.

    It’s preview, so treat it as preview — pilot it, don’t roll it across production on day one, and keep an eye on the docs as the configuration surfaces light up across tenants. But it’s the kind of incremental, sensible control that’s genuinely useful the moment it lands. If you run Azure Virtual Desktop or Windows 365 and you’ve ever had the BYOD-versus-data-leakage argument, this is one to test.

    Found this useful? I’d be interested to hear how you’re approaching device trust in your own EUC estate — drop a comment.

  • AVD-Assess: a free, open-source Well-Architected health check for Azure Virtual Desktop

    AVD-Assess: a free, open-source Well-Architected health check for Azure Virtual Desktop

    The Well-Architected Framework for Azure Virtual Desktop is genuinely good documentation. Five pillars, dozens of concrete recommendations, all the right guidance on scaling plans, FSLogix redundancy, Trusted Launch, Private Link, and the rest. If you run AVD at any scale, you’ve probably read it at least once.

    So why do so many AVD estates still drift away from it?

    The problem was never the guidance. It’s that turning a framework into an actual answer for your environment has, until now, meant one of three things: pay for a commercial assessment tool, sit through a manual review where someone clicks around the portal for a day, or (let’s be honest) do nothing and hope the next outage isn’t the one the framework warned you about.

    I got tired of that gap, so I built something to close it. This post is what it is, the problem it solves, and how it works under the bonnet.

    The problem, stated plainly

    A framework is a checklist you have to apply yourself. The WAF for AVD tells you that pooled host pools should have a scaling plan, that multi-session hosts want Premium SSD, that public network access on a host pool is rarely necessary in an enterprise with site-to-site connectivity. All true. All useful.

    But “apply this 80-page framework to a five-subscription estate, by hand, every quarter” is not a realistic ask for a team that already has a day job. The guidance is free; the act of operationalising it isn’t. That’s the bit that was missing: a free, automated way to take the framework and produce an answer you can act on and hand to a sponsor.

    What AVD-Assess actually is

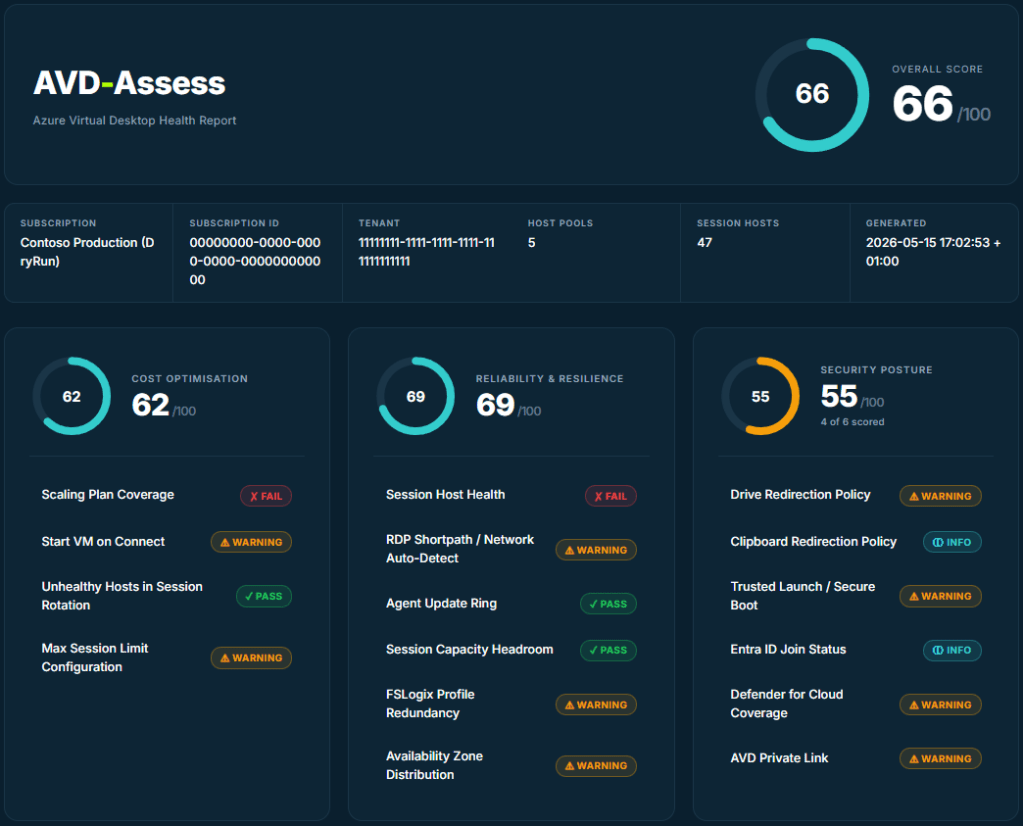
    AVD-Assess is a single PowerShell script. You point it at a subscription, it connects, reads your AVD environment, runs 25 best-practice checks across all five WAF pillars (Cost, Reliability, Security, Operational Excellence, and Performance Efficiency), then writes a self-contained HTML report with traffic-light scoring and specific remediation for every finding.

    No agent. No install beyond the Az modules you almost certainly already have. Nothing leaves your tenant. It’s MIT-licensed and lives on GitHub. A run takes about five minutes.

    The part I care about most is that every finding is specific. Not “consider reviewing your scaling plans”. Instead:

    0 of 5 pooled host pool(s) have a scaling plan. Uncovered: Ar-TEST1, CS-Multisession, QKEntra, RF-EntraIDOnly, RF-MultiSession.

    followed by exactly what to do about it and a link to the relevant Microsoft Learn article. A finding you can’t act on isn’t a finding. It’s a feeling.

    How it works

    The flow is deliberately boring, because boring is reliable:

    # One-time: install the modules
    Install-Module Az.Accounts, Az.DesktopVirtualization, Az.Compute, Az.Monitor, `
    Az.Resources, Az.Network, Az.Storage, Az.Security -Scope CurrentUser
    git clone https://github.com/waynebellows/AVD-Assess.git
    cd AVD-Assess
    ./AVD-Assess.ps1 -OpenReport

    It signs you in, or reuses your existing context with -UseExistingConnection, which is handy in Azure Cloud Shell where you’re already authenticated. It then collects everything up front: host pools, session hosts, VMs, NICs, disks, diagnostic settings, Defender pricing, private endpoints. Every check reads from that one snapshot rather than making its own calls, so a run is consistent and doesn’t hammer the API.

    Permissions are intentionally modest. Reader on the subscription covers the bulk of it. Two checks want a little more scope (Defender for Cloud coverage and Service Health alerts), and if they don’t have it, they degrade to an informational result rather than failing the run. A tool that needs Owner to tell you about your scaling plans is a tool nobody runs.

    The scoring model

    Each check returns a status and a score from 0 to 100:

    • Pass (green): meets best practice.
    • Warning (amber): a partial gap.
    • Fail (red): a real cost, reliability, or security risk.
    • Info (teal): couldn’t be evaluated, or doesn’t apply to this environment.

    Category scores are the average of the scored checks; the overall score is the average of the categories. The design decision I’m most pleased with is how Info is handled: it’s excluded from the averages entirely. If a VM fetch failed on a permissions boundary, the affected checks go Info, and the report says 4 of 6 scored next to the donut instead of quietly pretending a green ring is the whole story. A score that flatters you is worse than no score.

    What it checks, across the five pillars

    A flavour rather than the full list:

    • Cost: scaling plan coverage on pooled pools, Start VM on Connect, unhealthy hosts still accepting sessions, max session limits.
    • Reliability: session host health, RDP Shortpath, agent update rings, availability-zone spread, FSLogix profile redundancy.
    • Security: drive and clipboard redirection, Trusted Launch and Secure Boot, Entra ID join status, Defender for Cloud coverage, AVD Private Link.
    • Operational Excellence: diagnostic settings flowing to Log Analytics, resource tagging, Service Health alerts, load-balancing algorithm.
    • Performance Efficiency: Accelerated Networking, Premium OS disks on multi-session hosts, Gen2 VMs, FSLogix region colocation.

    Every one names the affected resources and links to the official documentation, so the report is the start of the fix, not just a verdict.

    From a snapshot to a trend

    A one-off score tells you where you are. It doesn’t tell you whether you’re getting better, and “is this improving?” is the question a sponsor actually asks. Running the London Marathon taught me that a single training run means very little; the line through all of them means everything. The same is true of an estate’s health.

    So the latest version turns AVD-Assess from a snapshot into a tracking tool. It can emit a structured, versioned JSON document alongside the HTML, ready to feed into a dashboard or a pipeline gate. Point it at a previous JSON report and every score, down to the individual check, gets a movement badge: improved, regressed, or unchanged. New checks are flagged; checks no longer assessed are listed separately so nothing silently disappears between runs.

    # Baseline today
    ./AVD-Assess.ps1 -UseExistingConnection -OutputFormat Both -OutputPath .\avd.html
    # Next month, see what moved
    ./AVD-Assess.ps1 -UseExistingConnection -OutputFormat Both -CompareTo .\avd.json

    Real estates also span more than one subscription: production, development, disaster recovery. There’s a sweep mode that assesses every subscription your identity can see in a single pass, writes a report per subscription, and produces a roll-up landing page. A subscription you can’t read is skipped with a reason rather than aborting the whole run, because one inaccessible subscription shouldn’t cost you the other four.

    Why it’s free and open source

    Because the framework is free, and the tooling to apply it should be too. There’s also a selfish reason: open source means the checks get scrutinised, and scrutinised checks are trustworthy checks. If you disagree with how a threshold is scored, you can read exactly how it’s calculated and tell me I’m wrong. That’s the point.

    It’s not a replacement for knowing your environment. It won’t catch everything, and a green score is not a certificate of perfection. It’s the absence of the specific problems it knows how to look for. Treat it as a fast, honest first pass that frees you up to think about the things a script can’t.

    Where to start

    Clone it, run it against a development subscription first, and look at your lowest-scoring pillar. Pick one finding. Fix it. Run it again next month and watch that arrow go green. That loop (measure, fix one thing, then measure again) is worth more than any single report.

    It’s on GitHub here: https://github.com/waynebellows/AVD-Assess

    If you run it and something’s wrong, or a check should score differently, open an issue. I’d genuinely rather hear it.