
Most of an AVD admin’s week is reading.
Job logs. Auto-scale settings. A Log Analytics bill that has crept up, and a host someone started on Tuesday and never stopped.
The answer is usually in the data somewhere, and the slow part is the hour spent clicking through five screens and two portals to find the one line that explains it.
So I handed the reading to an agent. I still make every decision.
Who Inch is
I call that split an AI-assisted workplace. The agent in mine has a name: Inch.
It runs my skills, prompts and rules for AVD and Nerdio Manager work.
I named it because “my AI setup” is hard to talk about. A name is easy to say and easy to explain.
It has a face: a small teal pixel-art app window with an amber progress bar along the bottom.
And it has a home: a public repo at https://github.com/WayneBellows/inch.
The repo is the whole agent: an AGENTS.md that says who Inch is, a RULES.md, five skills, three prompts and a folder of connection details.
Copy the folder and point Codex, GitHub Copilot, Cursor, Claude Code or Gemini CLI at it, and you get the same agent.
Every piece was run against my lab first.
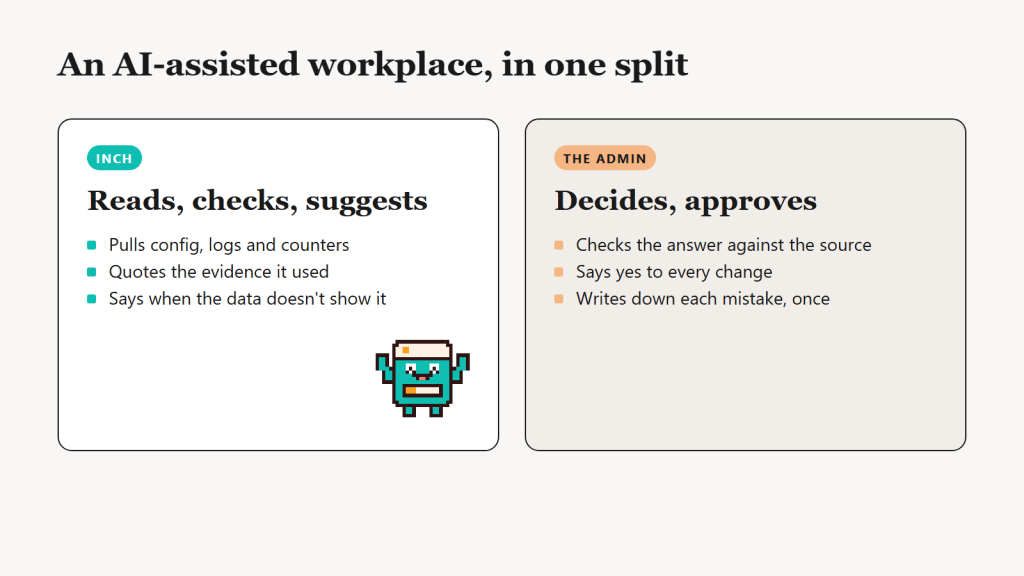
Inch reads, checks and suggests. I decide.
Most of it is read-only. Two skills can create, update or run a Nerdio Manager scripted action or shell app, but only after Inch shows me the exact request and I type yes.
It never deletes anything. It doesn’t touch a customer environment on its own.
Why it’s called Inch
The name comes from the “1% better” idea.
Nothing in my setup arrived finished. Most of it exists because an agent got something wrong in my lab, and I decided it wasn’t going to get it wrong the same way twice, so each fix is small and written down once.
The progress bar on the mascot is the same idea. It moves an inch at a time and never reaches 100%.
Step 1: Split the work three ways
AI as a label on a feature does nothing for me. I want a split of work that holds up when you’re tired and busy.
That comes down to three things:
→ The agent does the reading and checking. It pulls the config, the logs and the counters, and quotes what it found.
→ The admin decides. Every change, every time.
→ Permissions enforce it: read-only servers, your own sign-in and least-privilege roles.
That last one is the part to get right first.
A rule in a prompt is a request. A read-only flag isn’t.
An agent that’s been told not to change anything will still try if the permissions let it and the prompt gets misread.
Step 2: Connect Inch to Azure
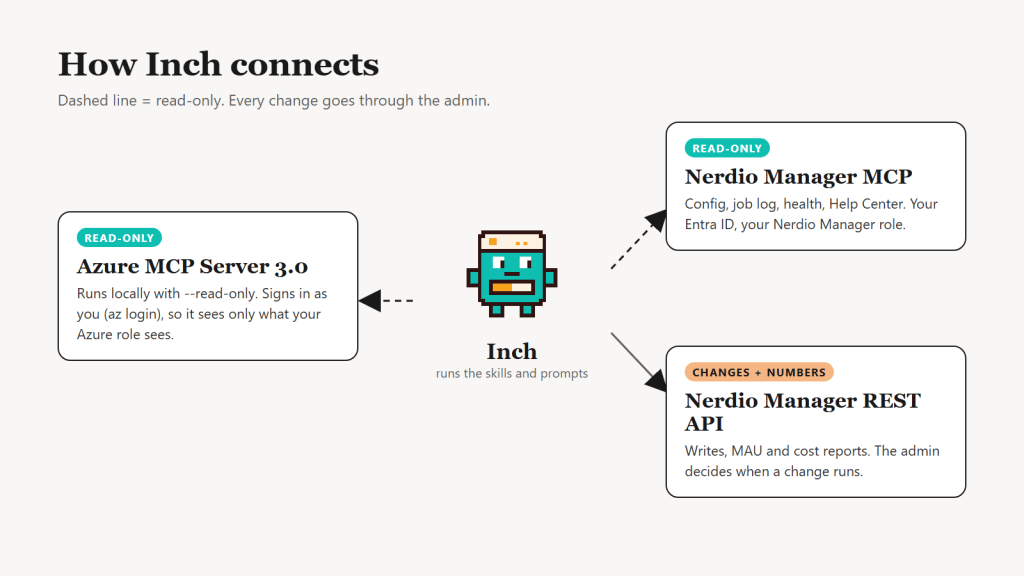
Inch reaches Azure through Microsoft’s Azure MCP Server (npm package @azure/mcp).
It runs on your machine and signs in as you through the Azure CLI credential chain, so after az login it acts with your own Azure RBAC permissions and sees what you can see, and nothing more.
Everything below happens on your own machine.
Set it up
1. Install Node.js (the LTS version), because the server starts with npx and needs Node.js on your PATH, and install the Azure CLI too.
2. Open a terminal and run az login, then run az account show to see the account and subscription you’re signed in with, because that’s the account the server uses.
3. Check that account’s role. Microsoft’s examples include Reader, which gives read-only access to Azure resources. I’d suggest giving the account only what your questions need.
4. Open your agent’s MCP settings and add the config below. The file depends on the agent.
→ Claude Code reads .mcp.json in your project folder. claude mcp add works too.
→ Codex CLI reads ~/.codex/config.toml, where each server is an [mcp_servers.<name>] table.
→ VS Code with GitHub Copilot reads .vscode/mcp.json. Use servers there, not mcpServers.
→ Cursor reads .cursor/mcp.json, and Gemini CLI reads .gemini/settings.json.
These file places change between agent versions. If one doesn’t work, check your agent’s own docs.
I start it read-only. Here is mine:
{ "mcpServers": { "azure": { "command": "npx", "args": ["-y", "@azure/mcp@latest", "server", "start", "--read-only"] } }}
I wouldn’t run it without --read-only, because without it the server can change resources. Microsoft’s 3.0.0 changelog says tools marked as write operations are left out when the server runs with it.
5. Restart your agent and ask: “Using the Azure MCP server, list my subscriptions.”
You should see the same list as az account list --output table. If you do, it works.
Microsoft’s guidance is least-privilege RBAC plus sensible safeguards, and I’d follow both.
The flag is a switch, but the role is what really sets the limit.
Step 3: Check what 3.0 changed
Azure MCP Server 3.0.0 was released on 12 October 2026 (release notes). These are the parts I’d flag.
→ It adds Azure Backup, resiliency, SRE agent, Terraform, optimisation, IoT Hub and insights. Advisor is expanded, and there are new tools in Cosmos, compute, App Service and Monitor.
→ Newly created resources start safer: storage Shared Key off, Event Hubs local auth off, Recovery Services vault public access off.
→ It adds SSRF endpoint checks, and telemetry no longer records option values.
→ Some changes break things. Unused parameters are removed, unknown parameters are rejected, and compute vm create needs --image.
→ It moves to the stateless MCP protocol, which is backward compatible.
One change matters if you run agents near real data.
The MySQL and PostgreSQL query tools are now marked destructive, not read-only, and they rely on your database permissions.
That’s a good reason to keep read-only and least privilege together.
2.0 arrived in April 2026 with remote hosting using Entra ID. The tool count grew from 170+ to 260+.
4.0 betas are out, but they aren’t stable.
If you’d like predictable behaviour, pin 3.0 with @azure/mcp@3.0.0. The snippet above uses @latest, so swap it in.
Install routes are npx, a dotnet tool, pip, Docker, or the VS Code extension.
Step 4: Ask it a real question
I ran one prompt against my lab, with the server read-only.
The question: which counter is my Log Analytics bill?
The full wording is in the repo. The short version: find the workspace that holds my AVD performance counters, rank the counters by billable size over 30 days, show the top five, flag anything over 50%, and change nothing.
It took about two minutes. Inch checked seven workspaces, found the AVD one, ranked the counters, and showed the top five.
User Input Delay per Process was 88.7% of the billable performance data over 30 days.
The next counter was 1.6%. A manual KQL query gave the same answer.
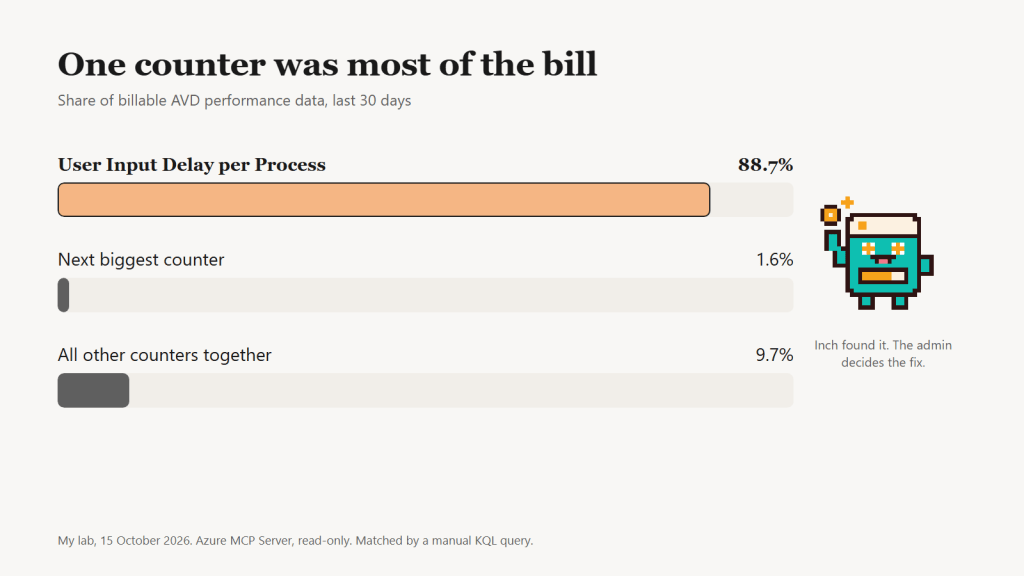
I’ve seen that same counter take most of the ingestion in real customer environments, so it’s worth checking first.
But the change is mine to make. A lower sample rate, or switching the counter off.
I check whether anyone uses it in workbooks or alerts before I touch it.
Step 5: Connect Inch to Nerdio Manager
Nerdio Manager offers two routes. They do different jobs.
The MCP server, for looking
It’s in public preview with Nerdio Manager 8.2, and it’s read-only. The Help Center lists it for the AVD Core, AVD Premium, Windows 365 and Unified Endpoint Management plans.
You set it up in two places, Nerdio Manager first and then your agent, and Nerdio’s own steps are in the Help Center article Nerdio Manager MCP Connector.
1. In Nerdio Manager, sign in as an Admin, because turning the connector on needs the Admin role.
2. Go to System > Settings > Integrations > Model Context Protocol.
3. Switch on Status and Nerdio Manager Permissions | Read.
4. Pick your agent from the client type dropdown, and Nerdio Manager shows a config snippet for it that you copy.
5. On the machine that runs your agent, make sure Node.js is installed, then open the agent’s MCP settings and paste the snippet, which connects you through Nerdio’s bridge:
{ "mcpServers": { "nerdio": { "command": "npx", "args": ["-y", "@nerdio-inc/mcp-bridge", "https://<your-nerdio-manager-app>/mcp"] } }}
Replace the URL with your own Nerdio Manager address, ending in /mcp.
VS Code is different, so run MCP: Add Server... from the Command Palette, choose HTTP, paste the /mcp URL, give it a name, and pick Global or Workspace.
6. Close your agent fully and open it again, and your browser asks you to authorise it through Azure.
7. The first time you ask something, the agent asks if it may use the connection. Say yes.
8. You can test it by asking: “Using the Nerdio MCP server, read the root path and list the areas you can see.” You should get areas such as host pools and the knowledge base.
The bridge signs you in with your own Entra ID account, so the agent sees only what your Nerdio Manager role sees. Anyone with read access to a module can use the connection for that area.
On my lab that’s about 190 read paths: host pool configuration, auto-scale settings, a queryable job log, health, Premium feature usage, and the Help Center knowledge base.
“What failed last night?” is a good question for it.
The REST API, for changes and numbers
It’s off until you turn it on, and turning it on needs the Entra ID Global Administrator role. Part of it happens in Nerdio Manager and part in the Azure portal, and Nerdio’s own article is Getting Started with REST API Integration.
1. In Nerdio Manager, go to System > Settings > Integrations and open the REST API area. If Current status says Disabled, select it. A pop-up walks you through three steps.
2. First, select Run. Nerdio Manager creates a new Azure application under the nerdio-nmw-app app registration in your tenant.
3. Second, select Grant, which opens the Azure portal, and select Grant admin consent for Nerdio there.
4. Back in Nerdio Manager, select the refresh icon. It confirms the permissions went through.
5. Third, select Generate. This creates the client secret and the other details you need for API calls, so copy the secret and keep it somewhere safe, because the helper script needs it to get a token.
6. Next to Credentials, select show. The client ID, the tenant ID and the scope are there.
7. On your machine, you need PowerShell 7 (pwsh). In the Inch folder, copy .env.example to .env and fill in five values.
→ NME_BASE_URL is your Nerdio Manager web app address. It looks like https://nmw-app-xxxxxxxx.azurewebsites.net.
→ NME_TOKEN_URL is https://login.microsoftonline.com/<tenant-id>/oauth2/v2.0/token, with your tenant ID in it.
→ NME_CLIENT_ID is the client ID from Credentials.
→ NME_CLIENT_SECRET is the secret you copied.
→ NME_SCOPE is the scope from Credentials. It looks like api://<nerdio-app-id>/.default.
.env is in .gitignore, so it never gets committed, and the secret never goes into a chat either.
The helper uses the client ID, the secret and the scope to get a token from the token URL, and then it calls the Nerdio Manager API with that token.
8. Run the check:
pwsh skills/nerdio-rest-api/scripts/nme.ps1 check
It prints which variables are set (their length, never the value), gets a token and reads one endpoint. You want the last line to say OK: token and read work.
You can also test by hand first. The same REST API area has a Swagger page and a Postman collection.
It has 260 operations, 108 reads and 152 writes, and it’s the only route to usage figures (MAU) and the User Cost Attribution report, which the MCP server can’t give you yet.
The REST API has a few traps. A path the console spells hostPool is only accepted by the API as lowercase hostpool, and there’s no call at all that lists your host pools.
So Inch has a nerdio-rest-api skill in the repo that works around them.
I keep changes deliberate. The write operations are there, but I decide when they run.
Inch’s two write skills go through one helper script that won’t send a change without my approval, and it has no delete command at all.
What it can’t do (yet)
Neither route gives you the auto-scale savings figure.
That one is console only, under Host pool > Auto-scale > History > Savings, so it’s one number I still read off the screen myself.
One caveat. Inch is my own project.
It isn’t an official Nerdio or Microsoft resource, and nobody can download it as a product. The repo is simply the prompts, skills and rules I use, shared as they are.
Where to start
If you’d like to try this, I’d recommend starting small.
→ Pick one prompt from the repo. All three are read-only.
→ Run it against a test environment first.
→ Check the answer against the source. Inch quotes the evidence so that you can.
→ Write down anything it gets wrong, once, so it doesn’t happen twice.
The repo is at https://github.com/WayneBellows/inch.
Run everything against a test environment first, and follow your organisation’s rules on AI tools and data.
If you could hand over one piece of reading tomorrow, what would it be?
And if you know an AVD admin who lives in the job log, send them this.
Wayne

Leave a Reply